Saturday, February 27, 2016

Not THAT Easy Being Green

Remember how excited I was about the expanding recycling opportunities around here?

From Target in Missoula where I could take the glass.

From the locally owned grocery where we could take numbers 1 and 2 plastics. Perhaps it's blurry because I was shaking with sorrow or maybe because of the downpour. 

Yeah.

When I was at grocery a young man from the volunteer organization that runs the recycling program was there collecting, so I was able to ask, "Whyyyyyyyyyy?" It turns out that they have to send their plastics to southern California and with oil costs so low right now, it's cheaper to make new plastic. The non-profit, volunteer-run organization is currently having to pay to recycle the plastics. They can't do that and maintain other services. When I told him about the glass recycling at Target being discontinued, the said they were surprised it lasted this long. With the local glass recycling, even one wrong item in the whole giant dumpster and the whole batch is considered contaminated. Of course, we can't trust the citizenry to not put cardboard or paper or caps or freakin' dirty - or even clean -diapers in the glass recycling which is a whole 67 feet from a more-conveniently located garbage can and likely about 15 feet from their vehicle if they drove or rode one.

The good news is that I was told that they are working diligently to get the plastic recycling back, but my hopes are not high for the glass. I hope I'm horribly, wonderfully wrong.


Tuesday, February 23, 2016

One Step At A Time: Kitchen Renovation Edition, Baby Steps I

It has been two weeks since I posted about the kitchen renovation. There was about a week of non-activity due to a visit from a friend and a short road trip. Be warned: there is a little mild cussing in the next paragraph.


Man, what a sh!t show! I don't think I'd ever agree to work as a contractor on a job being "organized" like this one, let me tell you. Part sourcing issues, part shifting priorities, part remodeling your own kitchen while still trying to have a normal life; this is one piece-meal, bullsh!t approach to a project. And I mostly have myself to blame.

1. Remove wallpaper and repair walls (and ceiling) as necessary.

I removed the wallpaper from this corner of the kitchen down to the first layer which is adhered very well. The first layer of wallpaper in the downstairs bathroom is glued directly to the drywall, so I didn't want to get into that mess again by going too far. So I filled holes and primed with an oil-based primer. Most of this area will be a tiled back splash and cabinetry, but above the cabinets I also did a light skim coat to cover the seams and primed with a water-based primer. I also filled the smaller holes in the ceiling in that corner where the track lights had been installed and primed the repairs. I haven't found the gumption to deal with the big holes from the toggle anchors. Oof.


2: The flex-track lighting situation.

I got the second 10' piece of track installed, but we're still nailing down pendants or some other solution for over the kitchen island. We may have gotten quite a bit closer while searching around this week so stay tuned. I did, however, get the ceiling medallions installed under the first flex track! Yahoo! Something is complete! Except the pendants. Sigh. But parts are ordered and/or chosen... in deep, desperate hope that they will work.


3. Painted other walls.

I didn't plan to paint anything other than the area over the cabinets in the oven corner up to where I stopped removing wallpaper over the sink. But I still had some paint in my tray when that was done and I didn't want to waste it. Pouring it back into the can is a sure-fire way to contaminate the whole can and I have more than 3/4 of a gallon left in that can so I just kept painting. Of course, this same situation presented itself for coat number two on the walls behind and above the wood stove, so I kept going on around the corner down the short hallway that leads to the laundry room and bathroom. I completed two of the three walls. The third has some wall anchors to remove and those holes to repair.


What I didn't do is do wall surface repairs behind the wood stove and here's why: I want my repairs to dry and cure under closer-to-ideal conditions than I'll have when the wood stove is still in daily use. The heat/cool cycles are too extreme right now, so I'll wait until after wood stove season.


4. Started refinishing the cabinet to the right of the stove.

If you're following along, you might remember that I had to remove an upper cabinet to get the collapsing corner shelf out. I realized that so many things would be easier while I had it down, so instead of putting it back up, I cleaned the (decades'?) accumulation of grease off the top, removed the blue floral shelf paper, primed and painted the interior*, filled, sanded and primed the exterior of the carcass (#6).


In addition to refinishing and raising the uppers, I want to add a small crown moulding to give them a more finished look. I ordered the profile I want at my local WBC on Thursday, so will have to wait until next week when that arrives. I'm kicking myself for waiting, because it postpones reinstalling that cabinet which means we'll have all the coffee mugs on the counter for another week+. But one thing I know for sure is that finish carpentry is a very special skill set and I don't have it. Having the cabinet down on a table where I can work comfortably and without things in my way will go a long way to be doing a passable job of the miters. And passable is my goal since excellence will only be attained by luck! Certainly not consistently, either.

Even though progress was made, none of the line items could be completely crossed off. Hopefully in the next couple of weeks I can get the (1) lighting and (5-6) work on and reinstall the upper cabinet to the right of the stove, remove, work on, and reinstall the upper cabinet to the left of the stove.

The original list of the order I thought the projects will happen. Line through for complete items, italics for additions. I'll let myself do partial line thoughs for partial completion, because it's good for my morale.

1. Light fixtures
2. Remove corner shelf in order to...
3. Remove wallpaper and repair walls (& ceiling) as necessary, get temp solution for backsplash
4. Paint walls above cabinets, around wood stove, paint laundry/bath hallway.
5. Cabinet repair, move, modify
6. Refinish cabinets
7. Maybe try to do something with that terrible brick veneer wood stove surround?
8. Refinish counter tops
9. Install backsplash, probably tile
10. Replace outlets, switches, plates.


*I worked on several cabinet refinishing jobs during my decorative painting contractor days and never once did a client want the added expense of refinishing the interior of the cabinets. And maybe once did they want the inside of the doors done. I decided that I will go ahead and do the inside of the doors and the interiors of the upper cabinets, too. One of us - ahem - is the type to leave cabinet doors open, after all. And since the only financial cost is a little more material, it seemed worth the extra time and effort to go most of all the way.


Tuesday, February 16, 2016

Whose Poop Is This, Anyway?


Kitchen redo update: Not much was accomplished in the last week. We had a visitor and a road trip. So next week I will include two weeks' worth of updates, but it will probably seem like only a week's worth of progress. To me, too, y'all. To me, too.


The snow is all but melted away. While it's nice to not have to deal with ice patches on the our road and driveway, February is way too early to be snow free. We'll need the snow pack higher up to get through the summer. That said, when the snow recedes, uncovered treasures abound. At our house that means lots of dog toys and dog poop (not shown). Just outside the fence in the National Forest, that also means Mystery Poop!

There happened to be a pile of deer scat about 4 feet from this. I doubt that means anything.


I'm pretty sure this pile is from one of the cows that sometimes get loose from leased state land up above us and wander through the National Forest looking for food and/or water. Yeah.


Tuesday, February 9, 2016

One Step at a Time: The Kitchen Renovation Edition, Taking It From The Top

It's been about a week since I posted about starting our kitchen redecoration/remodel. This week was a slow start, but still some progress has been made! I think I will try to post weekly update s on Tuesday covering progress from Saturday to Saturday. If no progress, no post; if I am too busy or not in the mood, no post.


I'm challenged to include the relevant details, explanations, etc. in my usual sort of rambling style. So, I think I want to try a slightly more outline-esque or bullet-pointy style for talking about our kitchen project. Here goes!

This week we made progress on a couple of aspects of the redecoration/remodel of the kitchen.

1. Removing the corner cabinet from behind the stove.


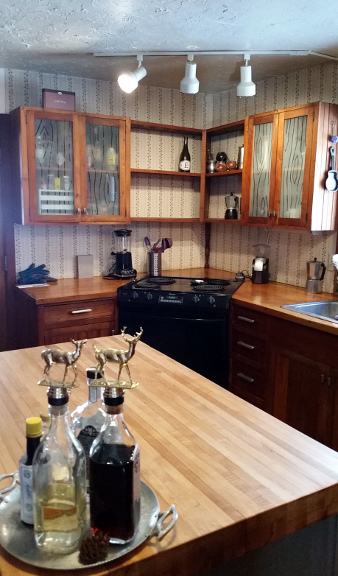
BEFORE: Corner shelf and upper cabinet

WHY
The corner cabinet sagged towards the back corner, because it was only attached to anything at the end. At some point someone had thrown a pre-made furniture leg under that corner, but it was not the right height to keep the shelves level. It turns out that the leg was probably doing a lot to hold up the whole section, because of the total of twelve screws attaching the shelves to the upper cabinets, only 3 were long enough to adequately anchor it to them. Yup.

The cabinet was also just a good place for cooking oils to land and not a good place to store anything for convenience's sake.

EXTENUATING CIRCUMSTANCES
The cord for the non-hardwired track lighting ran thru holes drilled thru the shelves, holes too small to get the plug through. So this meant the lighting had to be taken down first, because the other end of the cord would need to be disconnected to feed through the holes. See number 2, below.


One of the upper cabinets on the end of the shelves would have to come down to get it out of there.

Looks like they had to try a few times to find the stud... with their too-short screw.

This house is no stranger to stripped out screw heads and those holding up the smaller of the two cabinets is now exception. I received advice from some knowledgeable friends, bought a screw extractor set and was unable to get it to work. It was time to call in Renaissance Handyman, Nick. He got it taken down in short order and found... guess what... that those stripped screws were also barely holding that cabinet to the wall! Maybe that little furniture leg was holding up that, too! [giant sigh] Renaissance Handyman Nick also listened to some ideas I have for modifying the cabinets in a few places and thought that these ideas were sound and that he can lend a professional and skilled hand where needed.

ETC.
While that cabinet is down and it's easier to get into the corner behind the stove, I decided to get the 2-layers of wallpaper down, do drywall repairs, and prime the walls. So far I have just picked the top layer off - it turns out it's not even vinyl (i.e. water-resistant, easy to wipe). Still left on the wall is that layer's backing paper and what I hope is the original wallpaper. I also hope that it is not attached directly to the drywall paper like the original wallpaper the downstairs bathroom.


RESULTS
The coffee mugs, travel mugs, and associated accessories are sitting on the other end of the counter, the outlet and switch plates are removed and the walls in that corner have an in-progress/dodgy rental look. Oh, and the upper cabinet is sitting on the floor waiting to be cleaned up a bit and reinstalled.


2. Using flex-track light fixtures to replace the non-hardwired track lights, and the two hardwired fixtures, using just the two, existing electrical boxes in the ceiling. One is over the sink and one is allllllllmost centered in the room.

WHY
The fixtures seemed permanently dirty and difficult to clean off what wasn't permanently attached. One was broken at the base and no longer adjustable and another was missing the black ring around the opening. The wheel switches for turning them on and off were also really hard to get and keep clean and were inconvenient to use, especially with full or wet hands.

BEFORE: light fixtures

The center ceiling fixture provides inadequate light, is splashed with paint, and a very basic utility fixture. Maybe it'll find a home in the shop later.

The fixture over the sink had it's charms as a hand punched metal drum shade, but wasn't at all functional for providing task lighting and we almost never turned it on.

EXTENUATING CIRCUMSTANCES
The old track lighting did a pretty good job of lighting the counter tops and we definitely wanted/needed to keep that functionality, but we really didn't want to add complexity and expense to the project by having to hire an electrician to run wires, etc. In addition, the "center" fixture is not even over the island a little bit, it just missed it on the refrigerator end.


Like all the holes cut in the drywall for electrical boxes in the house, the ceiling holes are too big. That didn't matter with the previous fixtures, but it matters with these. The canopies on these fixtures won't set flat against the ceiling*, not even close. We'll do what we did for the chandelier over the dining table: paint small, simple medallions to match the fixtures and install them under the canopies.

Removing the track lights exposed unpainted areas, 4 large toggle anchor holes, and at least a dozen plastic anchors.


ETC.
I guess we waited too long to get "silver"/nickel/steel finished fixtures for our chosen (inexpensive) fixtures. While oil-rubbed bronze would suit our style, the house, and the setting, we're not huge fans of the look of flex track lights. They're just the lights that will give us light where we need it using only our existing electrical boxes. Since we don't plan to paint the ceiling a dark color and the cabinets are going to be painted a lighter color, oil-rubbed bronze lights would just draw the eye to what is not an aesthetic design feature for us. But they are better looking than was there!

RESULTS
One kit is up and in use! The stove, sink and most of the counter tops are well lit! And we like how these four, LED, 60-watt-equivalent bulbs light the task area without making the whole room bright. I know that "light and bright" is very popular, but we both lean towards darker interiors. Also, nice is that those bulbs should last years and are each pulling less than seven watts while not flickering or causing headaches like florescent bulbs can.


We're having trouble finding a couple of pendants for over the island which had stalled installing the other set until we decided to move forward using more spot lights until we can find something that looks a little nicer... the choice to use pendants was mostly aesthetic, anyway.

The original list, of the order I think the projects will happen. Line through for complete items, italics for additions.

1. Light fixtures
2. Remove corner shelf in order to...
3. Remove wallpaper and repair walls (& ceiling) as necessary, get temp solution for backsplash
4. Paint walls above cabinets, around wood stove
5. Cabinet repair, move, modify
6. Refinish cabinets
7. Maybe try to do something with that terrible brick veneer wood stove surround?
8. Refinish counter tops
9. Install backsplash, probably tile
10. Replace outlets, switches, plates.

*I painted the ceiling within a few months of us moving in. It and all the downstairs walls in the living room, dining room, and kitchen were pink which is not to our tastes. We both kind of hate the ceiling texture, but just the thought of skimming it all out exhausts me... that's a lot of overhead square footage and some thick and inconsistent texture to cover.

Saturday, February 6, 2016

One Step at a Time: The Kitchen Renovation Edition, The Starting Point

I MADE A HORRIBLE MISTAKE! I DELETED THIS POST! LUCKILY, IT WAS OPEN ON ANOTHER TAB IN MY BROWSER SO I WAS ABLE TO COPY AND PASTE THE CONTENTS. BUT THE BLUE HIGHLIGHT ALSO PASTED... SORRY IT LOOKS LIKE THIS!

I am not sure I am going to even try to fix it. :(

So maybe adding the island should've been The Starting Point, but it wasn't so this is. My blog, my changing the rules to suit my own selfish needs. [wink]

You can click to enlarge if you are so inclined. In this case, bigger is worse(r).

Like any renovation/remodel/redecoration of a room, our kitchen came with a list of specific challenges, some aesthetic, some functional, some both.

I think that nearly every single light fixture that came with the house is on a the Aesthetically Challenging List (ACL). The kitchen is right up there with the worst and also on the Functionally Challenging List (FCL). As is often the case in houses this size built in the 1970s or earlier, there was but a single light in the kitchen, overhead and, in our case, not even centered in the ceiling. So somewhere along the way someone added those track lights for task lighting on the counters. They do the job, but they aren't hardwired... so they take up outlet space AND the thumb wheel inline switch is impossible to keep clean. BLECH. Not to mention one of the lights' adjustable joint was broken and one was missing the lens thingie. Because of how the wire for these runs through the cabinetry, updating the lights is at the top of the list.

We hate the ceiling texture, but it's just such a HUGE project...

Another challenge that lands on both lists is the existing cabinetry. First, I want to say that it's well-made enough, has it's rustic charm, and we don't hate it. The counter height is good, too. As far as the ACL, the color is nice, but just too much of that tone in that room and it doesn't work with the new island which we knew when we chose the island's finish. And because they are made from fir which is quite soft, they're kind of beat to heck. Then there is the open shelving and glass-fronted upper cabinets. These are nice features for people with fewer spices in matching jars and fewer or prettier utensils and such. We've been living with a temporary fix for the glass, but want to upgrade that to something more durable and opaque. I'd also like to add a crown moulding type detail to the top just to give them a more finished look. As for the FCL, the uppers are mounted slightly below standard which means some small appliances don't work well, especially where someone added under cabinets lights (also not hardwired and not something we ever use). That corner shelf behind the stove is sagging, because it is NOT ATTACHED ANYWHERE BUT TO THE CABINETS ON EACH END! I guess whoever added that didn't know how gravity works... AT ALL. So they popped a pre-made furniture leg in there... but one that wasn't quite tall enough. I have to assume that this is what has pulled the two cabinets on either end out of level. Another thing is that one of the drawers will not stay closed because there is a bit missing from the carcass below it.

A chunk missing, holes from something someone else had mounted and removed. Luckily, I like a distressed finish, but still I'll be doing quite a few repairs before painting.

The cabinets are overdue for an oiling, but I have been putting that off, because I didn't want to add any extra work to preparing them for painting. The look nice when oiled, but I also don't want to continue to have a finish that I have to refresh every few months. Or even every few years.

We really like the wood counters. BUT once we refinish the cabinets, they'll need to be refinished in a different color for the ACL. For the FCL, we'll be applying a WAY more durable finish and lots of it. The former homeowners were using tung oil twice a year. That's not such a big deal, except that it is a windows-open finish and we live in Montana where having the windows open enough for really good ventilation is not feasible from October thru May.

We think it's neat that even though the counters are wood, they are not butcher block.

The wallpaper. It's just an inevitability that unless you spend money for the really good stuff, all wallpaper will eventually be outdated and of course, tastes vary widely. So removing this wallpaper is definitely an ACL line item. Now, I have never in my life seen vinyl wallpaper as a kitchen backsplash until we moved here. Maybe it was just that I never noticed, because now I have seen it in other, newer homes, as well as in pictures online. I have no idea how well it functions and hope that I am not horrified at the condition of the drywall behind it where it meets the counter. Hopefully, in retrospect this will NOT also be a FCL line item.


As part of the backsplash redo, we'll replace the switches, outlets and plates. The existing outlets are "upside down," loose, and some even stained with wood finish. The covers, where they exist, are wallpapered. We'll add a CGFI outlet where required by code dnd good sense as well as change the color to blend with whatever the backsplash color ends up being - I have a good idea what that will be, but YOU will have to wait.

No cover plate and no real way to put one on w/o some serious jury rigging. Plus wood stain or something all over it. Stay classy, VME (Vast Mountain Estate).

At some point they must have encountered an issue with the wallpaper-as-backsplash, because they made this for behind the sink. The tiles look collected, which I think is neat, but they are not our collection nor in our color scheme. Plus they have that wood frame and the cut-off tile on the right. Mostly this is a ACL situation, but there's some functionality to gain from getting rid of the wood frame both from a wood+moisture standpoint and the room the wood takes up back there making it hard to clean and dry that area.


At this point, I am hoping to accomplish these projects over the next couple-few months, ending with refinishing the counters during open-window season and adding a "proper" backsplash. Right now, I think the order is as follows:

. Light Fixtures
. Remove the corner shelf in order to
. Remove the wallpaper (repair walls as necessary, get a temp solution for backsplash)
. Paint walls above cabinets, around wood stove
. Cabinet repair, move, and modify.
. Refinish cabinets
. Maybe try to do something with that terrible brick veneer wood stove surround?
. Refinish counter tops
. Install backsplash, probably tile
. Replace outlets, switches and plates.

DOWN THE ROAD A PIECE

Eventually, we want to replace the sink with a deeper one that is divided in more of a two-thirds/one-third way rather than half-and-half. At that time we'd like a new faucet that is taller and probably with the integrated sprayer an a single control - fewer surfaces to clean! Eric really wants a gas cook top, so somewhere done the line we'll replace the stove. I want the oven to stay electric, so that means dual-fuel which means extra costly. And of course adding a propane tank and the plumbing for it is a big expense. Maybe even before then we can add a ventilation hood over the stove. Someday a new refrigerator, too. But they work and are fine for now, even though I think these are more on the FCL.


Someday we'd also like to replace our GIGANTIC wood stove with something slightly smaller, probably enameled, and with a window in the door. We'll get rid of the poorly installed brick veneer surround and base; hopefully replacing it with some kind of slab, solid surface where ash, dust and dog hair won't collect quite so easily.