Tuesday, March 29, 2016

One Step at a Time: Kitchen Edition, Halfway Point?

We finished "breaking down" the counter top last week and are now "building it back up." I also started getting some economy of scale going with the cabinet refinishing. If only it had been dry enough outside to utilize the deck as work space.


1. Refinishing the counter top.

We've selected a dark walnut color stain to bring in some warmth, nod to the wooden surface and to our forest location, and to tie in the raw umber glaze on the refinished cabinets, the wood tones in the rest of the house, and the tile we selected for the back splash.

Four coats of stain to get the pine this dark.


EXTENUATING CIRCUMSTANCES

So much for starting staining on Tuesday. The modifications to the counter were not done until Tuesday and then I had to go buy another size of wood plug for some of the holes and then do some more sanding. Sigh. Staining started on Thursday.

After reading up on several other similar projects online, I chose to go with Waterlox for the protective varnish. I'm doing lots and lots of coats, with 24 hours between them, so this is going to take awhile. Especially as there are a few coats on the underside around the sink and faucet openings, areas adjacent the stove and over the dishwasher. I started Saturday night.

ETC.

In the meantime, we've had some temporary, partial counter top comprised of boards that made the weird shelf in the bedroom that I removed back in April 2013. As half-arsed as it looks, it makes a big difference in the, albeit diminished, function of the kitchen.


2. Refinishing the cabinets.

Yes. Still. And taking advantage of the counters being off to do the interiors with more light... at least on the top shelves.

EXTENUATING CIRCUMSTANCES


The little turned-wood knobs that were on the cabinets before we swapped them out for the antique pewter finish knobs used wide screws... wide enough to have left 1/4" holes in all the doors. That is WAY bigger than works for standard cabinet hardware. WAY. It made the new knobs sink into the holes and spin out of true with the slighted provocation. So, I have been repairing those holes with 1/4" dowels and two-part wood filler. Then drilling another hole once the wood filler has cured. That has definitely added time to the project, but it has been worth it.

Quarter-inch dowels, 5/8" long.


ETC.

I made progress. Two more pairs of doors and two drawers filled, sanded, primed, painted and ready for glazing, then varnishing. One pair of doors filled and sanded and the under-sink area primed and painted. The last pair of doors with metal panels were finally reinstalled. Many more dents and dings filled on the lower carcass, too. It looks like quite a list when I type it out and it is making a slight difference in how it looks, but it's not what I'd call photogenic at this point.

3. Replacing the outlets and switch above the counter!

Looked so gross! Luckily, the gook is mostly accumulated wood oil and these were so close to the bottom of the open shelving that you couldn't even really see them. Of course that location is also why the outlets couldn't be screwed into the electrical box properly or covered with plates.

The old ones were dirty in hard to clean ways, stained with wood oil, and the outlets upside-down as far as we are concerned. The new, brown ones will blend with the tile, the GFCIs will make us up to code in the kitchen, and the rocker switch will be easier to keep and get clean. And I also installed extenders for the electrical boxes so the switch and outlets can be screwed flush and securely with the added depth of the tile. Nearly EVERY outlet in this house is loose, because the drywall was cut too big for the electrical boxes as you might remember from my rant when I worked on the lighting. They'll have the screw-less covers, like the new switches and outlet in the living room to help with cleaning, too.

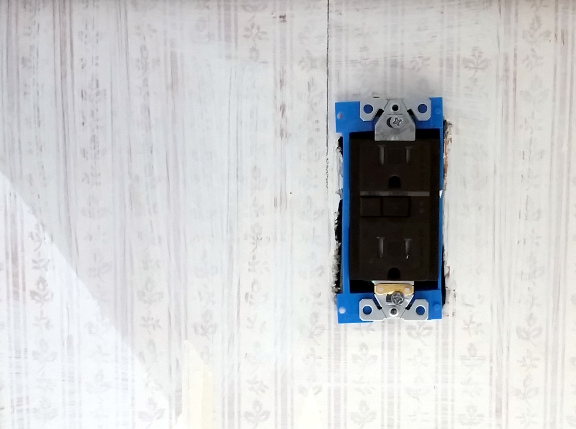
Look! So dark and mysterious and will blend with the tile when it's installed. Not only GFCI, but what we consider right-side up!

EXTENUATING CIRCUMSTANCES

The joker who wired this place, or at least the so-and-so who installed the outlets and switches, really cut the wires short. It's often an utter bee-eye-tee-see-aetch to replace the existing switches and outlets in this house. My hands are shredded and I spent a few hours doing what should have taken more like one hour. I had to get Eric involved, because 3-4 hands were needed for one of the GFCIs. I know I'll be glad I did it, but the person who set me up for this struggle NEVER wants to meet me in a dark alley, boy howdy.

The original list of the order I thought the projects will happen. Line through for complete items, italics for additions. I'll let myself do partial line throughs for partial completion, because it's good for my morale.

1. Light fixtures
2. Remove corner shelf in order to...
3. Remove wallpaper and repair walls (& ceiling) as necessary, get temp solution for backsplash
4. Paint walls above cabinets, around wood stove, paint laundry/bath hallway.
5. Cabinet repair, move, modify
6. Refinish cabinets
8. Level, repair, and refinish counter tops
11. New sink and faucet and the counter modifications that go with it.
10. Replace outlets, switches, plates.
9. Install backsplash, probably tile
7. Maybe try to do something with that terrible brick veneer wood stove surround?


Wednesday, March 23, 2016

One Step at a Time: Kitchen Edition, Getting a New Head of Steam

The project has been slowed by Renaissance Handyman Nick's schedule which has in turn been slowed by the weather and by my poor scheduling of orders. We're still without a working kitchen sink or dishwasher.


1. Counter top.

EXTENUATING CIRCUMSTANCES

It has been snowing a couple inches each day this week, Tuesday - Thursday. It also melts each day except in the shadiest of areas. I took advantage of the sunny weather on Friday & Saturday to get the counter top sanded down to bare wood outside.


You can see some of that snow from earlier in the week just on the other side of the fence in the shade. It was clear and sunny out, but it was not warm. Saturday's high was 51F and I am sure I had finished before it reached that temperature

I used Dad's belt sander and 80gr belts to get the majority of the decades of tung oil off. Then used 100gr paper and my palm sander to finish it off. The other section of counter is about 40% the size of this and together these took about 4-4.5 hours to get down to bare wood over two days.

When I finished I sat my carcass in the sun on the wood shed steps to warm up, listening to a podcast with my earbuds when all of a sudden...


ETC.

On Monday, Renaissance Handyman Nick was able to come alter the counter for the sexy new sink! That means I can get it stained and start finishing on Tuesday! There are still several days* of work before we can install the sink and faucet, but now that we can at least make progress each day it feels more like we're getting closer. Renaissance Handyman Nick has added blocks to the cabinet carcass so that we can attach the counter from underneath - like civilized humans - which means I don't need to finish the counter in place. And that means that I can keep the stink and vapors out of the house by finishing it in the shop! Of course, there is that little, separate piece of counter top under the mysteriously stuck upper cabinet that will be finished in place, but there will be soooo much less surface area off-gassing on that. Plus, it's no where near a water source or steam so I probably won't feel obliged to put several extra coats on it.

Shoot. I didn't get all I needed to sanded down to bare wood. I even thought that I'd over compensated. D'oh! More sanding.


2. Refinishing the cabinets.

I just keep plugging away at this. I got the last of the only-uppers finished, including replacing the glass in the doors with zinc-plated steel and was able to reload the contents which makes room on the dining table for the contents of other cabinets. Sigh. I think I have decided to go ahead and at least prime inside them to lighten them up a bit. And I have to empty them to replace the shelf paper anyway.

Just waiting on those special ordered hinge screws...


Another good thing about finishing the counter top in the shop is that I can feel confident moving forward refinishing the lower and tall cabinets since I won't have to mask them off with plastic. And in the insides with better lighting! YAHOO!

The original list of the order I thought the projects will happen. Line through for complete items, italics for additions. I'll let myself do partial line throughs for partial completion, because it's good for my morale.

1. Light fixtures
2. Remove corner shelf in order to...
3. Remove wallpaper and repair walls (& ceiling) as necessary, get temp solution for backsplash
4. Paint walls above cabinets, around wood stove, paint laundry/bath hallway.
5. Cabinet repair, move, modify
6. Refinish cabinets
8. Level, repair, and refinish counter tops
11. New sink and faucet and the counter modifications that go with it.
10. Replace outlets, switches, plates.
9. Install backsplash, probably tile
7. Maybe try to do something with that terrible brick veneer wood stove surround?

* By which I mean, probably nearly two weeks.


Tuesday, March 15, 2016

One Step at a Time: Kitchen Edition, Getting There Is Half the Fun?

Renaissance Handyman Nick is back on the job for now. That means we're skipping ahead to leveling up the counter top. There have been many small frustrations this week, but putting together this roundup of the weeks accomplishments has helped me feel better.


1. Counter top leveling.

Yahoo! Accomplishing this means being able to level up the stove which means easier cooking and less complaining. It also means that I got to take out the little strip of tile behind the sink. I had no idea how liberating it would be to have that out. I think it's a really neat idea to collect tiles and integrate them into the house, which is what it looks like the last owners did, but it was their collection in their style, ya' know?


It's all level now, but not yet reattached. That's because the sink we had liked that came with a faucet and was a nice-for-us price is just a smidgen too big for the cabinet. But we did find a sexy little number online that also comes with a faucet and it is due Tuesday.

Blurry shot, but such a relief!

EXTENUATING CIRCUMSTANCES

The counter is attached from the top. So, that means re-plugging the holes which is a pain in the butt. Also, I wasn't expecting this part of the project to come so soon, but it did and while it's exciting it's also a bit of a drag in that I won't be refinishing it in windows-open weather. It's going to stink and then at the end of each day's progress it's going to get cold in here while I air it out. But it really just makes sense to get it done before installing the backsplash and even before tackling the lower cabinets.

Betty isn't a huge fan of the ruckus, but she has enjoyed licking the sink now that it's handy.

We'll have been without a kitchen sink - or dishwasher since it drains into the kitchen sink's plumbing - for 6 days when this post goes up and will likely be another week-and-a-half to two weeks. Frustrating and inconvenient, but here we are with potable water brought by pipes right into our house in five different rooms and 11 different receptacles and appliances... I guess we'll be just fine.

This sexy little number by Vigo is arriving on Tuesday. It's going to be so hard to leave it all boxed up until the counter is done.


2. More of the ongoing cabinet refinishing project.

Time to tackle the last two sections of upper cabinets. Or should I say "upper-only" cabinets? We have an additional two sections that go from the floor all the way up: a corner pantry with a spot for the microwave and the refrigerator enclosure with cabinets over it.

EXTENUATING CIRCUMSTANCES

HOW THE HECK IS THIS UPPER CABINET ATTACHED!? After removing all the visible screws and then moving the fridge and partially emptying the cabinet above the fridge to remove 3 more it still won't budge. I had decided to ask Nick when he came on Wednesday, but since we have to postpone that, I reinstalled some screws and am storing some of our daily dishes there while I tackle the open-shelving section of upper cabinets. Man, I just hope some schlub didn't glue that sucker in there. ALWAYS THINK LONG AND HARD BEFORE SELFISHLY USING GLUE OR CONSTRUCTION ADHESIVE, PEOPLE! So I put some screws back in and stored our most used dishes in there while the open shelf was taken down for it's makeover.


I didn't get to see the process, but Nick pried it up! Yes, there was glue! It's a long story that I am not able to explain without lots of hand motions: that cabinet can move up, but not out, at least not without tearing up the neighboring cabinets. The days of refinishing them with my feet on the ground ended with the open shelving piece.

Moved up a few inches to match the others and ready to repair, modify, and refinish inside and out!

ETC.

The open shelves had some hidden screws, but overall it came down pretty easily and wasn't too heavy or big for me to move by myself - one of the benefits of using a soft wood to build them, I guess. Another thing I was going to have Renaissance Handyman Nick to was cut the sides and back off below the bottom shelf, but since he was not available I did it myself! I had some very good luck with my beloved new jigsaw both freehand and with a guide, so what the heck? We had a really dry and sunny day so I hauled it outside to make those cuts, add the crown moulding, and do some filling and sanding.


After priming, painting, glazing, and multiple layers of clear coat, it is up! But we need to wait until Wednesday to expose the finish to "regular use" so it sits empty and my dishes sit on the dining table and a folding table in the kitchen. I'm really excited to get those put back away .

3. Wallpaper removal.

DONE! All the wallpaper is off down to the original which was primed with an oil-based primer, skim coated over, primed with a water-based primer, and then painted with two coats. YAHOO!


The original list of the order I thought the projects will happen. Line through for complete items, italics for additions. I'll let myself do partial line thoughs for partial completion, because it's good for my morale.

1. Light fixtures
2. Remove corner shelf in order to...
3. Remove wallpaper and repair walls (& ceiling) as necessary, get temp solution for backsplash
4. Paint walls above cabinets, around wood stove, paint laundry/bath hallway.
5. Cabinet repair, move, modify
6. Refinish cabinets
8. Level, repair, and refinish counter tops
11. New sink and faucet and the counter modifications that go with it.
10. Replace outlets, switches, plates.
9. Install backsplash, probably tile
7. Maybe try to do something with that terrible brick veneer wood stove surround?


Tuesday, March 8, 2016

One Step at a Time: Kitchen Edition, Some New/Some Same

Well, my best laid plans have been at least temporarily been altered; Renaissance Handyman Nick has had to excuse himself while focusing on a family illness. 


1. Replace the glass in the cabinet doors.

WHY

Glass doors don't work for us. We really have to use all the space in our cabinets and not all our things coordinate or match or are even good looking at all, like our various bottles of hot sauces or vinegars or our sentimental and mismatched coffee/tea mugs. Below, a reminder of the situation.

Yeah, that's not decorative stuff happening in there.

EXTENUATING CIRCUMSTANCES 

Since Renaissance Handyman Nick was unable to come to cut the zinc plated steel sheets to replace the glass in some of the upper cabinets and since this metal is thinner than the one I had initially planned to use, I decided to bust out my hardly-ever-used metal shears and cut the panels. YEY for leather gauntlets!


ETC.

Look! Magnetic! I don't plan to treat these like a bulletin board, but I think it's going to be super handy when we're working from a hand-written or printed online recipe. And finally a place to keep the measure equivalent charts that are never handy!

One of my most used recipe print outs: a crab dip for my brain-shaped mould. A Halloween classic!

I am still not sure I am going to paint the cleats that once held in the glass and now hold in the metal. I kind of like the homage to the former cabinets and the touch of wood tone inside. I think Eric would prefer that they be painted.

Maybe the magnetic thing wasn't such a great idea...

2. Finally the remaining wallpaper is down!

As mentioned earlier, I didn't take the original wallpaper off, because I fear that it is applied directly to the unprimed drywall as is the original wallpaper in the bathroom. It's on there solidly and primed, so for exposed wall surfaces, I continued to prime with oil-based primer, skim it out, prime with water-based primer (because it's faster-drying and less stinky), then paint - which is all that is left for that bit.


EXTENUATING CIRCUMSTANCES

There are two small knot holes in the back of the open shelving section of upper cabinets. I like them and don't want to fill them, but I also don't want them to be a visual feature or distraction, so I primed, painted, and glazed the areas behind them... and a lot more area just to be safe!


HA! The knot from one of those holes stuck to the wall when I removed the shelf unit.

ETC.

I have cut off some of that shelf, added the "crown" moulding, filled and sanded, primed, and gotten on coat of paint on it! Hopefully, I'll get it glazed, varnished, and reinstalled before next Tuesday's post. Ahem.


The original list of the order I thought the projects will happen. Line through for complete items, italics for additions. I'll let myself do partial line thoughs for partial completion, because it's good for my morale. Note the sequence of the numbers is now, uh, out of sequence.

1. Light fixtures
2. Remove corner shelf in order to...
3. Remove wallpaper and repair walls (& ceiling) as necessary, get temp solution for backsplash
4. Paint walls above cabinets, around wood stove, paint laundry/bath hallway.
5. Cabinet repair, move, modify
6. Refinish cabinets
8. Level and refinish counter tops
10. Replace outlets, switches, plates.
9. Install backsplash, probably tile
7. Maybe try to do something with that terrible brick veneer wood stove surround?


Tuesday, March 1, 2016

One Step at a Time: The Kitchen Renovation Edition, Finally Getting Somewhere!

Week four feels like real progress! I know just as well as anyone that all the preparation steps are necessary and count as progress, but it is so much better for my morale when the changes look at least a little like the finished product.


1. The stove side cabinets: "mended," altered, primed/painted/glazed/varnished and reinstalled!

I had to special order my "crown" moulding, because even though I am using it as a crown, it is actually a picture rail profile. So while waiting on that, I decided to take down the other stove-side upper cabinet and get to work preparing it for refinishing. The moulding arrived much quicker than I imagined! Yey!

My first ever attempt at such a feat of finish carpentry! I am SOOOO grateful for the pneumatic finish nail gun.

The cabinets are closer to the "regulation" 18-inches off the counter surface or they will be once we get the counter leveled. While they were down I decided it would be easier to clean the cooking oils off the top of them - who knows how many years of accumulation were there? It took scraping with a putty knife and repeated scrubbing with Murphy's Oil Soap to come clean. I also took out the blue floral contact paper and removed as much of the adhesive residue from the shelves as I could, primed them and applied new, grey contact paper.


I am using Benjamin Moore's "new" Advance line which is a waterborne alkyd paint.  Between recommendations from my friend at Two Shallow Pockets and my local Benjamin Moore dealer is seemed like the way to go. It's got the durability and self-leveling (i.e. diminished brush and roller marks) of an oil-based paint, but the easy of clean up and low-stink of a water-based paint. The only downside is the 16 hour re-coat time. This will be less of a hindrance when I am painting bigger sections of cabinetry.

The long re-coat time is mostly frustrating because it means living with this sh!t show for longer periods of time. Work tables hogging floor space, supplies tucked under them with some of the contents of the cupboards boxed underneath, the rest of the contents all over the counters. Still worth it to work on these pieces on the tables instead of on the walls.

All the surfaces - except the backs - are primed with the Advance primer. The interiors are painted a Benjamin Moore 2072-60 (Beach Plum) and the exteriors with 2125-50 (Sweet Innocence). I used a simple raw umber glaze that I mixed using Proceed by Golden professional decorative painting products. The top coat is Varathane Polyurethane Heavy Use Formula in Satin; the same I used on the kitchen island.

At the post-glaze, pre-varnish stage.

We have this very nifty spice rack called Spice Stack that has helped us really utilize our cupboard spice storage efficiently. Now spice jars aren't buried in the back so we know what we have and can get to it easily. We also don't buy more of things we already have, but can't find. The only problem was that because the cabinet doors sit flush to the carcass, the shelf was just a little too shallow to accommodate the Spice Stack and the door would not quite close. So, after consulting with Renaissance Handyman Nick, I cut out part of the back of the cabinet to give me the room I needed. I think we'll order another Spice Stack, for the rest of our spice jars, too.


Luckily, I realized that I'd have to prime/skim out/prime/paint more of the wall behind the cabinet before I reinstalled it! Oh and since the house is 40 years old this year, it has settled. The cabinets were flush with door and window mouldings before I took them down, but there were not level. I suspect that means there will be an uneven gap there, so I painted a little strip next the mouldings with the cabinet finish hoping it will be less obvious.

Here is how I got the carcass within an inch of the mounting height. Then Eric was able to get it up to the level line I'd made on the wall above and I could screw it to the wall.

They're up! Sans doors and contents...

Still sans doors, but full of our stuff! Minus the mugs that are in the dishwasher. And now it is completely obvious why see-through doors weren't a good option for us - we have to cram these with stuff and it's stuff that we actually use.

You'll notice that the doors aren't back on the cabinets.... I am replacing the glass with something opaque to accommodate our not-gorgeous cabinet contents and that is scheduled for this week! YAHOO!


2. Pendants over the island!

DAMNIT! I added old number 2 up there in anticipation of the arrival of the flex track adapters that I ordered arriving on Thursday, but what I failed to notice is that that they are expected to arrive on Thursday, March 3. D'oh!


The original list of the order I thought the projects will happen. Line through for complete items, italics for additions. I'll let myself do partial line thoughs for partial completion, because it's good for my morale.

1. Light fixtures
2. Remove corner shelf in order to...
3. Remove wallpaper and repair walls (& ceiling) as necessary, get temp solution for backsplash
4. Paint walls above cabinets, around wood stove, paint laundry/bath hallway.
5. Cabinet repair, move, modify
6. Refinish cabinets
7. Maybe try to do something with that terrible brick veneer wood stove surround?
8. Refinish counter tops
9. Install backsplash, probably tile
10. Replace outlets, switches, plates.

Next week I hope number 1 will be entirely crossed off and that the doors of the already repaired, modified, refinished, and moved upper cabinets will be completed and installed. I also expect to have removed the rest of the wallpaper (down to the first layer), made wall repairs, and primed/painted them. I hope I will have made some decent headway on repairing, modifying, and refinishing the remaining two upper cabinets. I have already scheduled time with Renaissance Handyman Nick for some help with two of those and to discuss what all I need to have done before leveling the counter top.

So where am I going to put all our dishes in the meantime? Stay tuned to see that sh!t show!