1. Refinishing the counter top.
We've selected a dark walnut color stain to bring in some warmth, nod to the wooden surface and to our forest location, and to tie in the raw umber glaze on the refinished cabinets, the wood tones in the rest of the house, and the tile we selected for the back splash.
 |
| Four coats of stain to get the pine this dark. |
EXTENUATING CIRCUMSTANCES
So much for starting staining on Tuesday. The modifications to the counter were not done until Tuesday and then I had to go buy another size of wood plug for some of the holes and then do some more sanding. Sigh. Staining started on Thursday.
After reading up on several other similar projects online, I chose to go with Waterlox for the protective varnish. I'm doing lots and lots of coats, with 24 hours between them, so this is going to take awhile. Especially as there are a few coats on the underside around the sink and faucet openings, areas adjacent the stove and over the dishwasher. I started Saturday night.
ETC.
In the meantime, we've had some temporary, partial counter top comprised of boards that made the weird shelf in the bedroom that I removed back in April 2013. As half-arsed as it looks, it makes a big difference in the, albeit diminished, function of the kitchen.
2. Refinishing the cabinets.
Yes. Still. And taking advantage of the counters being off to do the interiors with more light... at least on the top shelves.
EXTENUATING CIRCUMSTANCES
The little turned-wood knobs that were on the cabinets before we swapped them out for the antique pewter finish knobs used wide screws... wide enough to have left 1/4" holes in all the doors. That is WAY bigger than works for standard cabinet hardware. WAY. It made the new knobs sink into the holes and spin out of true with the slighted provocation. So, I have been repairing those holes with 1/4" dowels and two-part wood filler. Then drilling another hole once the wood filler has cured. That has definitely added time to the project, but it has been worth it.
 |
| Quarter-inch dowels, 5/8" long. |
ETC.
I made progress. Two more pairs of doors and two drawers filled, sanded, primed, painted and ready for glazing, then varnishing. One pair of doors filled and sanded and the under-sink area primed and painted. The last pair of doors with metal panels were finally reinstalled. Many more dents and dings filled on the lower carcass, too. It looks like quite a list when I type it out and it is making a slight difference in how it looks, but it's not what I'd call photogenic at this point.
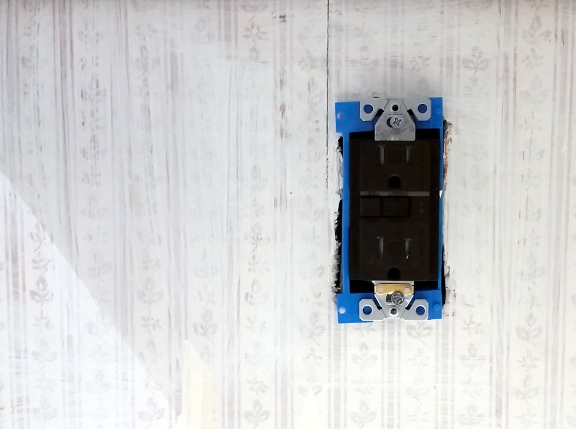
3. Replacing the outlets and switch above the counter!
The old ones were dirty in hard to clean ways, stained with wood oil, and the outlets upside-down as far as we are concerned. The new, brown ones will blend with the tile, the GFCIs will make us up to code in the kitchen, and the rocker switch will be easier to keep and get clean. And I also installed extenders for the electrical boxes so the switch and outlets can be screwed flush and securely with the added depth of the tile. Nearly EVERY outlet in this house is loose, because the drywall was cut too big for the electrical boxes as you might remember from my rant when I worked on the lighting. They'll have the screw-less covers, like the new switches and outlet in the living room to help with cleaning, too.
 |
| Look! So dark and mysterious and will blend with the tile when it's installed. Not only GFCI, but what we consider right-side up! |
EXTENUATING CIRCUMSTANCES
The joker who wired this place, or at least the so-and-so who installed the outlets and switches, really cut the wires short. It's often an utter bee-eye-tee-see-aetch to replace the existing switches and outlets in this house. My hands are shredded and I spent a few hours doing what should have taken more like one hour. I had to get Eric involved, because 3-4 hands were needed for one of the GFCIs. I know I'll be glad I did it, but the person who set me up for this struggle NEVER wants to meet me in a dark alley, boy howdy.
The original list of the order I thought the projects will happen.
1.
2.
3.
4.
5.
6.
8.
11. New sink and faucet and
10.
9. Install backsplash, probably tile
7. Maybe try to do something with that terrible brick veneer wood stove surround?


*Giggle* I sometimes think that itinerant monkeys were hired to do electrical on this side of the mountains, prior to around, oh, 1995. We had to have our place rewired recently...holy cats! Glad it's done, though. No more mysterious burning smells, flickering and/or nonworking light fixtures, etc. ;) Makes it easier to sleep thru the night!
ReplyDeleteYeah... what the heck was going on? And there is definitely a 1970s distribution of outlets in the house, too. By which I mean none in the hallways or near the bedroom doors... you know, places most convenient for plugging in a vacuum cleaner or a little light so guests can find the bathroom at night.
DeleteThis makes me happy. I am glad you are having and it looks prett darn good
ReplyDeleteThank you, Bascom!
Delete