1. Paint wood stove and stovepipe.
EXTENUATING CIRCUMSTANCES
Cussity-cusscuss! So, it turns out stripping this stove polish off the stove was a WAY bigger deal than I was expecting/hoping. The area where it would wear and need to be reapplied weren't so bad, but the much larger areas where it didn't wear off & was reapplied anyway took ages and ages. And ages. I'd say that I have about 10 hours into just getting the stove to the point where it can be painted.
 |
| Blurry? Meh. |
I'd like to wait for a day when Betty goes to the office Eric to do the painting. It's some STINKY stuff and with one fewer set of lungs, compromised lungs at that, to worry about it will be easier to just get it done and damn the torpedoes.

I am sure glad that I had the foresight not to prime or paint the surrounding brick before this, because it would have been ruined. Whew!
2. Do something with the terrible brick veneer.
[ this space intentionally left blank ]
3. Too-big hole for microwave
I'm calling this good for now. I need to be "done" so there will be a Phase II on the kitchen and Phase II will include making doors for this and a few other things. Perhaps when autumn arrives, or maybe even after the winter holidays.
 |
| Also blurry. Whatevs. |
Having fewer things stored here will help it look tidier in the meantime. Eric's new wok for his new grill (see below) will live on top for now. The digital scale and microwave accessories will find new homes nearby.

4. The flex-track light situation.
EXTENUATING CIRCUMSTANCES
I messed up. The style I bought and installed was different than the style I thought I was getting... i.e. the style you could hang pendants from. I didn't know that until I bought and painted the pendant adapters. Why painted? Because the cussity-cusscuss home center house brand lighting company didn't have them in the right color anywhere, anyhow. My mistake for not verifying, but their poor merchandising for not making it obvious that they sell two kinds... but not at the actual local outlet of their store. I'm frustrated that I didn't do my own due diligence and even more frustrated that this company - selling pretty specifically to the DIY market - has this very un-DIY-friendly merchandising, etc. I could go on, but instead I will say that after some more research, lots of weighing pros vs. cons, and trying to imagine how we'd feel about living with the lighting as-is, I ordered one of the correct sets just to see it in person - because of course they didn't have any in the store.

You see, I really wanted the pendants over the island and Eric really hates the obvious plastic-ness of the set we have. It's metal colored, but still pretty obviously plastic if you look at it at all critically. Of course, most of the time we don't and no one else would, either. Still be both know what is missing. The order arrived on Thursday: Eric in particular likes the color better and I like that we can have the pendants that I already purchased and even altered, so not returnable. We both like that the new set is dim-able and the bulbs are replaceable. I like that there are more support pieces and they're shorter and while we don't like the look of the lights themselves as much, we don't hate them so much that they cancel out the rest and they're workable with the rest of what we have going on style wise. So enough materials to finish replacing what we have has been ordered and is due later this week!
Old, new fixture.


We've decided that we even have good, new homes for the old-new fixtures: the master closet and the office/craft studio/auxiliary guest room. YAHOO! By installing these in those rooms and moving the existing office/craft studio/auxiliary guest room fixture to the guest room/auxiliary writing room the house will finally be builders' boob light free! YAHOO x 2!
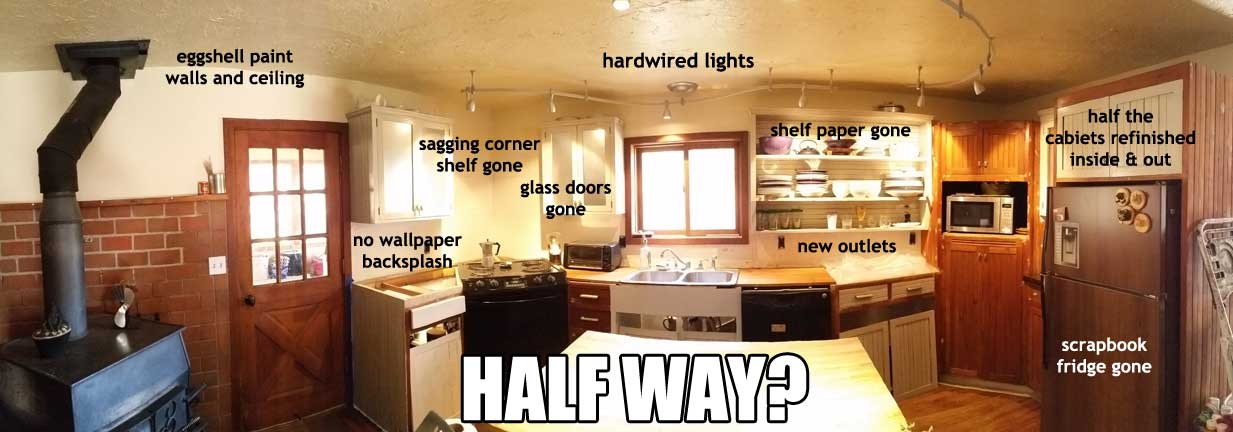
The original list of the order I thought the projects will happen.
1.
14.
15. Paint wo
7.