 |
| Three weeks ago. |
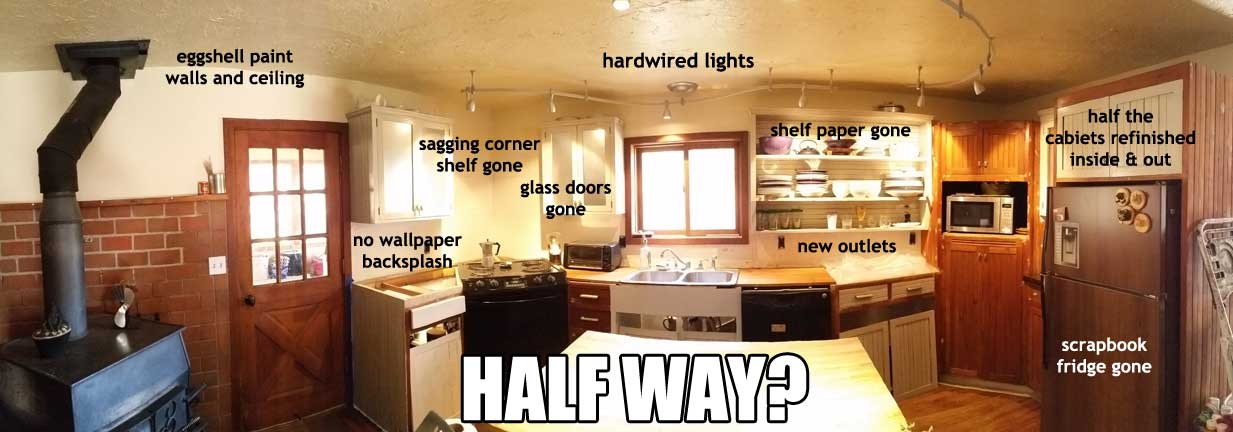 |
| Four weeks ago and now that the original list is longer, probably not halfway. Oof. |

1. Refinishing the cabinets.
Hot damn! The last four drawers are dee ewe en done, boy howdy!
 |
| And you bet I refilled those drawers right after taking this shot. |
EXTENUATING CIRCUMSTANCES
We are still waiting on the damn hinge screws to get the last 6 doors hung back up.

ETC.
I think I may have figured out how to make the door to cover the too-big-microwave space in the cabinets using the tools I already have. But I am going to allow myself to have a Phase II and have this project be a part of it. I'm just about ready for a break from this project.

The last bit of the cabinet part of the project is finishing the priming and painting the inside of the corner pantry piece. Perhaps next week. Oh, and reinstalling the last 6 doors should the hinge screws ever arrive.
2. Repair walls & ceiling, paint.
 |
| Never mind the ceiling texture. We're just sort of stuck with it until I feel compelled to spend weeks craning my neck and skimming it out. That could be a very, very long time. |
The anchor holes in the ceiling from the non-hardwired light fixtures have been there since early on in this project. I finally got up the gumption to deal with them. It was not a difficult project, just a pain in the rear end. Many steps that take more time to prep for and clean up after than to do... a real drag. In order to make it feel more worthwhile, I went ahead and got rid of the the last two anchors - on the last hallway wall to be worked on - and repaired those as well. Then I skimmed out the dumb texture, primed and painted. This part is a real yawner, but that doesn't mean I didn't take yawner photos.
 |
| Look ma! No holes! |
 |
What's not a yawner is that #4 on the original list is done! Well, less of a yawner. To me.
EXTENUATING CIRCUMSTANCES
I know it's hard to see in that photo, but this rough "barn wood" wainscot in this short hallway might have to come down in the future. Or maybe just the cap? Make it smaller? I can't decide if I hate it or am ambivalent.
3. New refrigerator surface.
Over an hour of scrubbing with Bar Keeper's Friend to get the remaining adhesive leftover from when I dismantled the scrapbook fridge (see the before-est photo here).
 |
EXTENUATING CIRCUMSTANCES
While I had the fridge rolled out of it's cabinet I decided to try to figure out how I could level it up. That's when I realized that the fridge is just barely out of level. The freezer door is more out of level and what I read to do about leveling it up did not take. Meh.
3. Magic cap catcher update!
Catchin' caps and taking names.
 |
| If you don't know what the heck this is all about, it's about this. |
4. Rant
I am real damn tired of my house (and outbuildings) giving me splinters. Rustic does not mean rough! We have some "barn wood" type situations here at the house from way before barn wood was a thing, but these so-and-so's just tore it off the barn and put it in the house. It's practically fuzzy with splinters. Now, I have a pretty hefty spring/summer project list, but I might have to squeeze in sanding and finishing some posts and a beam downstairs... out of spite if nothing else.
B. Unrelated to the kitchen project.
Betty, Betty holding steady.
The original list of the order I thought the projects will happen.
1.
6.
12. New
16. Replace light switch and plate in hallway.
14. Replace outlets, switches, plates by wood stove.
15. Paint wood stove and stovepipe.
7.
13. Build a door of some sort for that too-big hole for the microwave & deal with the inside.
No comments:
Post a Comment
It feels so good to read comments! If you're leaving one (or more!), THANK YOU! If you're not... c'mon, already!