Some history: For Christmas last year, Eric gave me a make-your-own-gin kit. It was fun and easy which made me want to make more. So for Valentine's Day he looked up some recipes online and then bought me ingredients at our local, awesome herb & spice store: Missoula Tea and Spice Trading.
What You'll Need*:
Low of the mid-range vodka, $10-$20/750ml bottle. I've been using New Amsterdam.
Dried Juniper Berries
The botanicals (herbs and spices) listed in the recipe that you find online
A tightly woven sieve
A funnel with a wide opening for the various spices to pass through
Bottles or jars for your finished product
(Scale is handy, but not totally required. Same for a paper coffee filter.)
I love an economy of scale, so I went with the 1.75 liter bottle. Heck, who doesn't enjoy an economy of scale? With a bottle that size there's not necessarily enough room for all the things you'll be adding, so start by making a cocktail or two to bring the level down a little. Time to take one for the team.
 |
| One of the drawbacks of making this tutorial in November in Montana is that this recipe is on a 24 and 12 hour schedule and there is not daylight for 12 hours so the photos are shot in our poor kitchen light. |
For 750 ml, I use about 0.3 oz of juniper berries. That's about a heaping tablespoon. For the 1.75 liter, I just doubled it, but you could just as easily do the math and do "correct" proportions. Use your funnel to add them to the bottle of vodka. Put the lid on, give it a good and thorough shake then put it in a cool, dark space for 24 hours.
 |
| The juniper berries and the botanicals tend to stick in the funnel, but a little tap n' shake usually gets them through. |
 |
| After shaking they still float; don't sweat it. The next say you can see the berries are a little swollen and the vodka has yellowed. |
Twenty-four hours later, measure out your botanicals and add them using your funnel. Replace the lid and give it another good shake. Put the bottle back in your cool, dark space for 12 hours.
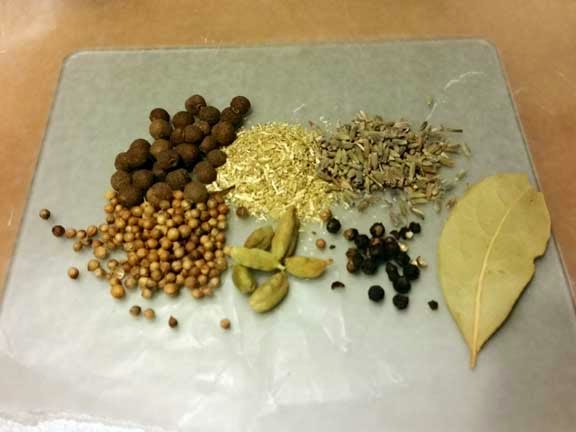 |
| For this batch I added equal parts by volume (approx 1 heaping teaspoon) of Mexican Allspice, Camomile Tea, Lavender buds, and Coriander Seeds. Then about three-quarters of that of Cardamom and black peppercorns. And one Bay Leaf. The total weight was about 0.3 oz. The Cardamom and Bay Leaf are easier to get in the bottle w/o the funnel using the poking-with-your-finger-method. |
 |
| Yup, all this stuff floats, too. A little bit of the chamomile stays in suspension. |
Twelve hours later, it's time to filter this concoction. Use the sieve over your funnel to pour the bottle's contents into another jar or bottle.
 |
| A wider mouthed jar holds the funnel in place which is helpful if you're doing this by yourself. |
Some of the botanicals get through the sieve and that was the case with the kit, too. They chocked it up handmade-ed-ness and for home use I'm okay with that. But for bartering or gifting I like to get rid of the floaters. So I use a coffee filter in a more standard sieve placed in a funnel. With an extra set of hands you could probably skip the funnel or put the filter directly into it. You can either pour into your final jar(s) or bottle(s) now or filter once more as seen below.
 |
| The sediment or "floaters" (left), as I call them, can be off-putting to a recipient. |
 |
| It catches most of the floaters, but doesn't make the liquid clear. I assume that's something to do with the distilling process and I just embrace the golden color as "artisinal." |
If you have a canning funnel and canning jars, this is a cute way to package it up for barter or gifts. It's reminiscent of moonshine & hooch! And what's more charming than hooch? I had a couple labels left over from the barter party and used one for this pint jar which is going to a friend.

The rest I decanted into a, uh, decanter. OK, it didn't all fit, so there is some left in that hinged lid jar on the right in the photo. We'll use that first.

One downside to photographing the steps along the way during November is that we definitely don't have 12 hours of daylight/day so most of these photos were taken in crummy, artificial light. That said, yes this gin is not crystal clear like the pro stuff and ends up a golden color. Seems just like more goodness to me.
* The kit I received for Christmas came with everything except the vodka (and scale).
This is so cool! Thank you for the tutorial- my husband is currently working at the Idaho Liquor Dispensary (yeah, we still have those here), so booze? Yeah, we got that! I suspect that this might just get the mister into the kitchen...and it might just work as a treatment for the almost-unavoidable Seasonal Affective Disorder that these short, short days brings on. Thank you thank you THANK YOU! :D
ReplyDeleteGin makes most things better! There are lots of recipes online, so don't get stuck with my vague description. But this method seemed like one of the easiest and quickest. Have fun!
ReplyDelete