Tuesday, October 20, 2015

It's No (Longer A) Mystery

Back in Auguest, Eric noticed a single LED light from our deck sting lights laying on the floor of our deck. Huh. So I looked over the railing and noticed that most of the bulbs were gone and the wires cut. The heck? So I looked around on the ground under the deck railing for the rest, after all it had been windy so maybe the wind eventually wore through the wires. Maybe? But I only found one bulb on the ground. Hmmmmm.


So I took that string down. Whatever was going on wasn't effecting the string that went the length of the overhang above the deck.


Until it did. My guess was squirrels, but Eric wasn't convinced.


Why would squirrels want light bulbs? 'Cuz they're jerks*, maybe?


Then a couple of weeks, just this last Saturday, later I noticed how the pattern of the indentations on the bulb covers looked roughly pine cone-like and mentioned it to Eric. He still was not convinced... until he saw a squirrel running on the fence line with something white in its mouth! It sneaked up into the "attic" of the shop! So I decided to use the photos I'd taken to start writing this post.


Fast forward a couple of days and Eric is calling me to the living room, "Come look at this!" and what are we looking at, but a [cuss word] squirrel running along the railing with a freshly plucked bulb from our string lights! Of course, the whole thing went pretty quickly, and my phone was charging so no photo.


But, WAIT A MINUTE! The very next evening Eric again calls me to come look and this time I grabbed my phone (i.e. camera). But Betty beat me to the door and startled the vandalizing thief off of the deck railing and into a nearby tree. Well, we watched him climb the tree then travel in the canopy through three or four trees, then scamper across the yard towards the fence!

Who does he think he's foolin'? The bulb in its mouth is obvious! 

He then used the fence as a thoroughfare to travel to the forest side of the property and off into the forest!

See that white bit in its mouth? That's our bulb!

He seems to either drop or deposit the bulb out there not too far from the property line, but our quick investigation was unable to find either a stash or a single bulb.

It does seem that there are more of the bushy-tailed rodents this year than in the past, especially the chipmunks, but they are not much bigger than the bulbs. The chipmunks keep the dogs busy hassling them, though. Chipmunks 2, Squirrels -136. Why 2? There are two entertained dogs. Why 136? As of mid-October, there are 14 bulbs left from the two 75-bulb strands.


* In Portland, the squirrels were eating the house! Chewed a dang doorway right through a drawer the built in buffet/china cabinet in the dining room! ACK!


Saturday, October 3, 2015

No Clever Title Including the Word "Shed."

I spent a good part of September building a woodshed. I expected it to take a couple of weeks, but I underestimated how physically difficult it would be for me and then we had rain, smoke, and even house guests! I had help from Handyman Nick and from Eric, but I think I did at least 85% of it myself. WOO! Some people might think that it is over built, but I would rather over build than build it again. It is 8' x 12' and should easily hold 3-4 cords of wood; more if we stacked it to the rafters. I took pictures at the end of almost all the phases and intend to post all of them here! You lucky so-and-sos!

Supervisor Betty checking on the materials while I was framing in the floor.


But first a little history:

The former owners had their firewood stored on pallets behind the chicken coop. When we bought the place, we bought a couple cords of wood they had stacked there under tarps. For this photo, I am standing just outside the back door which is the very closest to the wood stove. That highlighted, red building is the chicken coop.


After the crazy snowy February of 2014, we decided to move the firewood much closer to the back door with the intention of building a wood shed in the summer of 2014, but since I spent so much time away that summer it didn't get built and we just set up pallets as they were behind the coop. It was ugly, but way more convenient with a lot less snow shoveling just to heat the house.

I forgot to get the "before" photo before I started disassembling it to start building the shed, but you get the idea. 

The photo below is taken with me standing on the same spot as the photo of the highlighted coop. MUCH closer, but also that much uglier because it is so close to the house. And no matter how tidy and satisfying the pile was at the beginning of the season, it became messy and unruly looking as winter progressed.


And so we hired Renaissance (Handy)Man, Nick, to design a plan to our specifications and put together a materials list. He nailed it. We also hired him to do the brute work that I knew I couldn't or that if I could would take me so long I'd never get done: He dug the holes for the footings and set up the sonotubes for me to fill with concrete. He drilled the concrete for the post holders and cut/notched the posts, then I helped him set the posts. Later on he ripped down some of the siding trim pieces and also cut down the end pieces of the metal roofing. He was also great at answering questions via text or stopping by when he was in the neighborhood working for someone else.

And now a series of in-progress photos that will probably be boring, but dammit I have this digital witness to my accomplishment and I am sharing it. Like inviting friends over to see your vacation slides... every last one of 'em.

The lumber package, with the poured footings in the background.


The opening shot again, because it's the only one I took before the floor went down.


Posts up, headers up, floor down. I went to a small, family lumber mill in Florence to get rough sawn fir, in a true 1" thick. Nick suggested this instead of 3/4" plywood for ventilation and it is why the floor joists are 16" on-center.

If only I'd realized that there would be a point in the process that we'd have a cool stage, maybe we could've planned a party. I tried to convince Eric to bring out his amp and a guitar for a quick rock-out sesh, but he refused.

Rafters up and back wall framed.


Side walls framed. All this framing is with swinging a hammer. It would have gone sooooo much faster with a pneumatic nail gun... I thought I had one of dad's Senco guns in my things, but it turns out it is a stapler. D'oh!


Front walls up with doorway in the center!


When I got this far, I cleaned up the site then laid down in the dappled sunlight to rest and admire my work. Supervisor Betty took this as an opportunity to suggest that fetching would be a way better way to celebrate "our" accomplishment.


Drip edge and roof panels up! This was before Nick came back to cut the end panels. So I took those two back down. Sigh.


Instead of just solid and opaque metal, I specified for 2 clear, poly-carbonate panels for light. No reason to run power to the woodshed or struggle in dim light, either.


Before the siding could go up, Inspector Delia had to verify it's quality and that the chipmunks were hiding under the stack.


Siding up, but not the trim.


Trim up and end panels of roofing off to be cut.

Do not let the glamorous pose fool you. Supervisor Betty is a terrible boss. She either ignored me, messed with the materials, or shouted incomprehensible and incorrect instructions... usually sneaking up behind me to do so.
Siding stained, roofing panels reinstalled, steps built and stained! All just in time...


... for the first load of fire wood to be delivered!

That ladder is still there, because there are four (4) roofing screws left to go in the middle of the roof. I ran out and my sales person at the local lumber yard brought me a few from home so I wouldn't have to buy a whole package.

Some details that make it a "really good design" as spoken by our firewood supplier, Mike. Mostly it's about ventilation to keep that wood dry and let it further season.

That neat, rough sawn, true 1-inch lumber with approximately 1/2-inch gaps between them.

The gaps between the rafters were left open not only for ventilation, but also so the wind that might come in the front opening* doesn't off push the roof.


I added hardware cloth under the shed to prevent dog toys, and thus dogs, from going under there.


And finally the view from the forest.


* I think that next year I will add a sliding barn-style door. We'll see how much snow blows in there, how often the dogs get in there going after the inevitable chipmunk invasion, etc.


Saturday, September 26, 2015

No More Snow Beyond Measure For Us!


Not to get all House Stark on everyone, but winter is coming. That means preparing with lots of little projects, one BIG project, and this just-for-fun project: painting a snow gauge on one of our clothesline posts!

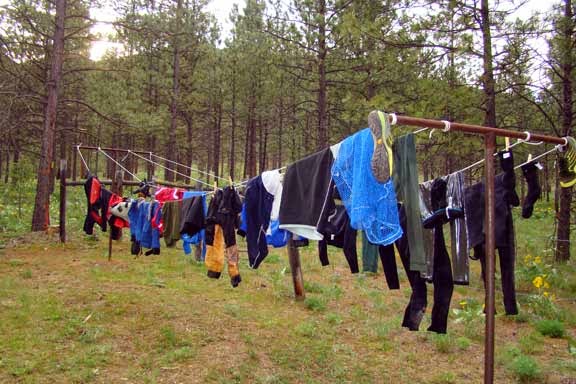
This picture is from way back in May 2013; it's all the MV guests' gear from the rafting trip. 

I love using the clothesline in the weeks between rainy season and smoke season and the one that came with the house has lots of room for lots of laundry, 4 lines about 24' long! But it was also kind of junky looking with its rusty posts and its drooping lines. I have pinned all kinds of pretty and clever clotheslines on pinterest, but the ones we have are plenty sturdy and stuck in cement footings. So... spray paint to the rescue! First I used a rust converter primer that I had on-hand, then this paint. It's just about the color of the most prevalent moss in our forest.


After the paint had dried a couple of days, I marked every 6" from the ground up to 4'. Then I tried to use delicate surface masking tape to mark the lines, but found it was pulling little bits of paint off, so I thought about it a bit and decided that our huge stash of toilet paper and paper towel tubes* could be put to use as stencils!

I am kind of surprised that we had 3 paper towel tubes; it takes us ages to go through a roll.


For the measurement marks I used the longer paper towel tubes. I marked & cut a larger strip for the foot marks and a smaller strip for the six inch marks, then split it up the back. Then I split 2 more to use to protect the adjacent areas against over spray.


I made sure the foot marks on the pole matched up with the larger strip on the stencil then taped the tube closed in the back. Then I added the other tubes, one above and one below before spraying the marks.


I waited a few minutes for the paint to dry then removed the tubes and did the same to the next foot mark until I'd done all four.

After all the measurement marks were up, I started making the number stencils. It was pretty much the same procedure but with drawn numbers on shorter toilet paper tubes.


I noticed that I needed a little help keeping some of the parts of the tubes around the cut out numbers stuck against the post, so rolled up tape to stick on the inside of the stencils where needed. I found the end and top of the foot lines thru the number stencil and tried to get them about 1/4" above. Then used my paper towel over spray tubes again above and below the number stencils.


And done! Now, I wish I'd had another color on-hand to paint the lines and numbers; something less harsh than the black, but also easy to see from a distance. Alas I did not and I didn't feel like buying more stuff to sit on the shelf.

I understand it's rare to get as much snow as this gauge is ready to measure, but heck, we could have a repeat of February 2014.


I still have to get new lines and install them, but I think that might wait until spring. I have just a few finishing touches on the woodshed to get done, plus many of those little things.

"PRO" TIP!


Don't get cocky and forget to make sure that there is no gap between your tubes! Or in my case, one of the over spray tubes was not taped tight against post. D'oh! Once it was dry, I used my masking tubes to cover the marks that were supposed to be there, then sprayed over it with the green. You can see the "patch," but it's good enough to dry the clothes and good enough to measure the snow so that's good enough for me.


*When set next to the homemade fire starters and stuffed with a bit of news paper, they are helpful for getting the fires in the wood stove going, so we save them.


Tuesday, September 22, 2015

Whose Poop Is This, Anyway?


So brightly colored!


So apple-y!

Same pile, my hand included for scale.

I do believe this belongs to that small bear I saw running away from the fence into the forest this morning! But that was just on our side of the fence, between said fence and the apple trees. Hmmmm.

Smaller pile as the hand-for-scale indicates. Also, you can see the red peels and apple seeds.
PRO TIP: Don't edit photos of apple-laden bear scat while eating a bowl of Grape Nuts.

And then when I realized that I should go back out there to shovel that over the fence to keep the dogs from rolling in and/or eating it, I found another pile right under the McIntosh tree.  The other tree, the little one with the red apples... it's now apple free!

I do believe the deer have been hopping the fence to get at the apples lately, too so we can't blame the bear entirely.

While it's fun and wondrous to live among wildlife, we also know we must be both smart and careful. Several neighbors have also spotted a bigger bear around lately, so we're all being more cautious with our trash cans, pets, and wanderings. Also, I guess we need to get out there and pick the rest of the apples as soon as possible.