Showing posts with label tutorial. Show all posts

Saturday, January 27, 2018

Hey Bookshelf, I Got Yer Back

A few weeks ago, I noticed that the weird, built-in bookshelf in the guest room was sagging under the weight of the books on it. During the project to shore it up, I decided to also spruce it up, because of course I did. Other than reorganizing and redistributing the contents, I also made some shelf backers to kind of balance the visual weight of the various sections as well as the whole thing.

The backers are behind the top, center shelf and the middle, right shelf.

One of the things that is kind of a fundamental way in which I approach most of my decorative house projects is doing what I can to make them un-doable. Obviously that's not always feasible - like with a tile back splash - but if I can use nails instead of construction adhesive with a good result, that's what I'm going to do. And if I can use screws instead of nails, then I'll to that if it'll keep the look right. That is how I approached this project. Someday we'll have our dream library in the next room and just take this less-than-ideal-for-us unit down, so not having weird rectangles of quilting cotton attached the wall is important for the future.

We were lucky that I had most of what was needed to make the backers on hand already:

     THE BASIC MATERIALS
     Bark print quilters cotton fabric
     Fusible interfacing (I had enough for only part of the project)
     Thread
     Polypropylene sheets (you could use thin plywood, masonite, foam core, even strong cardboard)
     Duct tape

     TOOLS
     Measuring tape & ruled straight edge
     Level
     Utility knife
     Rotary cutter & scissors
     Pencil
     Sewing machine
     Calculator
     Small wire nails

     OPTIONAL MATERIALS
     Spray adhesive
     Metal eyelets
     Base shoe or quarter round moulding
     House paint

First steps

1. Measure the back of your shelf in both directions. I sure hope yours is square - as in the angles are all 90 degrees, because everything is level and plumb - because it's hard to cut your backer if it's not. Mine was not and my backers are not quite right because of it. Which means I don't know how exactly to help you get it right, but I would recommend starting with something inexpensive/free and easy to get a hold of like cardboard or paperboard to get it just right before cutting into a more expensive backer material.

Here are the fingerprinted and lint-coated scraps. Pretty impressive photo, eh?

That said, use cardboard if you think it will maintain it's integrity through the process. Just be sure your material is strong enough to hold its shape while being flexible enough to get into place and that you have a way to cut that material.

See how I had to make sure my backer was flexible to get around this? The front opening is smaller than the back surface.

2. One you've got the size just where you want it - whether that is just-right or not - then cut your backer. Go ahead and dry fit it just to be certain it's right.

3. Press and cut your fabric with enough extra to wrap around your backer and at least an inch on the back. I did 1.25 - 2 inches on mine. Cut your interfacing just a bit smaller than your fabric, then follow the directions for that interfacing to fuse it to the back side of your fabric.


For the long backer, I had to sew together a few pieces of fabric to get it wide enough and that is what I used my calculator for. Had my print not been directional, I probably could have gotten it without that. I also had to piece together my polypropylene backing, because my sheets are pre-cut to 24" squares.

Next...

4. Lay your fabric wrong side up on a clean, level work surface that is big enough to fit the whole backer board on it. I used the guest room floor. Then center your backer board on that, back side up. Make sure you have the top of your backer matching the top of your fabric if you have a direction fabric. You can see I wrote on my the backside of my backer just to make it easy to keep this straight.

If you're working with difficult material, large piece, or are just nervous about keeping it all aligned, you might want to use spray adhesive on your backer then lay it on your fabric. Be sure to smooth over the surface so the adhesive makes contact all over. Obviously, test on scraps to be sure it won't bleed through your interfaced fabric, etc. Maybe double-sided tape would work, too, I haven't tried that.

5. Pre-cut/tear several strips of duct tape into 5-6" strips. You may have to do this a few times as you work your way around.

6. At the center top, fold over our fabric and tape it down. You want an nice crease, but you don't want to move the material around. If you have used the spray adhesive this shouldn't be a problem. Then do the opposite side. Then work your way, evenly down the left and right sides, alternating top and bottom.

I did my corners with one of the standard miter methods.


7. For the sides, start in the center and work your way to either end. Because my sides were fairly short, I did one whole side before doing the other. It ain't pretty, but it doesn't show and it's just for us.


Finally...

8. Flip it over and admire your work!


Installing that beautiful beast:

9. Have your hammer and wire nails ready, then put your backer in place. You might be able to use double sided tape for this, too, depending on how heavy your covered backer is. For mine I tacked tiny wire nails into the bookshelf about 1/4-1/3 of the way in, then bend them towards the wall with my thumb. Sort of like those metal tabs in the back of some photo frames. They are really hard to see so it works fine. I was originally going to paint them brown, but didn't have to.


Another option would be to add a small moulding piece. For the backer on the right end of the unit, I ended up using a bit of leftover base shoe from our kitchen island project. This was not so much to hold it in place as it was to cover where I messed up cutting my backer. LEARN FROM MY MISTAKES and dry fit, dry fit, dry fit!

I did have the foresight to paint the wall a color closer to the fabric, at least. At least the closest I could come with paint on hand.


And in actuality, that piece is held in place by nails in its own way.


Here is where the optional eyelet came into play. I knew I was going to display these sentimental pieces in there, so cut holes in my backer before covering it with the fabric, then after it was installed gently cut the fabric over the holes, and added the eyelets with a bit of glue. Just to keep the fabric from doing weird things, even though the interfacing would almost assuredly take care of that. It was a craft-geek moment, what can I say? Soooooo, that backer is essentially hung on those nails like an frame or other decoration or art would hang on a wall. The moulding is mostly to cover the gap and I didn't even nail it down... it was stable enough without doing so and this would be easier to undo (see second paragraph).

A little dab of base shoe will do ya'.
We have some things in-progress that will go in here instead of the mine cart and my signed copies, but for now it's like this.

Clockwise from top, left: Expert Typist Award, First Pound Earned, Mine Cart Book Display (with The Trials of Solomon Parker), Chock-a-saw Sagwa Tonic bottle prop, Dr Potter's Medicine Show, Dr. Morrison Hedwith's Basement Laboratory Diorama.


Thursday, July 20, 2017

Can I Offer You a Tissue, Dear Guest?


I just wanted to add one more useful item to the guest room's new bedside "tables." A perfunctory search at a few stores for a simple tissue box cover yielded naught, so I decided to make one. Luckily, I found a wooden blank at a craft store for not-much-cost and had everything else in my various materials stashes!


I stained and varnished the parts of the wood that would be exposed using a stain I'd bought as a test for refinishing our kitchen cabinets. I decided to go with paint in a very similar color on those.


 To decorate the sides I used part of a fat quarter of this Burly Beavers print that I picked up on a whim, fusible interfacing remnants from the tee shirt quilt project, and black cording & grey bias tape that were probably my grandmother's.


I assembled all those parts and glued onto the wooden blank with the same Mod Podge I used for sealing the coasters I made for the Balcony Upgrade.


Meanwhile, I'm furiously pinning inspirations for replacing the old blinds for the guest room and mulling over paint colors for the ceiling and maybe even one wall in there, too. It will probably be autumn, at least, before I get to those projects.


Friday, June 23, 2017

Piping Hot Lighting! Or Something. (Vintage Thermos Lamps)


Now that we have new, roomy bedside tables in the guest room, it is finally time for bedside lamps! But not just any bedside lamps purchased from Target or wherever else there is to buy table lamps around here. Vintage thermoses turned into bedside lamps!

House of Hawthornes' images are probably what compelled me to try to throw some other bits into the photo. The sun was bright and it was hard to see my screen. This was the best photo of the bunch... even though there's a dang fly on my mug! But let's face it... that's real life.

I mostly followed this super tutorial that I found on pinterest, but made a few changes to suit my particular thermoses. If you're interested in the how-to, check out the tutorial by Pam at the House of Hawthornes blog, but I'll describe my differences here.

Her yard sale thermos already had a broken glass insert and she broke it up further using a screwdriver then dumped out the shards through the top. Mine were intact AND my thermoses had the screw-off bottoms for replacing broken inserts, so I was able to just take them out.


Mine also had plastic liners that one's hot lunch would actually be poured into. My guess is that is because these are wide-mouthed thermoses, they were probably meant more for having hot soup or chili rather than coffee or tea. This would make it safer to eat directly out of them with a spoon. Anyway, this meant I needed to drill an extra hole and use an extra rubber grommet.


And because my thermoses were wide-mouth and didn't have that cute taper, I decided to keep the lids on. It turns out that was lucky for me, because one of the stoppers cracked and then totally came apart when I was drilling. Turns out there are little bits of cork as insulation in there! Who knew? Not me.


After all the holes were drilled and I had the correct size of rubber grommets, it all came together pretty quickly with the Westinghouse Make-A-Lamp Kit.

I realized after I'd taken this, that I inadvertently copied House of Hawthornes' styling, too, but photographing these on a picnic table! In my case, it was because it was the quickest outdoor surface to make look decent.


And then after this photo was taken I realized I'd forgotten to weight the bases so the lamps wouldn't be tippy. This part is extra fancy...


... it's gravel from the driveway. OooOOooooo!

I picked up a couple of lampshades at a big box home center and tarted them up with some clearance home dec trim from Jo-Ann and glued it on with fabric adhesive. These shades came with clip-on fitters, which means I didn't have to also buy harps.


A couple of 60 watt, warm, LED light bulbs and DONE.

[here is where a photo of them with their shades on was supposed to go, 
but I forgot to take it before...(see below)]


Not Done. The right width lampshade was a too-deep lampshade, at least with those (dang) clip-on fitters. It was awkward looking and physically awkward to get at the switch. I think the best solution would have been adding harps, but that's not really an option with the clip-on fitters. Instead, I bought two longer nipples than come with the Make-a-Lamp Kit. I used 5" nipples, but could've gotten away with 4" very easily. With two extra nuts, four fender washers, and some brass tubing, which I had to cut to fit using a hacksaw and miter box, I was able to extend the space between the top of the thermos and the socket. They are less awkward and ready to serve guests for up to a few dozen nights each year.

[insert that screeching needle on the record sound here]

DO OVER: A couple of 60 watt LED bulbs and DONE.

I do wish I'd been able to get a darker shade and I did look at the options, but they were either way too big or entirely the wrong shape. 

And now we're finally ready for some well-lit house guest bedtime reading action! Er... yeah.

I really need to get on ordering some reflectors for taking photos. This photo was taken the day after the Summer Solstice, so it's not going to be getting any lighter around here! 

I had to close the blinds to avoid the whole back-lighting situation. Even though I still really love that Ikea print, those gotta go!

Next up for the guest room: making new window coverings. I think I even have most or all of the fabric I need! It might be awhile before I tackle that though, because there are still those exterior & outdoor projects to do, but I really, really want to make them instead. Sigh. So, I am going to use making shades for and painting the guest room as a "reward" for doing other projects. What is wrong with me?


Saturday, September 26, 2015

No More Snow Beyond Measure For Us!


Not to get all House Stark on everyone, but winter is coming. That means preparing with lots of little projects, one BIG project, and this just-for-fun project: painting a snow gauge on one of our clothesline posts!

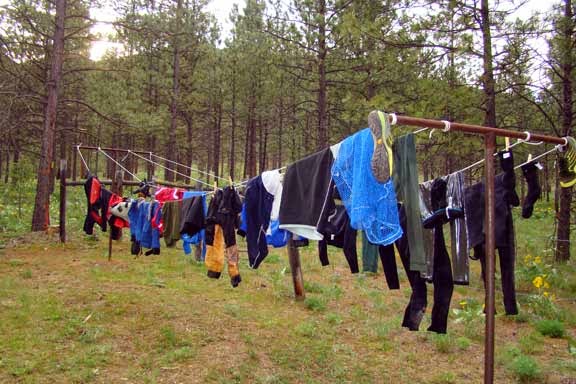
This picture is from way back in May 2013; it's all the MV guests' gear from the rafting trip. 

I love using the clothesline in the weeks between rainy season and smoke season and the one that came with the house has lots of room for lots of laundry, 4 lines about 24' long! But it was also kind of junky looking with its rusty posts and its drooping lines. I have pinned all kinds of pretty and clever clotheslines on pinterest, but the ones we have are plenty sturdy and stuck in cement footings. So... spray paint to the rescue! First I used a rust converter primer that I had on-hand, then this paint. It's just about the color of the most prevalent moss in our forest.


After the paint had dried a couple of days, I marked every 6" from the ground up to 4'. Then I tried to use delicate surface masking tape to mark the lines, but found it was pulling little bits of paint off, so I thought about it a bit and decided that our huge stash of toilet paper and paper towel tubes* could be put to use as stencils!

I am kind of surprised that we had 3 paper towel tubes; it takes us ages to go through a roll.


For the measurement marks I used the longer paper towel tubes. I marked & cut a larger strip for the foot marks and a smaller strip for the six inch marks, then split it up the back. Then I split 2 more to use to protect the adjacent areas against over spray.


I made sure the foot marks on the pole matched up with the larger strip on the stencil then taped the tube closed in the back. Then I added the other tubes, one above and one below before spraying the marks.


I waited a few minutes for the paint to dry then removed the tubes and did the same to the next foot mark until I'd done all four.

After all the measurement marks were up, I started making the number stencils. It was pretty much the same procedure but with drawn numbers on shorter toilet paper tubes.


I noticed that I needed a little help keeping some of the parts of the tubes around the cut out numbers stuck against the post, so rolled up tape to stick on the inside of the stencils where needed. I found the end and top of the foot lines thru the number stencil and tried to get them about 1/4" above. Then used my paper towel over spray tubes again above and below the number stencils.


And done! Now, I wish I'd had another color on-hand to paint the lines and numbers; something less harsh than the black, but also easy to see from a distance. Alas I did not and I didn't feel like buying more stuff to sit on the shelf.

I understand it's rare to get as much snow as this gauge is ready to measure, but heck, we could have a repeat of February 2014.


I still have to get new lines and install them, but I think that might wait until spring. I have just a few finishing touches on the woodshed to get done, plus many of those little things.

"PRO" TIP!


Don't get cocky and forget to make sure that there is no gap between your tubes! Or in my case, one of the over spray tubes was not taped tight against post. D'oh! Once it was dry, I used my masking tubes to cover the marks that were supposed to be there, then sprayed over it with the green. You can see the "patch," but it's good enough to dry the clothes and good enough to measure the snow so that's good enough for me.


*When set next to the homemade fire starters and stuffed with a bit of news paper, they are helpful for getting the fires in the wood stove going, so we save them.


Friday, August 21, 2015

Dogust Birthday: Betty Turns Five!

Betty turned five years old on Thursday, August 20! Her papa was out of town on beeswax, so she was treated to a solo performance by mama. What a lucky girl!


A friend from a Facebook group shared a recipe for "dog ice cream" so I decided to make pupcicles to celebrate! One of the pupcicles is the base for Betty's peanut-butter-supported carrot "candles."

RECIPE*
Add the following to a blender:
3 ripe bananas
1 cup peanut butter (make sure it does not contain xylitol, which can be deadly to dogs)
Blend until combined and at least mostly smooth. Pour into ice cube trays or moulds. Freeze.


I was lucky to have received this bone-shaped, silicone baking mould for Christmas and it worked great! I also had this silicone mould of sausage shapes because I couldn't resist it when I saw it.


Once the treats are completely frozen you can pop them out of the moulds, put them in a freezer-safe container and then back in the freezer.


HAPPY BIRTHDAY, BETTY!


Both of the Beastie Grrrlz love these cool treat on these hot Dogust days and I have to say that of all the dog treats I have made, there are the tastiest!

* Here are the changes I made:
I did a 2/3 batch because I had only 2 bananas in the freezer.
I mixed the ingredients in a bowl, using a fork to break up the banana as necessary. We use the blender for bulletproof coffee and I didn't feel like doing all the cleaning it would take to use it for the pupcicles.
Because of that my mix was thicker and I scooped it into the moulds with a spoon.
My 2/3 recipe made 15 bones, 8 sausages, and about a dozen regular ice cubes. I bet the original recipe would fill about 3 standard ice cube trays.


Thursday, August 13, 2015

Another Wedge of Lime


The saga of dealing with the lime in the well water continues. This time it was the increasingly spattering upstairs bathroom sink faucet. I couldn't set my classes on the vanity to wash my face w/o them getting all spattered with water and it could get you, albeit lightly, right in the crotch if conditions were just right... or just wrong.


I had been taught that plumbing parts such as the aerator were to be hand-tightened only, but this one was on there so good I thought the skinflint* former owners had managed to buy a faucet where it wasn't removable. Then I noticed that there were flat sides on it indicating a place for a wrench to grab. Eureka!

I also had a rag to protect the fixture from the wrench.

I grabbed the channel lock wrench, a Pyrex dish, good old white vinegar, a toothbrush used for household cleaning. Later I added the probe; you'll see why.

Oopsie! Apologies for the blurry shot, it's too late to take another. You can see the chunks of lime that fell out just from removing the aerator.
I added enough vinegar to the Pyrex bowl to cover the parts, then soaked them for a few minutes, then brushed off the thinner layer. Soaked again, then went after this guy with the probe. Soak, probe, soak, probe, until free of lime scale.


How did water get through there at all?


And finally they were clean!

I noticed those small bits on the edges of the gray piece as I was photographing, so picked them out with the probe real quick before reassembling.

Finally, I put it all back together and gave it a test run.


Works like new!


*I know that wasn't a nice thing to write, but I'm getting more and more frustrated with having to live with, clean up, and/or fix their cheap shortcuts, some of them dangerous and/or illegal. Sigh.