I'm really on a kick to make things with as much material that I already have around as I can. Not only does this mean I can make more things while spending less money at the same time it also means that I can feel justified in moving all the boxes of paint supplies and craft materials that I did, as well as reuse some stuff that we can't recycle or recycle easily here (which is everything). Besides, who doesn't like to get more for less?


And because it's a 3D prop, I finished the bottom as well. It's not especially interesting, but it is kind of funny because of the name of the feeder or the company that made. Yeah, not so perky when I was done with it. HA!


I'd seen some dollar store, mini skeletons made into fairy skeletons and decided that I wanted to make one, but when I hit the dollar store the only skeleton left was bigger than I was planning on by two or three times. I decided to give it a try, bought it, brought it home and stuck it in the craft pile studio.

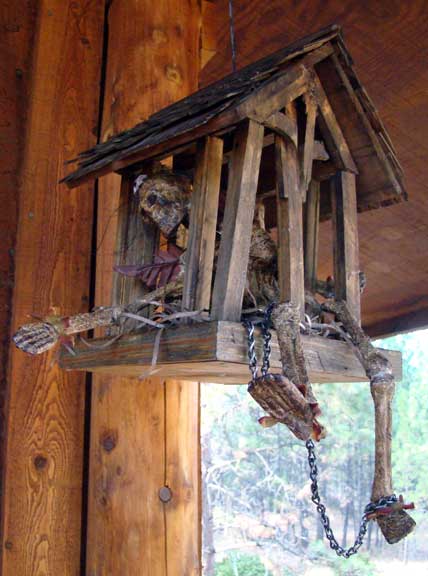
And then I found a broken, wooden bird feeder in the burn pile left by the former homeowners, probably the one that the bear had broken the week before we got here.

So, I did not clean it up, and I gave it a couple of "washes" of watered down craft paint on it in black and brown. I had thought that I was going to shore it up where it had come apart, but I didn't.

Then I took apart the skeleton. The neck, shoulders, wrists, hips and ankles were already articulated, but I had to cut the knees and elbows so I could bend them to suit my purposes.

Then I used watered down white glue to decoupage white tissue paper onto the "bones" to imitate mummified skin and let it dry. I left the balls of the articulated joints tissue-free, but covered all the holes.

Next I dry brushed on some Proceed Rough Irregular Texture (which is a professional decorative finish material) because I have it. You could probably get a similar effect by adding a little sand to craft paint.
 |
| You can see that I bridged the area between the rib cage and pelvis to make it look like the abdominal skin. Next time (if there is a next time) I'll put something in there first to look like shriveled organs. |
Next I painted the whole thing (including the non-tissue-covered ball joints) with ivory craft paint. The color didn't change the end effect much, but I wanted consistency in the surface absorbency before I added the glaze. This probably isn't necessary for a small Halloween prop, but I guess that's what years as a professional decorative painters does.
 |
| Pardon my glaze encrusted nails and skin. |
Next up 2 layers of glaze over the whole thing, one raw umber, the next Van Dyke hue, making sure to get extra in the eye sockets, "nostrils," and teeth of the skull. These were not craft paints, but more Proceed brand colorants in their Full-bodied Glazing Medium. Again, a similar effect would be achieved with craft paint and extender or blending medium and they would probably dry faster.

After locating the tissue-covered holes, I punctured them with the tip of a ball-point pen. The articulated pieces went back together then, but joints I'd cut took a few more steps.

Next I really get into the scrounging around the property for stuff that the former owners left behind. There is a small pile of BIG wire cut into 5-6' lengths. Who knows where or why, but it's there and I brought a length in to harvest the wire, which appears to be aluminum - so not the best for electrical purposes. But just fine for making mummified fairy knees and elbows. I used a utility knife to strip off a few inches of the cover then broke off individual wires for the *joints.

Next I figured out the angle I wanted the joints to be, then glued them in place in one of the bones of each pair and let that dry. I LOVE this glue, but I wish I'd used something that dried faster and harder not so much because the end result would have been different (although, it might have been), but because I didn't want to wait.
 |
| OK, OK, I purchased the Milk Duds, too, but not specifically for this project. |
When I had gone under the house to look for the mouse-in-a-trap I noticed that there were lots of little things on the ground that had fallen out of boxes that the last owners has stored there, including many pieces of silk flower arrangements - there were also lots of silk flowers around the yard stuck into hose guides and wire fences and such, so it's safe to say that one or more of them was into silk flowers. So I decided to go back under there with a bag to see what I could collect for this fairy. And if I happened to stumble upon some pioneer artifacts or bags of gold nuggets, all the better. I found plenty of good stuff, but none that good. So, while the joints were drying, I cleaned these ferns and leaves with watered down craft paint and dry brushed this galvanized chain (also found under the house) with black craft paint.
 |
| I don't know what those little glittery plastic bits are, but I decided to age them the same way as the leaves and use them as the base for the wings. |
Once the leaves were dry (which was way before the wire joints) I assembled them into wings and attached them to the back at the shoulder blades. The glittery plastic bits are essentially buried in there, but I think their presence helps the wings stand out a bit.

The chain had a hook on one end and I used it to make a loop around the trapped creature's neck while we both waited for the joints to dry. Soooo much waiting that I had time to distress some tiny flowers from under the house to make a "crown" as well as dig through my craft stash for the hair which is made from "Animal Whiskers/Moustaches des Animaux" glued to the skull

Finally I was able to glue the wired bones into the otherwise assembled skeleton, but because of dry time and wanting them to end up at a certain angle they had to be done just one or two at a time and propped up after the fairy was placed inside its cage.

While all that was happening I stained some excelsior that came in a package Eric received to make dirty-looking bedding for the cage. Again, watered down craft paint, brown and black and let it dry. Oy with the drying!

I decided that there needed to be something of interest on the opposite side of the cage; that's one of the fun challenges of making a 3D prop, making sure it looks right and cool from all angles. I decided a food dish could go there and that it could be made from a bottle cap. Guess what... more diluted craft paint and a black upholstery tack to attach it.
 |
| Again, please pardon the glaze encrusted nails and skin. |
I wanted to fill it, but didn't find any little doodads in my boxes to put in there. I had found a few small bones out by the chicken coop a week or so before, but I didn't think they'd show up well and thought I could find a better use for them later. Then I remembered that I had pinned a recipe for fake moss that used dryer lint and paint & I mixed some up. It wasn't going to make good moss** (I'd thought that I'd put some on cage's roof), but it would be fine for filling this food dish with unappetizing slop. Sadly the cage wood was too hard from me to push the tack into, so I drilled a hole, then glued it in place.

And in there somewhere I decided the fairy needed more decoration so I dug out more silk flowers, took them apart, stained them with watered down craft paint, and made wrist and ankle "wraps" out of them. For now I think it's complete! YES!
 |
| The other end of the neck chain is wrapped around the left ankle and secured with a super thin wire from a floral pick in my stash (not shown above). |
Congratulations and thank you if you've gotten this far, even if you just skimmed! Here are the shots of what my Mummified Fairy Prisoner prop looks like complete! There are still more photos that probably necessary, but dang it, I put a lot of thought and time into all the angles of viewing, so dang it, I'm sharing them.
 |
| The position was dictated by two things: 1) the prop would be hung form the ceiling so the focus should be looking down and 2) the skeleton I ended up buying was just too big for the cage and to see its head it would have to be positioned something like this. I think the size discrepancy adds to the torturous back story implied by the prop. |
 |
| Reaching out for help in its last moments; extra creepy and horrible. What is wrong with my imagination? |
 |
| The reason I put the creature at this end of the cage is because it was most damaged by the bear attack. With all the fussing of positioning the skeleton in there, the cage fell apart a little too much and I ended up gluing a few parts for stability. |
 |
| The creature wrapped its left arm around the cage to support itself as it reached out with the right. The hand on the wood post there is the only place that the skeleton is glued to the cage. |
 |
| The back of the creature as viewed though the bars of the cage. That cable is what holds the roof on to the bird feeder as well as makes the hanger. Because it is anchored in the floor of the bird feeder and runs through it, the feeder remained stable enough to make this even though it was broken up. |
 |
| The back is certainly not as interesting as the other sides, but adding this little bit seemed to really make a difference. |
And because it's a 3D prop, I finished the bottom as well. It's not especially interesting, but it is kind of funny because of the name of the feeder or the company that made. Yeah, not so perky when I was done with it. HA!

Since this wrapped up on September 8, I still have time for more Halloween crafting! MWAHAHAHAHAHAAAAAAA!
*From being around residential construction, carpenters, and woodworkers throughout my life I keep wanting to write "joins" rather than "joints."
**I didn't actually read the recipe before barging ahead. When it wasn't working, I thought, "maybe my lint has too much dog hair." But it turns out that I had left out 1/3 of the ingredients: the craft glue.
You have done well here.
ReplyDeleteThanks, B! Doing well and doing evil, that's my game. MWAHAHAHAHAAAAA!
DeleteLOVE it! It's going to go FAB with the graveyard. Your place is so perfect for a graveyard Halloween party that I wish we were having one. I can't wait to see what else you come up with it. Love that it was so cheap and it doesn't look it at all! Very creepy. I'm totes sharing this. People need to see this tortured sole.
ReplyDeleteThanks! We still have a few ceiling hooks left and I think I'm going to hang this one by the caged animated hand!
DeleteThing One would like you to know that "That is creepy as HELL! It gives me a shiver, and I've even seen how she made it!!!" I concur- nicely done! The boys are now demanding that we do something similar. :)
ReplyDeleteSUCCESS! ;) Thanks! You all are going to have fun making these! I hope you share when you're done.
DeleteWhat is wrong with you?! Now you'll have every fairy in the forest placing spells on you and your family. You better watch out!
ReplyDeleteVery well done. More sad than creepy, though.
Oh, I spoke with the Woodland Fairy Union Local 814 before I started and they were able to see the dark humor in it enough for the vote to go my way 15 to 4.
DeleteBRILLIANT!!!! Want one!!!!
ReplyDeleteAll you need is a $1 skelly and about 10 hours! ;)
ReplyDeleteCrazy, creepy cool! I've been meaning to get over here and read through all the details of the making of this lil lady, and I'm finally catching up on a few blogs tonight. Dang! She looks great, and by great I mean awesome and scary! I love that tissue technique, it really, really does look like old skin! You did a bang up job on the painting, too. Something that suprised me was her size, she's wee! I thought it was a near-life sized skelly, then I saw the box of Milk Duds and had to go back and look at everything again, wow - tiny! I must have thought somewhere in my minds eye that that bird feeder was the dog house size, lol... but that would be cool too! Oooh, oooh, haunted dog house! Haunted chicken coop! The possibilities are endless.
ReplyDeleteOh, man. If I could get life-sized skeletons for a buck, my closets would be FULL! And now I may have a use for the two dog houses the last owners left behind that our dogs are probably never going to use! Thanks, Lisa! And thanks for your compliments, too, doll.
ReplyDelete