Moving on to really getting the other side, i.e. the "fireside," of the room whipped into shape. Also, guess who has two thumbs and hinge screws... THIS GAL! [points thumbs at self]
 |
| One week ago. |
1. Paint wood stove and stovepipe.
Painting the wood stove went easily and quickly. I had fans in the front and back doors pointed in the direction of the back door to draw as many of the fumes as I could right out that door next to the stove. I wore a respirator, Delia went upstairs behind a door in a room with an open window, and Betty was at work with Eric. This product has a pretty quick evaporation/dry time* so by the time I cleaned up and took my respirator off it was pretty mild. Still Delia and I ran some quick errands just to let it keep airing out, then when we got home we did some fetching.
 |
| *Because of the quick dry time, there was no avoiding applicator marks. I chose to apply to a small area and then stipple it out rather than have brush marks. |
The result is pretty pleasing. The color we chose is "Metallic Charcoal" but I would describe it as looking more like graphite. I think it's going to look pretty sharp when we get those darn bricks grey-ified. Even though this project came a week later than anticipated, it might have been the perfect weather for it; outside air not to cold, but not so warm it was ridiculous to have a fire with the doors open. They say it could off-gas or smoke a bit for the first few fires, so it was necessary to waste the wood. And now that we see the color of the paint live and applied, we know we'll have to do something else with the rest of the stove pipe. Perhaps that is part of Phase 2.
2. Do something with the terrible brick veneer wood stove surround.
It took 3.75 tubes of the "mortar" to get all the cracks n' crevices filled. But I did get them filled and then I finally got those dirty, red, brick-bastards primed with two coats grey primer. YAHOO!
We are a couple weeks out from having the new shelf made and installed, but I sourced my kiln-dried, fir 4x4s at the local lumber yard, went back for them, then prepped and stained them. We're calling Renaissance Handyman Nick back for installation; he has the tools and the experience.
3. The flex-track light situation.
First, a small rant. It's great to get the email notifications when your item is shipped with tracking information and such. GREAT, I say! Some online retailers' emails say "your shipping label has been printed" and I LOVE THAT. Because if you tell me, "your order has been shipped" and then for
three days I see something like "your order is en route to the shipping company" or "shipping information has been received" it makes me worry. Where's my stuff? Is it lost? Did someone misplace it? What's going on? How about just an accurate statement, guy? If that is your real name.
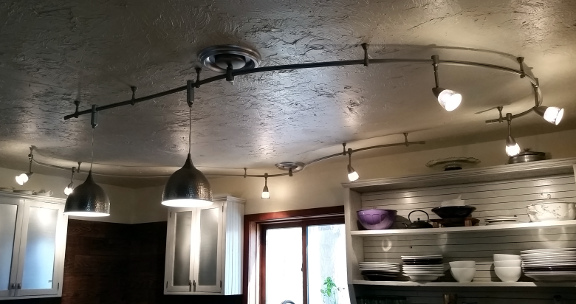
Second, the 2nd fixture arrived on Thursday, went up on Saturday, and we're digging it for the most part. I might decide to replace the halogen bulbs with LEDs, because I don't think I like the way these make the cabinet finish look. Plus, LEDs generate a lot less heat and therefore are more energy efficient.
4. Counter top leveling.
The counter has been level and in regular use for weeks. Maybe months, at this point.
EXTENUATING CIRCUMSTANCES
By leveling the counter from the high point, much of the counter is taller. The area on either side of the drop-in stove especially so. Taller than the adjustable feet will make the stove! Uh-oh. It turns out they don't just make appliance feet with longer bolts either... or at least not according to the appliance repair people I talked to. They also don't carry that kind of thing at hardware stores. I thought, "well, maybe I can find some pre-made wood furniture legs to paint" and after that I just let it slide while I worked on other things. THEN one day a couple weeks ago when I was poking around those little drawers of small bits at the local-est of our hardware stores, I found ELEVATOR BOLTS! I bought one to bring home to compare the size and threads to the stove's feet. THEY MATCH!
 |
| In the meantime, the stove has been sitting extra high. |
So I went back to get three more and this weekend Eric helped me hold up the stove/move out the 2x4s it has been resting on and install the elevator bolts. The feet aren't quite as suitable for wood floors as actual appliance feet in terms of sliding the stove in and out on them, so we used pieces of cardboard to move it and then pulled them out. It sure was nice to find a fix and for it to cost just $4.36 ($1.09 per foot).
We're really hoping to replace this elderly electric model with a new dual-fuel model in the next year or so. But that means getting a propane tank and trenching for the supply line, etcetera and so on, so it will wait. There
is something about new finishes on everything else that makes an old stove look older and shabbier, though.
5. HINGE SCREWS IN THE HOUSE!
ALL THE DOORS ARE ON ALL THE CABINETS! ALL OF THEM! Man, it makes a difference not to see inside the cupboards. Given all the planning and effort that went into modifying the upper cabinets to rid them of the glass fronts, you'd think we'd have realized this more viscerally, but we were even more relieved than we expected when the doors were back up
6. Install picture rail in hallway, etc.
The order arrived, I picked it up, sanded it, conditioned it, stained it, and varnished it.
 |
| Blurry photo actually used on the blog? YOU BET! |
It will probably going to be a couple weeks before I will dedicate time to getting it installed. So it goes.
The
original list of the order I thought the projects will happen.
Line through for complete items,
italics for additions. I'll let myself do partial
line throughs for partial completion, because it's good for my morale. And
brown-out for items moved to Phase II.
1. Light fixtures
2. Remove corner shelf in order to...
3. Remove wallpaper and repair walls (& ceiling) as necessary, get temp solution for backsplash
4. Paint walls above cabinets, around wood stove, paint laundry/bath hallway.
5. Cabinet repair, move, modify
6. Refinish cabinets
8. Level, repair, and refinish counter tops
11. New sink and faucet and the counter modifications that go with it.
10. Replace outlets, switches, plates in backsplash.
9. Install backsplash, probably tile
12. New refrigerator surface to replace old new refrigerator surface.
16. Replace light switch and plate in hallway.
14. Replace outlets, switches, plates by wood stove.
15. Paint wood stove and stovepipe.
7.
Maybe try to do something with that terrible brick veneer wood stove surround
and shelf?
13. Build a door of some sort for that too-big hole for the microwave & deal with the inside.
17. Install picture rail in hallway and that one wall behind the wood stove for now.


