Monday, April 24, 2017

One Step at a Time: The Bathroom Redo Edition. Volume 6B


Annnnnd we're back - to working on the main floor bathroom after several months rest. I wanted to get the cabinets & and shelving unit refinished by the end of April. Then finish a couple other smaller interior projects in May before moving on to outdoor projects and House Guest Season.

See how I left things back in August 2016 here. But below is what we started with when we first moved in.

Status before starting again: wallpaper down & walls painted; towel & TP holders replaced; cabinet pulls and knobs replaced; shower doors removed; window covering replaced (twice over); spider plant rehomed; switches, outlets and covers replaced; light fixture replaced (no before photo).

Originally, I was going to pickle the lot. Not a real lime pickle, but an acrylic version which is probably more steps and maybe more money - BUT I already had everything to do it, so kind of "free" and requiring less prep work. I had a recipe I came up with for some arm chairs I did for an upholstery and furniture design firm back in the day. Then we decided we kind of liked the look of the sanded down vanity, so I just varnished it.


Router details are all fun and games until you have to sand them down by hand. [deep, cleansing breath] And while doing so decided to replace the hinges on all of them. Luckily, I found some that better suited the new vibe and nickel-look of the new handles in the same type at a good price. I also added a moulding at the base just to give it a slightly more rustic look.


New hinges with the shadow of the old ones. I'm glad that my appreciation of wear and tear and the life of a piece also means easier and cheaper processes sometimes! Living in the woods in a 1970s house helps with accepting these "flaws," top. 
It seems that there was never a base shoe or quarter rouund on the toe kick, so I added a bit of moulding. Glazed it to blend (but not exactly match) with with sanded down cabinets, then varnished.
I had a quart of paint for the interior of the wall shelf (below) which was way more than I needed, but the least I could buy. So I decided to paint the sides of the drawers! It's a look I have always thought was clever and fun and I finally got to do it.

Part of this vanity revamp was fixing the bottom drawer which a couple years ago had come free of what had to be its second drawer slide hardware. WOO!

At that point, I figured I'd still pickle the rest. And the mismatch of the new moulding on the big cabinet seemed to require it. But the more I thought about it, the more I thought that if I could get a more even sanding on the side of the big cabinet and maybe glaze the moulding to blend it, I would like it better than the pickle finish. Also it would be faster - by far.

Apologies for the blurriness. It is what it is, folks!

Unfortunately the new hinges for this cabinet were back ordered. They're the same look at the new ones on the vanity, but they are the inset type. They're supposed to come in at the beginning of May. But that didn't stop me from putting the "seifles oN" embroidery back up! Now it is hung from the picture rail/crown I added to the top. This method worked out so well with the kitchen cabinets, I knew I wanted to do it again. There are a few seasonal decorations that go there and now I can customize their placement without adding additional nail holes to the cabinet.

I finally got to use some of this ridiculous picture hanging cord that I bought when I was getting a few different types for the kitchen decorations.


I also added a moulding at the base - the same profile as on the vanity and also glazed to blend with the wood of the cabinet.

I think this cabinet is a lot like Bigfoot - just naturally blurry, regardless of the photo.

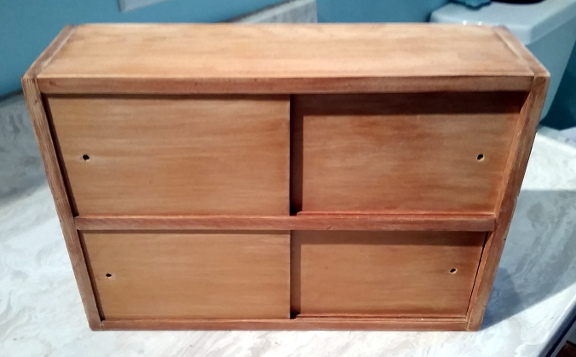
And let's not forget the shelving unit that was in the laundry room when we got here, was taken out within a couple of weeks, and has spent the years since in the shop... I sanded and attempted to strip that one!


The interior and back of the shelf had been painted a few times over the years and both sanding and stripping down to bear wood were just taking more time and materials than I felt like putting into this, so I sanded them down to stable, then primed and painted - Benjamin Moore 2071-50 (Amethyst Cream), semi-gloss finish.

Partly sanded, back still on.
I knew I'd want to put seasonal lighting in there and such and since there is actually an outlet on the wall below where this would be installed, I drilled 1.5" holes in all the horizontal surfaces to accommodate a power cords.

A view from the top. Three of the four holes are pretty much lined up, but the bottom one is deliberately off. That one has to avoid some of the stuff that makes the drawers slide straight and such.

The cute, little, antique-brass and porcelain knobs were just right - except for the brass. I mean, I liked the look of the white and brass together, but not in this room for this project at this time in my life. I hesitated to alter them, but I just couldn't get excited about buying new ones (let alone shopping for them) when these would be perfect with a quick paint job using paint I already had.


The quick paint job didn't work out. (of course?) I had two different satin sheen "silver" colored spray paint. But they both achieved the "satin" or "brushed" affect by being speckled/pointillist and that was unsatisfying. I was pondering the solution when I realized I had a sort of pewter-y nail polish in the cabinet! Worked great AND dried quickly.


Here is where I hit a snag. I wanted to do something extra for the back of the shelves and never could settle on a stencil or decorative paint finish, so I decided to use fabric that I had purchased before we moved - one that coordinates with the shower curtain border. When I went into my fabric stash to get it, discovered I didn't have nearly as much as I thought and also not enough. Luckily, the piece I had did have manufacturer information on the selvage! I found a couple of sellers on Ebay so ordered up a yard from Florida that would likely arrive on Saturday, April 22... annnnnnnd that ended up being one of those contact-Ebay-itself-for-a-refund situations. Sigh. So, on Friday, April 21, I ordered another yard from Arkansas that was shipped promptly and is due on Tuesday, April 25. Whew!

I also added this little cabinet near the shower. I had picked it up at a thrift store a while a back thinking it would become part of my growing Halloween apothecary, but when  I was trying to figure out a way to help Eric with his soap maintenance disability. We have different body washing product preferences these days and Eric just can't remember to replace his bar soap when it's getting down to a sliver. Then I remembered this little cutie, dug it out, and tested that it would fit some bars of soap. It did! This piece got the pickling treatment and new knobs (because it only came with three) and there she is! Soapfully, this will work out. [ducks to avoid thrown tomatoes]

After I stared sanding it. You can see it had a sort of warm, maple look.


The knobs I picked up at one of the big box stores are a little out-sized compared to some I found online, but they were right here, right now, and no shipping charges. And I admit there is something about their cartoony-ness that tickles me. I mean the whole notion of a wee cabinet next to the shower specifically for bars of soap, although totally practical, is kind of silly in the first place.

I had planned a photo with a door slid open to show the soap, but... it's time to replenish the back stock. So next time? Probably. Maybe

So much for finishing by the end of April. I was even ahead of schedule for a while there! The back ordered hinges and the overestimating the amount of material I had on hand for the back of the wall shelves backing, set me back. So, I'll start on May's projects and them come back to this when I can. Poop.


Downstairs Bathroom Redo Master List
1. Walls
   a. remove floral wallpaper & repair damage
   b. prime original wallpaper & skim coat
   c. prime skim coat and paint
   d. veneer plaster & topcoat
2. Ceiling
   a. skim out or remove popcorn texture
   b. remove some of the plant hooks?
   c. prime
   d. fun faux finish
3. Cabinetry
   a. sand & add moulding
   b. pickle - nope! went a different route
   c. replace pulls and knobs
   d. add reclaimed, refinished wall shelves
   e. add wee cabinet by shower
   f. paint interior of large storage cabinet
4. Tub/Shower
   a. remove and replace caulk
   b. add tile "backsplash" above
   c. remove doors
   d. replace shower curtain
5. Move hardware
   a. train rack over toilet
   b. hand towel bar
6. Floor
   Not sure, but must deal with wrecked stuff beneath tub/shower
7. Window covering
   a. tba
8. Decorations
   a. on walls
   b. in shelving unit + linens
   c. on big cabinet


Monday, April 17, 2017

Wildlife Watch X!!!

This is part of a group of seven that I counted in a neighbor's yard as I was driving down the mountain. Of course, I stopped the vehicle to get out my phone and take a photo.

It's been awhile since I've seen anything out of the ordinary around here. There are lots of squirrels and birds, even several sightings of bald eagles and other impressive specimens. There are always white-tail deer out and about, but lately there has been a group of 7 or 8 mule deer in the neighborhood! It had been a couple of years since either of us had seen them and even then they were not just loitering around like this.

These two are harder to see. I just happened to spot them out of the upstairs window when I was changing. It's not a great photo, but it is a pretty accurate representation of deer lying in the forest - the whole reason there are still deer is because they blend in.

I can't believe how close to our fence these two were, especially for laying down instead of browsing. They didn't let me get any closer than this before bounding off. I was kind of peeking around a tree and using the truck to steady my camera which I had zoomed in a bit. If you can't see them, the are just above the fence rail and on either side of that small fir tree, but back a ways.

Also, I spotted this massive beast while I went out to cut a few daffodils for a vase a few days ago.

Standard sized kitchen shears for scale.


Sunday, April 16, 2017

D-easter Egg Hunt!

Delia had her first egg hunt! That's right, I am one of those dog people and I embrace it. 


It was just one six-pack of plastic eggs that happen to have little air holes in them, each with a small aromatic treat or two. 


Delia knew that there were treats in that bag and she watched me "hide" them from the deck.


And they weren't hidden very thoroughly for the most part.


These are simply the three most photogenic of the six.

After dispersing them around the yard, her papa let her off the deck and joined us for The Hunt! 


She did a pretty good job once she realized that the treats were no longer in the bag, but her having watched me hide them didn't seem to effect her efficacy, if you know what I mean.


This was the hardest one for her to find and she went around and around before we pointed it out to her. It was the only one we helped her with and also the only one hidden above her head, so that probably had a lot to do with it.


She was so gentle with them, too! The first four she just poked with her snootle until one of us opened it up for her and gave her the treats. The last two she did pick up in her mouth, but very gently and offered them to one of us immediately.

I hope to make this a tradition... it was so dang cute!

THANKS EASTER BUNNY! [brock! brock!]


Friday, April 14, 2017

Whose Nest Is This, Anyway?

Guess what I found IN THE HOUSE. That's right, what appears to have been the winter homes of a couple of h*ckin' wasps! Every year, starting in late February or early March we will find a few slow and clumsy wasps in the house. I think we're at about 6 so far this year. Neither of us are the type to just kill all the bugs we come upon, but wasps in the house... well, they're asking for it. Besides, I heard once that the wasps you find out in late winter or early spring are queens* looking to establish a hive and I ain't havin' a freaking wasp nest in my house!


*I did not verify this and I'll kill them even if they're just simple commoners. NO MERCY.


Friday, April 7, 2017

Craft Slump: Is It Over?

I have had a rough run of crafting and home project struggles. Maybe the tee shirt quilt was the turning point. I sure hope so.


We've been without real snow-on-the-ground for a few weeks now, maybe even a month, and Spring officially sprung about two weeks ago, so it is definitely past time for replacing the door decor. I looked at my pins and then poked around for more wreath pins and found one that I thought would work well for us. And I thought I had most of the materials on hand.

Photo from less-than-perfect Life of Bliss

I had bought a couple of large embroidery hoops at thrift stores for another, up coming non-embroidery project, but only found one-and-a-half of them. That other half is what I was going to use. I am really trying to use only materials from stash to make things like this so I really didn't want to buy another, in particular I didn't want to buy a brand new one and of course finding one at a thrift store is touch and go. Sooooooo, I went back to the pinterest board (like drawing board, only I can't draw... see?) & saw some completely different things, saw some nice things for other times, & then got to thinking about the small stash of wreath forms I have rescued from old wreaths, etc.

That's right, I chose to grab a pic of these on the deck rug with exactly the kinds of forest detritus one would expect to find on the rug on a deck of a house in the forest. Now, I gave it a shake, but this was the best i was going to get without involving a vacuum or at least a broom and I just had too many other things to do. 

TA DA! I had copper spray paint, two sizes of wire wreath forms, some faux greenery (the one thing I bought for this project), paperboard, paper, exterior Mod Podge, embroidery floss, wire, etc. and so forth. Easy enough to spray paint the wreath forms then cut apart and attach the plastic plant pieces to the painted forms.

That's right, this photo is taken on the side of the house, because the lighting was decent enough. Also, I probably could'be done with with the photo above, but didn't think of it. So there! 

Now, affirmations and such aren't really my thing. Nothing wrong with them, they're just usually not a touchstone for me. Same for "word decor" most of the time. Super cute in lots of places, but usually the words available don't speak to me, so to... uh... speak. This even more so for Eric. In fact, I'm pretty sure he'd be insufferable if I put something like "happy" on our front door. So what was I gunna do? Oh, I know! Something a little obscure and more than a little sassy! Now that's our style.

When thinking about spring-y words and ideas, I remembered "vernal." This totally jibes with my preference for "autumn" over fall - as they are both associated with the equinoxes. YEY!

I just found a suitable font online, installed it, typed it in 260 point using an open source word processing program, transferred it to paperboard with carbon-less paper, painstakingly cut it out with many brand name craft knife blades, then decoupaged scrapbook paper to it with exterior grade Mod Podge. A mere 12,600 seconds later I had my sassy phrase*. I had the birds already in my vast and impressive stash

Hopefully next month it will be warm & dry enough for me to prime and paint that door jamb to match the door and moulding.

At this time of year no one is really using the balcony door, but it is visible and it gives me some satisfaction to coordinate it to the front door directly below it. I already had the bird silhouettes AND there are two different bird nesting "vessels" on that balcony that have been used every year, so it seems appropriate to use them.


My wreaths aren't really at all the vibe of what I initially set out for, but I think they suit us, our house, and my strange urge to hang stuff on our doors even though we never have people over and aren't expecting house guests until Summer. I do still really like that inspiration piece, though, so maybe I'll keep my eyes peeled for another embroidery hoop when I'm at the thrifts. Hmmmmmm.

Some details, because if there is one thing I am all about, it's the details.

Just look at these cute plaid birdies! I just love plaids, checks, and tartans, so it was nice to get a chance to use them around the house. And so nice to find some that aren't mostly red.

Because our doors have mullioned half-lights the backside of anything we hang on them is visible from inside the house. So I also decoupaged the back of the birds and the words. I used a green gingham paper for that.


*ver-nal: adjective of, in, or appropriate to spring
AF: (look it up)

~~~~~~~~~~~~~~~~~~~~~~~~~~~~

The creepy couple faux chocolate jackalopes are still incomplete.

The mini-diorama of Dr Morrison Hedwith's Basement Alchemical Laboratory was successful, for the most part, but it was indeed a bit of a struggle. And hey! It was selected to be a Featured Project for half of April on Craftster! This means ALL the mini dioramas of Dr Hedwith's lab ever made to this point have been Featured Projects! Check out Deanna's here.

I have finally started back to work on the downstairs bathroom redecorating. I really hope to have all the cabinetry and the "new" shelf-thingy done by the end of April. The initial parts of this phase are somewhat dependent on weather as I am sanding the cabinets and whatever I can take outside to sand, I will.


Wednesday, April 5, 2017

Dr Potter's Medicine Show - More SheFANigans!


Dr Hedwith's laboratory work table, all told the table and contents are about 3" tall.

Until this piece, it was all about the titular Dr Alexander Potter. This is all about the diabolical and Certified POS, Dr Morrison Hedwith, the creator of the Chock-a-saw Sagwa Tonic... and the other tonic. I bring you a mini diorama of Dr Hedwith's basement laboratory circa 1878 in Portland, Oregon.


Alchemical ingredients and books on shelves, lab equipment on a sturdy and well-worn work table. Lab equipment, rats, horror - all housed underground.

There is a scene in which a frustrated and enraged Dr Hedwith throws a bottle against the wall and it breaks. The light stain and the broken "glass" represent that.


The bookend is made from a vintage celluloid charm that I painted with brass metallic paint and then mounted on a tiny bit of wood stained ebony. The books are made from leather-like papers over foam core board.

Best not to think about what or who was chained to the wall in that basement, let alone what that red stain is.
Dr and Mrs Hedwith live upstairs from the the lab in a fairly lavish home for the time. There is a scene where the doctor spills his nightly brandy after losing control of his failing body. His manservant fusses a bit over the stain in the rug. I added a dimple in the rug, left by the foot of his chair, after the servant moved it to attend to the spill.


For some reason I felt compelled to make this diorama a 360 degree affair. So the exterior is supposed to represent a view from the sidewalk.


I did a tiny bit of research and found that the sidewalks of the day in Portland were raised wooden boardwalks. This gave me a place for mud and discarded rubbish.

I found scans old Oregon newspapers online and printed up a period-ish front page of The Oregonian and of course, had to use this Potter's Whiskey bottle I picked up last autumn.

I also found a late 1870s front page of the Hillsboro Argus - a fun shout out to my hometown which is only about 20 miles west of Portland. Then I made a crushed tin can to go with.

Dr Hedwith also operates a small shop where he sells the standard Chock-a-saw Sagwa Tonic above his lab, so I added this sign which is made from a scaled-down version of the label I made for the Sagwa bottles for the photo shoot last December.


I worked on this off and on for about 2 months. Fandom doesn't really come naturally to me and I only have a tiny bit of experience with miniatures. Hence, I took quite a few photos and I am going to show them to whoever will look. You lucky so-and-sos!

This shows how light comes in through the basement window.

This shows the light from the window casting on the work table - before I made and installed the candlestick.

I made the table top scarred with burns and water damage, but most of it is covered by the lab equipment and notes.

With a ruler to help show scale.

Before adding the base, I "signed" and "titled" it under the boardwalk. I did this back when I thought I'd finish in February. What a rube!
The mortar and pestle I made with a penny for scale. After the photo, I painted in the inside of it to look well-used and stained.

The glass (yes, real glass) brandy snifter that I did not make. I did dig around for over an hour trying to find something to make one with, but ended up buying this online. My friend, Janet, helped me hunt it down!

I am not sure how many more DPMS projects I will take on, but I have started collecting images and inspirations for The Trials of Solomon Parker which is due out in October 2017!