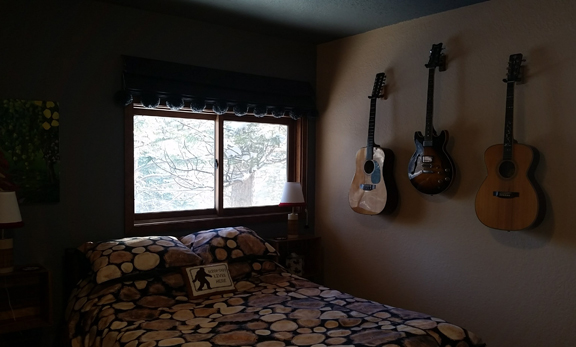
But before we get to the paint, let's talk window shades.
This project was more of a stash buster: the grey fabric is left over flannel from making the back of the duvet set - which was originally a queen sheet set. I guess I never posted about that project specifically, but a photo of the duvet set can be seen in the post about the bedside tables I made last spring. As with the shelf-backers project, I had to buy fusible interfacing to stabilize the flannel so it would hang nicely and be easier to work with.

The back is black-out liner I was given back when we lived in Portland; the same batch I used for the first set of blinds for the guest room. I also had all the roman shade hardware except the cleat in my stash. Aw, yeah!
Entirely plain shades did not sit will with me, but adding a color to them didn't either. While poking around on the internet looking at all kinds of window blinds trim I came upon giant pompon trim on an ottoman and became immediately smitten. Now here is my little bit of ridiculous! I picked up some yarn to coordinate with the flannel on sale + coupon. I already had the pompon makers.
I also already had all the little hardware bits for the shades themselves (rings, screw eyes, cleats, cord pulls). Originally I imagined cast iron cleats and did not want to use the clear plastic ones I had, but I really like the feeling I get when I use what I have and since the cord management isn't a design statement in this case, I decided to stick with the clear plastic. I also wasn't excited about the white plastic cord pulls, so I dug around in my "non-paper ephemera" and bead stashes until I found these funny plastic bowler hats that come on Broker's Gin bottles!
I know it's counter to just about everyone else's love of Light & Bright, but both Eric and I prefer Dark & Serene. That inclination combined with the colors in the duvet set, lead to me being sort of obsessed with dark grey. Not for the walls, but... for the ceiling! After deciding on the window shades, I wanted to do the window wall, too. Of course, we didn't have this paint on hand, so we had to purchase it. It was easily the most costly part of this whole project... which says something about our (by which I mean MY*) skills at thriftiness, because DIY painting is widely considered one of the least costly ways to update a room.
While I was at it, I chose a new color for the rest of the walls. It coordinates better with the duvet and new shelf backers better... and I think it looks better with Eric's guitars, too. That said, it's not so different that any return guests will likely notice, but I feel better about it.
Anyone who knows me from my decorative painting contractor days knows how I feel about outlets and switches; I hate the "look at my white rectangle" vibe that can happen when applying dark or bright colors and finishes to walls. Sure, I'm just-painting this room, but when I had worked with clients and designers to come up with fancy finishes in just the right tones and shades, it was a big old bummer to have the distraction of white/ivory/almond rectangles popping out at every switch and outlet. Soooooo, I was not going to have the old ivory outlet on my new dark grey wall, even if it's practically behind the bed & under the bedside "table." We decided to go for it and put in an outlet with USB ports so our guests can charge their devices conveniently. And while I was at it, I went ahead and got the screwless cover. And while I was at that, I went ahead and got replacements for the other two outlets and the two switches and all the covers in there, too. Not as much for color, but for my preferred styles of outlets and switches and also so I could get the screwless covers. These are small changes that probably hardly anyone else cares about or even notices, but I care and notice. Because I can install them myself, they aren't that big of an expense - except the USB outlet which was very close to half the cost of updating/upgrading these.
As is typical with me, I added another while-I'm-at-it part to the painting project: cleaning off all the slop and spatter "applied" by prior painters to the mouldings and even the baseboard heater. Sigh + eye roll. Luckily, all the past paints were latex and removable with some denatured alcohol which I happened to have on hand. Luckily, it only added about an hour to this project to get clean up the mouldings. I still have to do some thinking and testing on dealing with the baseboard heater.
_______________________________________
I had masking materials, drop clothes, roller covers, paint brushes, etc. I did need to replace my roller frame and buy paint. I also had most of the materials for the roman shade.
OUT OF POCKET COSTS:
PAINT
$ 93.00 - 2 gallons of paint
$ 7.45 - roller frame
$100.45
WINDOW SHADES
$ 14.93 - fusible interfacing
$ 3.61 - 1x3 MDF
$ 2.88 - screen moulding
$ 11.98 - yarn
$ 33.40
ELECTRICAL
$ 55.29
________________________________________
I have just a one more - hopefully simpler - project before I take another break from gussying the guest room and hopefully it will be completed and shared within a few weeks. After that, all that's left in here that is not just details is removing the awful, blue carpet. This blue had its day, but that day was decades ago... and let's face it, any broadloom carpet that is decades old is probably awful in one way or another. New flooring that room is not in the cards right now since we want to do all or most of the second floor with the same material. Either we'll live with it or do something advanced-half-ass. Let's call it "three-quarter-ass."
*Eric is plenty thrifty. PLENTY. But these kinds of purchases and DIY skills are not in his wheel house.


