Friday, April 29, 2016

Our Secret Celebration FINALLY Revealed!

THE SET UP

We had a little reason to celebrate awhile back, so I decorated the house real quick while Eric was at work...

Mavis doing a little Carol Channing thing.
The chandelier over the dining table.
Ramon feeling all fiesta!
No better place for this elaborate tissue banner than on a pre-existing nail by the pantry doors.
New head-on-a-wall family member, Dale the Jackalope!

THE REVEAL

A few years ago and after some years, Eric came back to writing, or "typing" as it is called in our house. Then he took the big leap of sending unsolicited manuscripts to literary agents. It was the usual story, until April 2015 when he signed with Jennie Goloboy at Red Sofa Literary. WOO! After some edits and such, Jennie started sending his manuscript out to editors at potential publishers and in December he received word that one of those editors was interested! Then he (we) waited patiently-not-patiently to hear back... and the he did! WOO! Angry Robot offered a two-book deal! Expect to hear a lot more about it as the estimated February and November 2017 release dates get close. Wheeeee!


And then came more waiting for contract negotiations and actual contracts and snail mail - yes, really. Finally in mid-March 2016 the contract arrived, he signed it, and mailed it off - yes, really in the mail.


And then more waiting for the contracts to arrive in England and Angry Robot and Red Sofa to make the official announcements. OMG, THE WAITING!


And now I FINALLY get to post here about it! And blab around to all and sundry! And make a fuss on Facebook! And post pics on my Instagram! And more importantly, point you all towards Eric Scott Fischl, Author's various social media presences and ask that you follow, like, add, and SHARE, pretty, pretty please.

Website: verbadverb.com
Twitter: @eric_fischl
Facebook
Pinterest

He's using his middle name, because of the famous artist Eric Fischl getting all the SEO already. D'oh!

Thursday, April 28, 2016

Magic Bottle Cap Catcher!

While there are still parts of the kitchen remodeling project to complete (and start), we are at the point where I am able to start reinstalling and adding some of the fun stuff. Talk about a morale booster!

Eric pointed out how the bear looks like a boar from the side and now I can't un-see it. And you can't either.

I've wanted to have something like this for ages and finally figured out that I actually could! Awhile back I gave Eric this bear head, wall mount bottle opener and we installed it in the kitchen on the cabinet that encloses the refrigerator. I took it down to refinish the cabinets and while I was going about the project, I realized how I could make this work for us.

So yeah, I haven't primed and painted the whole cavity where the fridge goes. Trust me, that's not what I want. But as I was workign in there, I realized I was getting low on materials so I decided wait until I had finished the rest to do this. I mean, it's not like anyone is going to see inside the fridge cavity, right? Unless I post pictures on the internet, that is.

I used a 1-1/2" Forstner bit in the drill to remove a spot to house a neodymium magnet (1-1/2" diameter x 1/2" thick) on the backside of the cabinet - the side the fridge sits in. The hole is about 5/8" deep and I used the plastic ring that came with the magnet and some plastic plumbing strap to hold the magnet in and to add a little bit of something between the super strong magnet and refrigerator. I don't know how much difference this makes to the attraction to the refrigerator, but it made me feel more comfortable. The magnet is centered about 6" below the bottom screw on the bottle opener.

You can't even tell there's anything special going on from the outside!


Since bottle caps have sharp edges and I just spent a whole lot of time refinishing these cabinets, I added this thin wooden plaque under the bear to protect the paint job. It's a cheapie from the craft store that I stained and varnished.

Check out the action!


I looked up a few different tutorials online and from those put together what I thought would work for us. They boil down to the following:

A big, strong magnet (mine has about 80 pounds of force) mounted behind a minimum of wood (in my case about 5/16") not too far below the opener (mine is ~ 6"). Read all the warnings associated with these magnets and follow them to avoid injuring yourself, others, and your stuff - including the magnets.

PS I just noticed that in my excitement to get this done and test it out, I didn't even match up the screw heads! That is not like me at all. For decorative stuff, I always have them all going the same direction, usually a particular direction. Rest assured, friends, that I am getting up to fix that right now.


Tuesday, April 26, 2016

One Step at a Time: Kitchen Edition, Lights at Ends of Tunnels

When you live in the woods on the side of a mountain and are 30-45 minutes from most of your retail options and then those are limited by the fact that you live in a state that has fewer people than a not-especially-large metropolitan area, projects sometimes things take longer.

One week ago.

Three weeks ago.


1. Refinishing the cabinets.

I am down to a few parts and sections. It's a little slow going as we have limited space for working on the doors and drawers. The last sections of carcass adjoin the backsplash which I want to have grouted and sealed before I glaze and varnish. I did manage to get the rest of the carcass glazed on Sunday afternoon!

That hole there is the result of poor planning on someone or many someones' part: no outlet on this section of counter. That hole allows access to the outlet behind the refrigerator. This is where our toaster oven lives.

EXTENUATING CIRCUMSTANCES

Just a few hours after I typed the last information into that last post I was still waiting for my hinge screws, then I got the call that they were in! Well, half of them anyway. At least I was able to get a few sets of doors back in their rightful places.

ETC.

Annnnnnd, I got to start a special cabinet-related bonus project over the weekend! It's a secret until it's done, but I will give you an vague hint: Forstner Bit.

2. Installing the backsplash.


After doing a small color test of the grout with the tile to verify that they would work together, I was able to get that backsplash grouted! Which means we were able to put the stove back in place (for now)! YEY for the work area being back to easy and convenient! BUT I also realized that this grout is not the kind of grout I am used to and I needed to get another product so that I could ensure that I could get the extra grout off of the tiles. Since I driving to Missoula and back is a 60-80 minute round trip, sometimes steps are postponed a few days until the next scheduled trip... this was the case with the grout.


Now there's nothing left but the crying. And by "crying," I mean "caulking the bottom along the counter." I'll shop for dark brown kitchen and bath caulk when I'm in Missoula next week.


3. Replace outlets and switches.


B'bye wallpapered plates!

Once the backsplash was grouted and cured, I was able to install the plates. Like I did in the dining and living room, I decided to use the screwless covers. Unlike the other rooms, I chose brown to blend with the backsplash. Because the tile is more of a matte finish and the plates are shiny, I used #1 steel wool to scuff and dull the plates. I might have another go with finer steel wool in hopes of making them even more dull.

Wait. What's that? A GFCI in the kitchen within a few feet of the sink? Here in the Bitterroot? Who'da thunk.


B. Unrelated to the kitchen project.

Helping Papa keep an eye on the burn piles.

Betty is doing well with the chemotherapy. Because her tumor is benign, this does mean that her treatment is palliative and not curative. She's feeling well and living large and we're going to treasure all the time she has with us that is time that is good for her.

There is just something so great about rolling on the ground on a warm, spring day.

The original list of the order I thought the projects will happen. Line through for complete items, italics for additions. I'll let myself do partial line throughs for partial completion, because it's good for my morale.

1. Light fixtures
2. Remove corner shelf in order to...
3. Remove wallpaper and repair walls (& ceiling) as necessary, get temp solution for backsplash
4. Paint walls above cabinets, around wood stove, paint laundry/bath hallway.
5. Cabinet repair, move, modify
6. Refinish cabinets
8. Level, repair, and refinish counter tops
11. New sink and faucet and the counter modifications that go with it.
10. Replace outlets, switches, plates in backsplash.
9. Install backsplash, probably tile
7. Maybe try to do something with that terrible brick veneer wood stove surround?
12. New refrigerator surface to replace old new refrigerator surface.
13. Build a door of some sort for that too-big hole for the microwave & deal with the inside.
14. Replace outlets, switches, plates by wood stove.


Thursday, April 21, 2016

Other Projects at the Vast Mountain Estate (VME)

While I am entering Week 12 of the kitchen remodel, Eric has spent time the last few weekends dealing with the pine needles and cones* in the yard. First raking them into piles and then performing the first burning this weekend!

Of course, Betty decided to run through one of the piles, stop in it, then squeal and run. Eric caught her and I ran out with a ice pack and within 6 minutes she was barking insistently for her papa to kick a pine cone for her to chase.

This time of year we see lots of smokey piles around as people are trying to get their yards and properties cleaned up before burning closes for summer. We've got a just few weeks in spring and a few weeks in autumn when open fires are permitted.


Eric has also spent the last few weekends exploring all the options and benefits of his new Weber gas grill! I have spent those same weekends enjoying delicious grilled dinners. And we've been lucky that at least two of the last three weekends have had eat-al-afresco weather!

Even pizza!


* Oh yeah, and some dog poop. There's definitely some dog poop in those piles.


Tuesday, April 19, 2016

One Step at a Time: Kitchen Edition, Counter Productive

Big doin's this week, y'all! We finally finished numbers 8 and 11 on the original list! And have kept at it on number 6 and begun number 9.


Yesterday

Two weeks ago


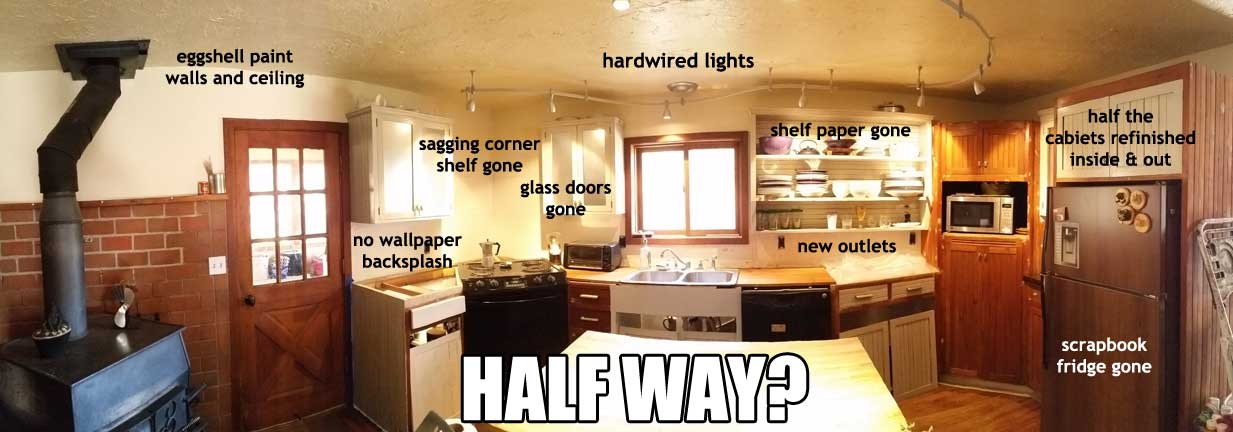
Three and a half years ago... not much different than 10 or 11 weeks ago.


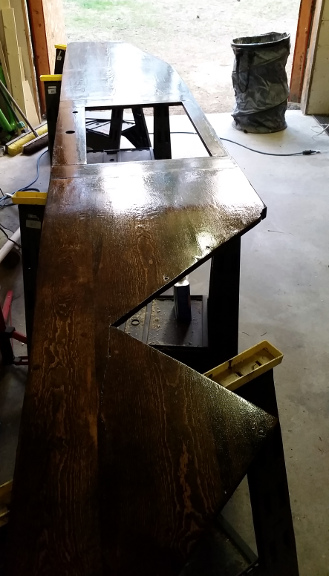
1. Refinishing the counter.

That's right, folks! The everlovin' counter is refinished and reinstalled! HOT DAMN!


Look at 'er dark shininess! Hoo boy! EXCLAMATION POINT.

2. Replacing the sink and faucet.

Boy howdy! Is that one sexay sink or what? You didn't even know there was such as thing as a sexay kitchen sink, did you? Well, now you do because you've laid your eyes on this baby!


And here she is with the wire racks she came with installed. So cute!


You guys. Seriously. We can put deep pots and buckets and such just right in there! Without moving around the faucet and swooping in at an angle or anything. This sink is so deep - 9" verses the last sink's 6", so luxurious, so... swoooooooon. And I just want to say here that I have been super impressed with the Vigo sink AND faucet from the moment I started unwrapping the very thorough and well-designed packaging. They're both so heavy and well-made with thoughtful and thorough design details. Sigh.


And look at this genius drain basket thingy! It will not just accidently seat into the drain and start filling up your sink with crumb-filled water! You have to actively push it down to stop the drain. I have always ended up either putting the basket in the cupboard, putting it in the drain upside down, or taking it half apart so it would not plug the drain and thought "Do people even use these things? There has got to be a better way!" Well there is and now I have it!

3. Refinishing the cabinets.

Yup, just keepin' on keepin' on with this part for the last couple of weeks. I completed the addition of the crown moulding on the last two sections, got lots more painted, some bit less than that glazed and varnished. Part of what I completed was a section I had kind of forgotten about... the toe kick areas. But it's done now and is there all kinds of dog hair imbibed in it? You bet there is! Feels good and now that the counter is on and lookin' so good, I have a new fire under my butt to get the the finish line.


We added a hook to the end of the cabinets by the mudroom door. Eric now hangs his work bag here - instead of the door knob.


EXTENUATING CIRCUMSTANCES

Like so many screws around this place, many-to-most of the hinge screws for the cabinet doors had stripped heads. So I went to get new ones... like 120 new ones. Of course that was way more than they had in those little drawers at the hardware store and way too much to pay at that rate, so they special ordered boxes of them for me. Like 5 weeks ago. It took 2 weeks to get them and they were the wrong size. Then they ordered the right size and as of this writing I am still waiting. I bought a few to get the uppers' doors back on way back when, but now I'm stashing completed doors all over the kitchen and living room. Ultimately, it's not a huge deal, but I think having those reinstalled would go a long, long way towards minimizing the chaos surrounding this project which is one of the most frustrating parts. Not to mention keeping the sawdust and dog hair out of the cabinets.


ETC.

The rest of the exteriors of the cabinets were primed and painted with 2 coats since these photos were taken on Wednesday morning. The push is really on so I can get that tile backsplash installed!

4. Installing the backsplash.

I picked up the tile, mastic, grout, etc. on Tuesday! I was going to rent a tile saw, but Renaissance Handyman Nick has one he offered to lend me. YAHOO!


I wanted to get the cabinet that will adjoin the backsplash at least primed and painted as well as the lower parts of the carcass completed and a good ways towards cured before I get to that, so I busted my bum on that so I could spend the weekend installing tiles!

This little section of backsplash by the fridge went pretty quickly with just a few straight cuts.

On Saturday, I got the first course laid above the entire main counter area and up to the bottom of the upper cabinets on either side of the stove.

If the first 51 individual pieces of tile installed, only 8 did not need cutting. If you've ever installed tile, you know that cutting is the most time consuming part - so a mere 40 square feet or so took me about 9 or 10 hours over to days. I guess that's what you get when you use bigger tiles to do a backsplash. I hope that the large tiles have the opposite effect on grouting time.

What's a little bit more faux bois going to hurt?

B. Unrelated to the kitchen remodeling project.


Betty completed the first week of her chemotherapy. The Thursday ultrasound of her chest showed The the fluid associated with the tumor is gone and that while the tumor is the same size, there might be more craters in it. So she has her second round of IV chemotherapy and is continuing with the prednisone at the original dosage. Her breathing has improved a lot, her attitude has stayed good, her chemotherapy-related toots have diminished; and we're working on keeping all the water dishes fresh & full and keeping her weight on. That story.

An example of why we and they can't have nice things.


The original list of the order I thought the projects will happen. Line through for complete items, italics for additions. I'll let myself do partial line throughs for partial completion, because it's good for my morale.

1. Light fixtures
2. Remove corner shelf in order to...
3. Remove wallpaper and repair walls (& ceiling) as necessary, get temp solution for backsplash
4. Paint walls above cabinets, around wood stove, paint laundry/bath hallway.
5. Cabinet repair, move, modify
6. Refinish cabinets
8. Level, repair, and refinish counter tops
11. New sink and faucet and the counter modifications that go with it.
10. Replace outlets, switches, plates.
9. Install backsplash, probably tile
7. Maybe try to do something with that terrible brick veneer wood stove surround?
12. New refrigerator surface to replace old new refrigerator surface.
13. Build a door of some sort for that too-big hole for the microwave & deal with the inside.

Tuesday, April 12, 2016

One Step at a Time: Kitchen Edition, More of the Same

Clean, fill, sand, prime, paint, paint, glaze, varnish, varnish, varnish, varnish. Repeat. 

One week ago.


1. Refinishing the cabinets & counter.

This week's work was cabinets, cabinets, cabinets and keeping the shop environment good for curing the counter top finish. Not super photogenic or exciting. Perhaps next week there will be some stunning photos.

ETC

I think Eric and I figured out our plan of attack for making the refrigerator look nice with the new cabinet and counter finishes (see number 12, below) Stay tuned for that!


B. Unrelated to the kitchen remodeling project.

We were singing spring carols here.

We also got some sad news about our dear Betty. The short story is that she has a large-ish benign mass in her chest (thymoma). While there is no cure, one treatment is the same prednisone + chemo treatment that a dog with lymphoma would get. The treatment doesn't leave her feeling poorly and, in fact, has helped her breathing and appetite, so that's what we're going with as long as it helps her and she can maintain her high quality of life. Various appointments and errands associated with this as well as re-implementing the "life is short, play with your dog" policy has taken some time from the kitchen project and that's just fine with us.

Just a couple hours after her first IV chemo treatment - hence the bandage, Betty insisted on fetch-as-usual.


The original list of the order I thought the projects will happen. Line through for complete items, italics for additions. I'll let myself do partial line throughs for partial completion, because it's good for my morale.

1. Light fixtures
2. Remove corner shelf in order to...
3. Remove wallpaper and repair walls (& ceiling) as necessary, get temp solution for backsplash
4. Paint walls above cabinets, around wood stove, paint laundry/bath hallway.
5. Cabinet repair, move, modify
6. Refinish cabinets
8. Level, repair, and refinish counter tops
11. New sink and faucet and the counter modifications that go with it.
10. Replace outlets, switches, plates.
9. Install backsplash, probably tile
7. Maybe try to do something with that terrible brick veneer wood stove surround?
12. New refrigerator surface to replace old new refrigerator surface.


Tuesday, April 5, 2016

One Step at a Time: Kitchen Edition, Holding Steady

And now we have come to the part where I just do the same thing to different, but similar, pieces of the kitchen day after day.

Not to mention the addition of the kitchen island!


1. Refinishing the counter top.

Every night I add a coat of the Waterlox, then crack open the shop doors and run two fans to increase air flow. Every morning I make a fire in the shop's wood stove, close the doors, and keep one fan going to bring up the heat while keeping up some air flow.


BONUS

Renaissance Handyman Nick has put together a temporary sink solution for us! He used the same re-purposed boards that we used for the "temporary, partial counter top". YAHOO! It is SOOOOO nice to wash the dishes in the kitchen sink and have the dishwasher back in operation.


2. Refinishing the cabinets.

I keep plodding away. I am doing the interiors, too, which adds quite a bit to the time frame, but makes the cabinets feel so fresh and clean. Not to mention the much lighter color bounces more light around inside making it a little easier to see what all has migrated to the very back corners.

Emptied of our things and with blue floral shelf paper removed. Apologies for the blurriness... I didn't realize until I'd already primed it and it as too late for another before shot.


It's surprisingly satisfying to put our things back into completed drawers and cabinets. These are the first two completed drawers: flatware and serving utensils. Painted inside and with new contact paper in the bottom. I hadn't planned on it, but I had to get a photo because it made me so happy.


The original list of the order I thought the projects will happen. Line through for complete items, italics for additions. I'll let myself do partial line throughs for partial completion, because it's good for my morale.

1. Light fixtures
2. Remove corner shelf in order to...
3. Remove wallpaper and repair walls (& ceiling) as necessary, get temp solution for backsplash
4. Paint walls above cabinets, around wood stove, paint laundry/bath hallway.
5. Cabinet repair, move, modify
6. Refinish cabinets
8. Level, repair, and refinish counter tops
11. New sink and faucet and the counter modifications that go with it.
10. Replace outlets, switches, plates.
9. Install backsplash, probably tile
7. Maybe try to do something with that terrible brick veneer wood stove surround?