Showing posts with label faux taxidermy. Show all posts

Friday, July 8, 2016

One Step at a Time: Kitchen Edition, Done Enough For Now

It's been a few weeks. We had a house guest and some other priorities, so kitchen projects were done piecemeal. Not to mention I really just took my time glazing and especially varmishing the "brick" beneath the wood stove and fitting in a few other projects in the main bathroom. Now I'll take a break from this to work on other things around the property before starting Phase II, but I will probably work on some decorations and such here and there. 

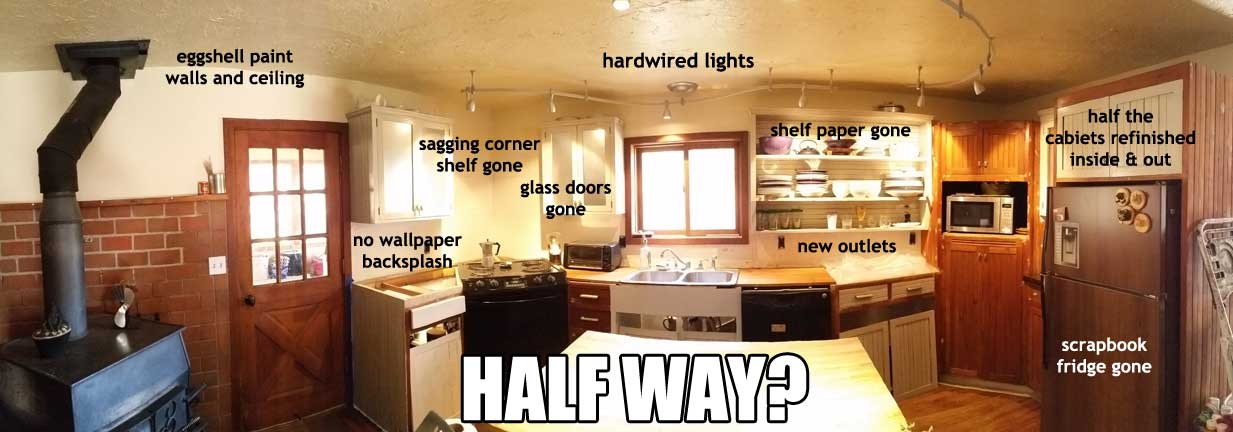
Just about every surface except the floor was refinished or replaced and nearly all the hardware and fixtures, too. Dudes. Here are the after panorama shots of each side! I'll put before shots at the bottom of the post.


The last Four weeks' projects are all on the fireside of the room and the last of the kitchen projects for a while.

1. Do something with that terrible brick veneer and shelf.

At the time of the last post, the brick veneer had been repaired and primed. It has now been glazed and varnished! Whew! What a change in the room to be rid of those dirty, red, brick-bastards!


I searched around the internet for images of grey bricks to find some examples to semi-replicate using various glazes. Even though I know better to just go at a surface without making a sample board and I did intend to make a sample board I did not actually make a sample board. Sooooo, this took longer than expected, but still with some days to start curing before Renaissance Handyman Nick cuts and installs our replace shelves on the top.

If you look, you can see that the new grey switches and outlets now have their plates! I also removed the land line port (socket? outlet?) and replaced it with a blank cover painted and glazed to match the brick veneer.

I still have the base part to do, but wanted to wait until the shelf was installed so we'll won't not be walking on it for a good while. Renaissance Handyman Nick got the shelf up in pretty short order! I had pre-finished the kiln-dried, fir 4x4s that just needed a bit of touching up here and there after the cutting, screwing, and nailing. I still have to touch up the paint where these projects marked it up a little.

I was so excited about the shelf that I couldn't wait for the base bricks to be done to get another panoramic shot!

2. Install picture rail.

I waffled back and forth about whether I should install this or not. I wasn't looking to add a contrasting color where the planes of the wall and ceiling meet - that could do the same thing that all the wallpaper borders did around here: make the ceiling seem even lower. BUT this hall gets various seasonal and holiday decorations and I a) was tired of hanging them haphazardly on just available nails and b) didn't want to put a bunch of holes in the walls to accommodate each season. This is pretty much the same reason I chose the picture rail profile for the crown I added to the upper cabinets. AND I just could not get excited about painting them to match the walls and ceiling. Finishing them to match the cabinets seemed a bit like Garanimals-style decorating.

You'll note that the picture rail stops short of the end of the wall. I still hate that corner where the beam and post come together and have that weird and weirdly finished drywall. I have some ideas for dealing with that brewing in my noggin.

I think that this photograph of Mount Hood will be the main occupant of the space. It had been in the kitchen before and came from my grandmother's house. I believe she got it from her parents or perhaps paternal grandparents.

I need to scour the house for appropriate tchotchkes. I can not wait to see the stockings hung with care this winter! I noticed in the photos of the stockings you can see the ugly old phone jack. And what do you know, it was crooked to boot! 

I think we'll have rotating and seasonal knick knacks, doodads, and tchotchkes on the shelf under these great silver, resin antlers I got for my birthday!

Look at all the line-thrus! YAHOO! But of course, the original list begat another list (see below).

The original list of the order I thought the projects will happen. Line through for complete items, italics for additions. I'll let myself do partial line throughs for partial completion, because it's good for my morale. And brown-out for items moved to Phase II.

1. Light fixtures
2. Remove corner shelf in order to...
3. Remove wallpaper and repair walls (& ceiling) as necessary, get temp solution for backsplash
4. Paint walls above cabinets, around wood stove, paint laundry/bath hallway.
5. Cabinet repair, move, modify
6. Refinish cabinets
8. Level, repair, and refinish counter tops
11. New sink and faucet and the counter modifications that go with it.
10. Replace outlets, switches, plates in backsplash.
9. Install backsplash, probably tile
12. New refrigerator surface to replace old new refrigerator surface.
16. Replace light switch and plate in hallway.
14. Replace outlets, switches, plates by wood stove.
15. Paint wood stove and stovepipe. 
7. Maybe try to do something with that terrible brick veneer wood stove surround and shelf?
13. Build a door of some sort for that too-big hole for the microwave & deal with the inside.
17. Install picture rail in hallway and that one wall behind the wood stove for now.

PHASE II


Of course, that's supposed to be "... rest of stovepipe" but hey. it's my list on my phone and I know what I mean. I'm obviously no stranger to typos! Also, we've decided to continue the picture rail around the kitchen.


Tuesday, May 3, 2016

One Step at a Time: Kitchen Edition, It Does Go On, Doesn't It?

The last little fiddly bits seem like they take ages, especially when they are parts of different projects within the project. And then the fact that we keep adding "little" projects makes it seem like we've ages to go.

Two weeks ago.

Four weeks ago and now that the original list is longer, probably not halfway. Oof.


1. Installing the backsplash.


I picked up brown caulk and installed it on Wednesday. This completes number 9 on the original list (below). HOT DAMN!


2. Refinishing the cabinets.

The last pieces of the carcass were varnished early in the week! To celebrate, I put up some decor using the picture rail hooks and cord. It was unduly exciting to get Dale the Jackalope back in his rightful place and joined by my cool new birthday resin antlers!


I admit, it's a little bit of a thrill to put to use my idea of using picture rail to add a crown to the upper cabinets. And a little bit of a thrill to get out and use the particular picture rail hooks I found which are just right.


The last four doors, all for the corner pantry, are done and ready to go up when the dagburn hinge screws get here. I do not believe it is the fault of my local lumber yard that this has taken so long, but I do wonder how the ever-loving hell a hardware distributor can not just freaking distribute hardware. Hardware that has specifically been requested. The rep doesn't even have to come out to get the commission - it's been called in. Why do they not want easy money?

No, this does not mean that my hinge screws came it. It means that the little doors above the fridge and microwave are being held temporarily in place by the magnetic closures.
You can see I've removed the faux bois "skin" and the handles on the fridge in preparation for #12 on the original list (below).

The last four drawers are well on their way and the interior of the corner pantry is next up. I am not looking forward to emptying it and stashing dry good in boxes that we'll have to keep dogs from sniffing around. But I am looking forward to being able to see better inside the pantry and all the other cabinets are now better organized just from having taken things out and put them back in, so hopefully that'll happen with this one, too.

3. Doing something to that terrible brick veneer wood stove surround.


First, the wood rail at the top came off. We'll replace it with something a little more finished-looking and level. Not only were the lag screws drilled at varying distances from the center of the shelf, they were lag screws used for finish carpentry AND it seems whoever installed them was making up for the way-too-short screws that "held up" a couple of the upper cabinets. These suckers practically went into the laundry room on the other side of that wall!

Note that whoever installed this little shelf/cap didn't even make a fresh cut to get rid of the mill stamp on the end of the lumber, let alone sand it at all.

Second, reattaching the loose "bricks" and re "mortaring" the loose or missing "mortar." The last owners seemed to think that the "mortar" around the "bricks" is what attached them to the wall so to "fix" loose "bricks" they just added more caulk tube mortar. So yeah. At some point in the next few years we're hoping to replace our wood stove with something slightly smaller, with a window in the door and a built-in fan. At that point, we'll redesign the whole hearth area and hopefully use something less textured - i.e. less dust collecting - probably some kind of slab material


Third, make a sample to determine how exactly I'm going to make these red bricks look like some not-red bricks that I found online and pinned on my "Homefront: Kitchen Revamp" pinboard. But that'll be next week.

EXTENUATING CIRCUMSTANCES

When searching for something else related to wood stoves online, I happened upon stove paint - not the appliance paint you get at the home center or hardware store - and now we're thinking we want to paint the wood stove. After reading the instructions for the paint, I am thinking that I need to do that before I refinish the bricks. Sigh.

B. Unrelated to the kitchen project.


The mass in Betty's chest had not diminished after 3 weeks of chemotherapy. This was a likely outcome, because the tumor is benign and therefore slow-growing. So we are discontinuing chemotherapy. Because the fluid has stayed off, we are continuing with the prednisone and in two weeks she'll get another sonogram to see if the fluid is kept off by the prednisone.

She seems to be feeling pretty well. Other than some side effects of the prednisone and the occasional slightly-to-moderately labored breathing, she is acting pretty normally - just a smidgen more leisurely.


The original list of the order I thought the projects will happen. Line through for complete items, italics for additions. I'll let myself do partial line throughs for partial completion, because it's good for my morale.

1. Light fixtures
2. Remove corner shelf in order to...
3. Remove wallpaper and repair walls (& ceiling) as necessary, get temp solution for backsplash
4. Paint walls above cabinets, around wood stove, paint laundry/bath hallway.
5. Cabinet repair, move, modify
6. Refinish cabinets
8. Level, repair, and refinish counter tops
11. New sink and faucet and the counter modifications that go with it.
10. Replace outlets, switches, plates in backsplash.
9. Install backsplash, probably tile
7. Maybe try to do something with that terrible brick veneer wood stove surround?
12. New refrigerator surface to replace old new refrigerator surface.
13. Build a door of some sort for that too-big hole for the microwave & deal with the inside.
14. Replace outlets, switches, plates by wood stove.
15. Paint wood stove and stovepipe. 

Thursday, April 28, 2016

Magic Bottle Cap Catcher!

While there are still parts of the kitchen remodeling project to complete (and start), we are at the point where I am able to start reinstalling and adding some of the fun stuff. Talk about a morale booster!

Eric pointed out how the bear looks like a boar from the side and now I can't un-see it. And you can't either.

I've wanted to have something like this for ages and finally figured out that I actually could! Awhile back I gave Eric this bear head, wall mount bottle opener and we installed it in the kitchen on the cabinet that encloses the refrigerator. I took it down to refinish the cabinets and while I was going about the project, I realized how I could make this work for us.

So yeah, I haven't primed and painted the whole cavity where the fridge goes. Trust me, that's not what I want. But as I was workign in there, I realized I was getting low on materials so I decided wait until I had finished the rest to do this. I mean, it's not like anyone is going to see inside the fridge cavity, right? Unless I post pictures on the internet, that is.

I used a 1-1/2" Forstner bit in the drill to remove a spot to house a neodymium magnet (1-1/2" diameter x 1/2" thick) on the backside of the cabinet - the side the fridge sits in. The hole is about 5/8" deep and I used the plastic ring that came with the magnet and some plastic plumbing strap to hold the magnet in and to add a little bit of something between the super strong magnet and refrigerator. I don't know how much difference this makes to the attraction to the refrigerator, but it made me feel more comfortable. The magnet is centered about 6" below the bottom screw on the bottle opener.

You can't even tell there's anything special going on from the outside!


Since bottle caps have sharp edges and I just spent a whole lot of time refinishing these cabinets, I added this thin wooden plaque under the bear to protect the paint job. It's a cheapie from the craft store that I stained and varnished.

Check out the action!


I looked up a few different tutorials online and from those put together what I thought would work for us. They boil down to the following:

A big, strong magnet (mine has about 80 pounds of force) mounted behind a minimum of wood (in my case about 5/16") not too far below the opener (mine is ~ 6"). Read all the warnings associated with these magnets and follow them to avoid injuring yourself, others, and your stuff - including the magnets.

PS I just noticed that in my excitement to get this done and test it out, I didn't even match up the screw heads! That is not like me at all. For decorative stuff, I always have them all going the same direction, usually a particular direction. Rest assured, friends, that I am getting up to fix that right now.


Thursday, April 2, 2015

The Little Things: One Bear Bottle Opener

I gave Eric this guy for Christmas and finally installed him the third (3rd) week of March. He's mounted on the side of the kitchen cabinet that houses the refrigerator where he happily opens beer bottles.

I went to our small local hardware store looking for, but not expecting to find, brown wood screws. Well, what to you know? "Window screws" in four (4) or five (5) colors, including brown. POW!

I think he needs some kind of bottle cap catcher underneath, we'll see what we come up with. And when/if we come up with it.  And then install it.

Also, helll-llloooo April!


Yes, that indicated varying changes of rain/snow from Wednesday through Sunday of this week. Which reminds me of this.

Friday, October 24, 2014

Costumes for Everyone!

Trick or treat!  Here's Mavis the Blue Wizard at your door begging for candy.

I picked up this hat in the bins years ago 


And good ol' Ramon, bustin' out his classic Viking disguise.  He'll take mead, thank you.


Friday, June 6, 2014

The Ramon.

For some reason it took me ages to get Mavis out of her clown costume, but I finally did.  Funny how the clown wasn't creepy, but this kitten is totally creepy.


Ramon is also keeping it simple with his Tin Woodman hat/funnel.  This disguise is especially silly, because if there is one thing that we all know it is that Ramon is alllll heart.


Tuesday, April 1, 2014

Foolin' Around

HAPPY APRIL FOOLS DAY!

Pretty much the only non-creepy clown around, Ms. Mavis.  Seriously, she's less creepy in person.

Once I spotted the red clown nose in the 50% off bin at Michael's, I knew Mavis had to have it.  What I couldn't believe was that between the two of us neither Eric or I had a rainbow clown wig!  That's not like us at all. Lucky for me, my friend, Denise, had part of one left over from a project and our mutual friend, Lisa, guilt-ed her into sending it to me!  YEY FRIENDS!  YEY GUILT!  The rest of her outfit was cobbled together with materials at hand, mostly scraps and remainders from other projects.

Something about this great, big , bushy beard makes Ramon look kind of cranky. That's how you know it's an April Fool's joke, because Ramon is the cheeriest guy there is.

We also didn't have a bushy, ginger beard for Ramon, if you can believe that.  I did have orange yarn in my stash, though. YEY STASH!  The hat was picked up from the Goodwill bins a few years ago & has been in the costume box waiting for the right occasion.

Monday, February 3, 2014

Love Is Hung On The walls. Or Love Is In The Air; I've Heard It Both Ways.

After taking down the Christmas decorations in the 3rd week of January, ahem, it was looking pretty plain around here.  That was especially so of Ramon and Mavis and I could not let that stand.  Since moving here, I've become suddenly interested in holiday decorating*, especially decorating the taxidermy.


I don't have much in the way of decorations for anything other than Halloween and Christmas.  After trawling around pinterest I decided Mavis needed Cupid's arrows and made these.  She looked pretty plain after the gloriousness of her Christmas get up, but after I few days her new, sleeker look grew on me.

Ramon and Mavis trade off keeping it classy, but Ramon usually opts to skip his turn. Introducing Ramon: Lounge Lizard & Love Tyrant.

Ladies...

That 70s Dinosaur.


For Ramon I used wigs from the costume box(es), dollar store novelty shades, and a homemade gold chain.  I cut open and re-glue a couple of Mardi Gras bead necklaces to get one long enough to fit over his face and then I added the gold heart which I had purged from the Christmas tree ornament box this year.


*see what I did there?


Tuesday, December 17, 2013

Oh, They Know It's Christmastime All Right.

Oh, Ramon!  You're such a Christmas Cad!

Santa hat? Check. Santa beard? Check.  A few extra details? You bet!

Mavis decided to go Full Glamour this year. She looks like something from America's Next Top Faux Taxidermy, doesn't she?

Glitter bough antlers, a shiny, jingle bell choker, AND a fluffy, glimmering birdie buddy? Please.


Thursday, November 21, 2013

Turkey Season is Open!


This year Mavis has gotten into the spirit of the autumn season and decided to wear Delia's turkey costume.  Now that Delia is well past her second birthday, she does't fit it anymore anyway.


And Ramon is feeling his hunter instincts kick in!  He's a conscientious guy though and made sure to don his flash orange hat. "Safety first!"

Thursday, October 10, 2013

Costumes All Around!

Just because the human life forms around this joint don't have a costume event to attend for Halloween, doesn't mean the rest of these yahoos aren't going to don their fancy dress.

Oh, Ramon! You're such a fun guy to have around.

Too bad Cub Scouts don't sell delicious cookies. Ramon likes cookies and is an excellent Salesdino.


When I tossed Eric's old Ziggy Stardust wig on Mavis, I knew she'd have to follow in his footsteps.

If Mavis has a "God-given ass" it's on the other side of that wall, in the pantry. Yuck.


Tuesday, May 7, 2013

"Huntsters"

Ramon is doing is best hipster imitation, but his cheery demeanor and infectious smile give him away.  Or maybe he's a Florence, Montana Hipster; there's a kid who works at our local grocery who looks like a hipster, but acts like a really nice young man with manners and everything.

t-rex tyrannosaurus_rex hipster


Meanwhile, Mavis is trying to infiltrate the hunter crowd.  She's WAY too glamorous to pull if off for long.

fake_beard faux_taxidermy safety_orange


Friday, March 15, 2013

On St. Patrick's Day Every Dog is an Irish Wolfhound

All the critters and beasts in our house LOVE dressing up for holidays.

Mavis is a bonny Irish lass.


Watch out!  Ramon is ready to do some pinching.  Don't let the tiny little arms make you complacent, either.


O'Betty the leprchaun!


"Gold" buttons and brass buckles!  O'Betty is so good natured.


dog_costume dog_leprechaun
Delia is our tomboy and likes to keep the costumes low-key.


NEW DISCOVERY!

dog_costume dog_leprechaun dog_abe_lincoln

In a moment of Photoshop clarity, I discovered the only differences between a leprechaun and Abraham Lincoln are color and height.  I know, your mind is blown.