Saturday, January 27, 2018

Hey Bookshelf, I Got Yer Back

A few weeks ago, I noticed that the weird, built-in bookshelf in the guest room was sagging under the weight of the books on it. During the project to shore it up, I decided to also spruce it up, because of course I did. Other than reorganizing and redistributing the contents, I also made some shelf backers to kind of balance the visual weight of the various sections as well as the whole thing.

The backers are behind the top, center shelf and the middle, right shelf.

One of the things that is kind of a fundamental way in which I approach most of my decorative house projects is doing what I can to make them un-doable. Obviously that's not always feasible - like with a tile back splash - but if I can use nails instead of construction adhesive with a good result, that's what I'm going to do. And if I can use screws instead of nails, then I'll to that if it'll keep the look right. That is how I approached this project. Someday we'll have our dream library in the next room and just take this less-than-ideal-for-us unit down, so not having weird rectangles of quilting cotton attached the wall is important for the future.

We were lucky that I had most of what was needed to make the backers on hand already:

     THE BASIC MATERIALS
     Bark print quilters cotton fabric
     Fusible interfacing (I had enough for only part of the project)
     Thread
     Polypropylene sheets (you could use thin plywood, masonite, foam core, even strong cardboard)
     Duct tape

     TOOLS
     Measuring tape & ruled straight edge
     Level
     Utility knife
     Rotary cutter & scissors
     Pencil
     Sewing machine
     Calculator
     Small wire nails

     OPTIONAL MATERIALS
     Spray adhesive
     Metal eyelets
     Base shoe or quarter round moulding
     House paint

First steps

1. Measure the back of your shelf in both directions. I sure hope yours is square - as in the angles are all 90 degrees, because everything is level and plumb - because it's hard to cut your backer if it's not. Mine was not and my backers are not quite right because of it. Which means I don't know how exactly to help you get it right, but I would recommend starting with something inexpensive/free and easy to get a hold of like cardboard or paperboard to get it just right before cutting into a more expensive backer material.

Here are the fingerprinted and lint-coated scraps. Pretty impressive photo, eh?

That said, use cardboard if you think it will maintain it's integrity through the process. Just be sure your material is strong enough to hold its shape while being flexible enough to get into place and that you have a way to cut that material.

See how I had to make sure my backer was flexible to get around this? The front opening is smaller than the back surface.

2. One you've got the size just where you want it - whether that is just-right or not - then cut your backer. Go ahead and dry fit it just to be certain it's right.

3. Press and cut your fabric with enough extra to wrap around your backer and at least an inch on the back. I did 1.25 - 2 inches on mine. Cut your interfacing just a bit smaller than your fabric, then follow the directions for that interfacing to fuse it to the back side of your fabric.


For the long backer, I had to sew together a few pieces of fabric to get it wide enough and that is what I used my calculator for. Had my print not been directional, I probably could have gotten it without that. I also had to piece together my polypropylene backing, because my sheets are pre-cut to 24" squares.

Next...

4. Lay your fabric wrong side up on a clean, level work surface that is big enough to fit the whole backer board on it. I used the guest room floor. Then center your backer board on that, back side up. Make sure you have the top of your backer matching the top of your fabric if you have a direction fabric. You can see I wrote on my the backside of my backer just to make it easy to keep this straight.

If you're working with difficult material, large piece, or are just nervous about keeping it all aligned, you might want to use spray adhesive on your backer then lay it on your fabric. Be sure to smooth over the surface so the adhesive makes contact all over. Obviously, test on scraps to be sure it won't bleed through your interfaced fabric, etc. Maybe double-sided tape would work, too, I haven't tried that.

5. Pre-cut/tear several strips of duct tape into 5-6" strips. You may have to do this a few times as you work your way around.

6. At the center top, fold over our fabric and tape it down. You want an nice crease, but you don't want to move the material around. If you have used the spray adhesive this shouldn't be a problem. Then do the opposite side. Then work your way, evenly down the left and right sides, alternating top and bottom.

I did my corners with one of the standard miter methods.


7. For the sides, start in the center and work your way to either end. Because my sides were fairly short, I did one whole side before doing the other. It ain't pretty, but it doesn't show and it's just for us.


Finally...

8. Flip it over and admire your work!


Installing that beautiful beast:

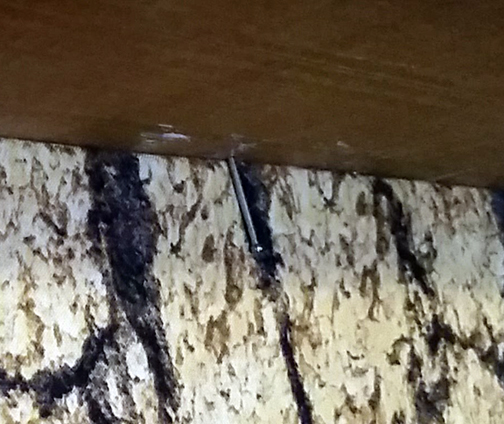
9. Have your hammer and wire nails ready, then put your backer in place. You might be able to use double sided tape for this, too, depending on how heavy your covered backer is. For mine I tacked tiny wire nails into the bookshelf about 1/4-1/3 of the way in, then bend them towards the wall with my thumb. Sort of like those metal tabs in the back of some photo frames. They are really hard to see so it works fine. I was originally going to paint them brown, but didn't have to.


Another option would be to add a small moulding piece. For the backer on the right end of the unit, I ended up using a bit of leftover base shoe from our kitchen island project. This was not so much to hold it in place as it was to cover where I messed up cutting my backer. LEARN FROM MY MISTAKES and dry fit, dry fit, dry fit!

I did have the foresight to paint the wall a color closer to the fabric, at least. At least the closest I could come with paint on hand.


And in actuality, that piece is held in place by nails in its own way.


Here is where the optional eyelet came into play. I knew I was going to display these sentimental pieces in there, so cut holes in my backer before covering it with the fabric, then after it was installed gently cut the fabric over the holes, and added the eyelets with a bit of glue. Just to keep the fabric from doing weird things, even though the interfacing would almost assuredly take care of that. It was a craft-geek moment, what can I say? Soooooo, that backer is essentially hung on those nails like an frame or other decoration or art would hang on a wall. The moulding is mostly to cover the gap and I didn't even nail it down... it was stable enough without doing so and this would be easier to undo (see second paragraph).

A little dab of base shoe will do ya'.
We have some things in-progress that will go in here instead of the mine cart and my signed copies, but for now it's like this.

Clockwise from top, left: Expert Typist Award, First Pound Earned, Mine Cart Book Display (with The Trials of Solomon Parker), Chock-a-saw Sagwa Tonic bottle prop, Dr Potter's Medicine Show, Dr. Morrison Hedwith's Basement Laboratory Diorama.


Sunday, January 21, 2018

Limited Shelf Life III

We're almost there!

The last two bits to consider this part of our Guest Room Update are complete!


First, I tackled the lower, left shelf which holds a power strip for our network hardware (and that amp below it on the floor) and the wifi router which is connected to the wifi internet router which is on a post about 80' from the house. Meaning, it would be a huge pain in various body parts to move it and there's really no better place for it. These two pieces and their various cords were a jumble that hangs out the front of the shelf. By attaching the power strip to the wall using the hangers on the back of it, I was able to make room for the router and all the now-gathered-and-tied cords on the shelf.


Then, I used the fabric stiffened with fusible interfacing to make a curtain. I used a purchased tension rod to mount it. We can just pop the whole thing out if we need serious access to that stuff or just move it out of the way to plug or unplug or reboot things.


Second, I tackled the upper, center shelf backing. After adding the backing to the center, right shelf on which we're displaying Eric's growing collection of author-ly souvenirs and such and covering the jumble of network equipment and cords, the relatively empty shelf showing all that back wall stood out in a way that I didn't like. Luckily, I had enough of the bark-print fabric and polypropylene to make another backer for it. However I didn't have enough interfacing, BUT I was able to get it just a few miles from home instead of having to drive all the way into Missoula. WOO!


I think it helps the whole shelf look more like a cohesive unit rather than several pieces shoved together.

The center section books are all by authors Eric knows in some form or other through Jennie the Agent, Angry Robot, etc. Even since I started this project we have more books to shelve, so those books will join these pretty shortly, likely on the left end for a more balanced look.
____________________________________________________

I'm super pleased that this project has been accomplished using mostly things from our supplies stashes. At this point the only thing we had to purchase was 10' of 3/4" quarter round moulding of which I used 9' 5.5", a small tension rod for which I used a 40%-off coupon, and 2 yards of fusible interfacing.

    OUT OF POCKET COSTS (to date):
      $ 5.70 - quarter round
      $ 3.59 - tension rod
      $ 5.00 - fusible interfacing
     $14.29
____________________________________________________

For now we're going to call this project complete! I'll post about how I did the backers soon. Most likely.

NOTE: We realize that storing books stacked on their sides isn't the best way. We hope this won't be in place more than a couple-few more years. Hopefully it is less harmful to paperbacks, because most of those stored that way are paperback.


Thursday, January 18, 2018

Limited Shelf Life II

Here we go!

Phase I is here.

Since the side pieces have dadoes cut to hold the shelves and run from top to bottom, I figured a level brace supporting them would give enough support. We shall see. When I went into our wood scrap stash, I assumed I would rip down 2x4 or 2x6, but then I spotted this piece of brick mould left over from the front door project. I just had to sand the paint & primer off several inches off in order to get enough to do both sides.


Even after Eric pushed up the sagging sides of the end sections while I attached the cleats, I wasn't satisfied with the change in the center section. So I located a couple of ceiling joists and screwed the upper piece into them which made a satisfactory difference.

That's right, the ceiling in there is a bright, apple green and that is my doing. I loved it and still do, but as we've been changing the decorative vibe in there it's become not-right. I have a plan for that...

After this was done, I just couldn't not add one last thing... a finish piece of moulding at the ceiling. I was tempted to add some screen moulding at all the seams where the wood butts up against the drywall, but I controlled that urge. This piece I did not have in our stash. Silk purse from a sow's ear and all that. The shelves are pine that was probably only oiled at one point in the past and that has been oxidizing and exposed to UV for however many years while the quarter round moulding is hemlock that was probably milled fairly recently by comparison. So, they don't match. I got them a little closer by putting a quick coat of clear varnish on the quarter round and that's all I feel like doing. I'm not saying the idea of painting the front of the whole bookcase didn't occur to me, but I am saying that I'm not going to bother.

Yup. It's both lighter and pinker.
And yup, I decided to hand nail it up rather than dragging the super heavy air compressor, hose, and pin nailer across the ice rink of a driveway for 5 or 6 nails. I am NOT good at hand nailing, but it worked out good-enough.

One admittedly foreseen side effect of shifting the shelves is exposing former paint colors. Luckily, in most cases these will be covered by the shelves' contents. Another thing that's not as good as we had hoped is that we weren't able to hoist both sides all the way to level. The right side is still leaning towards the center, but not as much and hopefully it should at least be stable now.

At least the colors aren't strikingly different!

Not much prettier, but hopefully much more stable and secure. I did decide that I could style the bookshelves a little better, without reducing the storage capacity by much. Well, I found a new home for a few non-books and even brought some books in from other places and have room to spare! There will always be more books. In fact, I would guess that is really only about 10-15% of our books, anyway. Oof.

This was taken before adding the quarter round to the top. You can see the sag has improved.
The lower, right shelves are mostly books that could be read or flipped through by an overnight guest. Comics, short stories, essays, pop-ups, novelties, and photo books. Some goes for the shelf above the wifi router on the left. 

In the midst of this, I remembered that Eric has acquired some neat items associated with his authoring, but that we only have an ad hoc display of them. I started trying to figure out what we can remove or rearrange to make a space specifically for displaying them. It's the middle shelf on the right there. There are some more things coming to that shelf in the next couple month, so stay tuned for some close-ups! Anyway, it's not the same as if Eric had a dedicated writing space, but he does sometimes write at the fold-down desk in the guest room. Mostly he does it at the dining table.

Hopefully, in the next week or so, I will address the wireless network crap on the bottom left shelf and tune up the center section.

____________________________________________________

I'm super pleased that this project has been accomplished using mostly things from our supplies stashes. At this point the only thing we had to purchase was 10' of 3/4" quarter round moulding of which I used 9' 5.5".

     OUT OF POCKET COSTS (to date):
     $5.70


____________________________________________________

NOTE: We realize that storing books stacked on their sides isn't the best way. We hope this won't be in place more than a couple-few more years. Hopefully it is less harmful to paperbacks, because most of those stored that way are paperback.


Saturday, January 13, 2018

Limited Shelf Life I

[giant sigh]

Yup. Not good looking, particularly in this photo. But a place to shelve more of our books, stash the network hardware, and some of Eric's guitar thingies.

Well. It seems that the odd book shelves that were installed in the third bedroom when we bought our house are not particularly well installed. Shocking.


That center piece that goes across the top doesn't seem to be attached to the wall studs or to the wall at all, just to the shelf pieces on the sides. Not unlike the cabinet/corner shelf situation in the kitchen. I sincerely hope that doesn't mean that the few screws attaching the side pieces only go about 1/8" into the studs like the cabinets in the kitchen.


Anyway, it did seem like things were sturdy enough as we have had books and network equipment stuffed in there since a few weeks of our moving in, more than 5 years ago. And then the first week of January 2018, I noticed that the unit seems to have begun.. sagging. Ugh. I considered both shoring it up OR going ahead making new shelves, but since we eventually want to turn the second bedroom - where most of the books are shelved - into a library, I decided to try to just shore it up until we can remove it altogether.


First step: remove the contents of the shelves. Well, everything but the network equipment (left) and guitar-playing whatchamajiggers (right).

Don't worry, we don't use the heater in there except on rare occasions.

Even though it won't make an aesthetic improvement, I am hoping to get this secured and reloaded before the end of January, but we'll see. So long as I don't let it go for months, I'm fine with it.


Thursday, January 11, 2018

Making the Most of Icy Weather

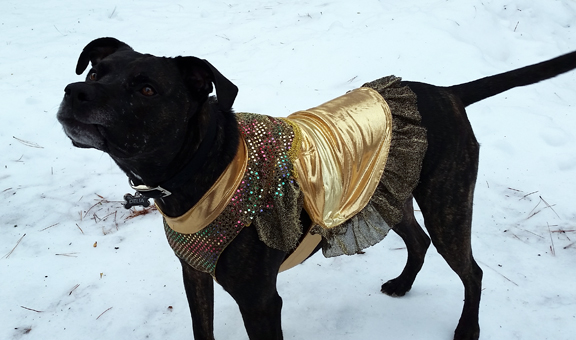
NOTICE: I don't know why the body text is highlighted. Well, I have an idea why, but my attempt to fix it failed and I don't want to put any more work into it, so I guess we can all just be glad that this post is mostly photos of a dog in her funny outfit and focus on that.

When life hands you lemons in the form of an ice rink driveway, you make lemonade in the form of a figure skater outfit for your dog! And my "you" and I mean "me/I."


I dug through all my fabrics & trims bins looking for remnants and leftovers to cobble this majestic outfit together and came up with a variety of golden treasures!


Ruffles!

Sequins!

Please note the flutter sleeves.

The whole thing is lined with polar fleece remnants.


Monday, January 8, 2018

Weird Winter Weather

It's been awhile since I felt compelled to post here. Probably because the last few months have been pretty much routine, which I guess means we're settling into routines as we enter our 6th year here in the woods on the side of our mountain in Montana. I know I "promised" a post about dealing with the wildfire threat, evacuations, etc., but I just can't seem to want to sit down and focus on gathering the photos together and writing about them. It was frightening, sort of surreal, and, let's face it, damn inconvenient. THAT part of 2017 was anything but routine. Here's hoping it stays anything-but-routine.


It seemed to take a long time for the snow to come and stay. A couple times we got some inches, then a week or so later it would be gone. Then we also had some freezing fog which wasn't too bad for road conditions that we noticed, but was very pretty to look at for a few days.


We learned a new word!
Pogonip: a meteorlogical term used to describe the uncommon occurrence of frozen fog. It was coined by Native Americans to describe the frozen fogs of fine ice needles that occur in the mountain valleys of the western US in December. 

December 24-25 brought us up to a good foot of snow in some places. It was very pretty and also pretty powdery, so not that challenging to plow and shovel.


The first week of January decided to warm up: rain, freezing rain, sleet, melt-and-refreeze, wintry mix, you name it. If my Facebook feed is any indication, I'm about the only one I know who wants it to stay below freezing! Like, until sometime in March or April. Snow is one thing, but ice is a whole other hassle. A dangerous, dangerous hassle.


Plus, you know, we need that snow pack for water next fire season.