Monday, May 14, 2018

Adventures in DIY Flooring - Cutting the Rug IV


Me: After what seemed like constant setbacks & extra weeks of research and work, I finally got to start installing the planks!
The Imaginary Crowd: NO WAY!
Me: WAY!

Here are the first few rows... the second time I installed them. Ahem.

Friday afternoon, I did a few courses in both areas and quite when I came to where I'd need to do fancy cutting for door jambs.


On Saturday morning around 9:30, I made those tricky cuts done and kept going. Let me say that this stuff is a breeze to cut with the jigsaw fitted with a metal blade.


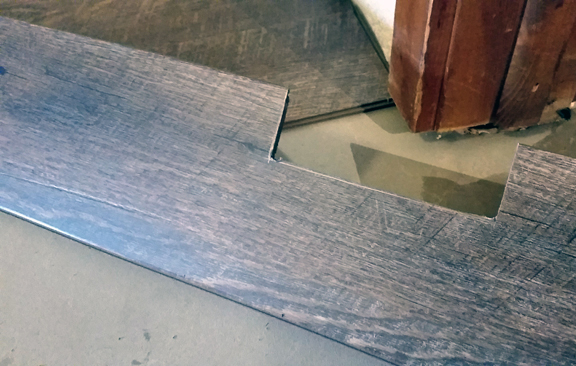
By around 4:00 on Saturday afternoon, I'd gotten the hall and over half of the guest room done! My feet, knees, and hips were hurting and I was starting to make cutting mistakes, so I called it a day.

Base moulding not yet reinstalled.

YAHOO! And HOT DAMN! And [celebratory, creative cussing]! As of Sunday, the floors are starting to be in. Like in-in. For reals in. I even got all the baseboards back in and then all the furniture in the guest room. In addition to all the additional construction-related expenses, I followed manufacturer best practice and added felt pads to all the feet. I'm not looking forward to the way lint and dog hair clings to those, but that's better than marring these hard-earned floors.

I am so glad I labeled the back of each piece of base moulding when I took it off, because it went back in pretty quickly. Hand nailing it was kind of a hassle, though.

This view makes the room look less colorful than it is, but we definitely need some more color now that there is all that wood tone- probably through some rugs.

New threshold-adjacent piece! I got a deal on a damaged oak threshold, ripped it down to suit, stained, etc.

It was Tuesday by the time I had the base moulding reinstalled and the furniture put back in the hallway. Due to a wow in one of the walls and a rookie mistake in another place, I added a base shoe to the base moulding in the hallway, so that added time for purchasing, finishing, and installing. Plus I kind of needed a break for sanity, comfort, and to work on some other things. With the staining, varnishing, cutting, and live-in-general this wasn't complete until the next Sunday.

The paint color in the hall is far from great, but man does it look worse in these photos!

When i was working in the hallway, I noticed that the cool bear tile that hangs above the guestroom door was in need of a bit of repair, so I took it down before it fell down. I need to get on that and get it back up!

Since the LVP is thinner than carpet + pad, the base mouldings are lower than they were before all this. And since we haven't yet repainted the hallway, I have no way to disguise the evidence of that on the walls, but giving them a scrub helped quite a bit. Anyway, repainting the hallway has moved up on the to-redo list, but of course that means other* projects associated with that have also moved up the list. However, those are probably winter projects.


I used pretty much exactly 14 boxes of planks to do these two rooms. I would say that there are less than two planks' worth of waste to date. That's quite a bit less than the expected waste of 6-10%! However, I am probably being way more attentive to that and moving much more slowly than professional installers on all counts, so it probably makes sense. Some of that waste is being put to use to temporarily hold things in place where the finished floors meet the as-yet-incomplete floors.


Next up: the master bedroom and closets. This whole self-leveling thing which adds a few hours of work and days of wait to the process is really going to mess with my intended schedule which had us able to sleep in there every night of the process. I guess we will not. So, this means that I am going to wait until I get back from a little trip and after MisCon is done. Eric will be on some panels and will be participating as a Pro in the MisCon Writers' Workshop. Also, his friend Tex will be staying with us so we'll do her the kindness of not having our king bed set up in the living room.


* It turns out that a house is a collection of cans-of-worms and working on the house is a series of opening those cans.

___________________________________________________


More unforeseen additional steps:

Adding felt to the feet of all the furniture.
Learning how to re-install bi-fold closet doors at a different height.


Saturday, May 5, 2018

Adventures in DIY Flooring - Cutting the Rug III


It is taking me awhile to get started installing the planks. There are a couple of reasons for this. First, I didn't have written directions specifically for this product. I mean, I understand the gist of the whole thing, but once you start you're stuck or you're wasting product. I just happen to like going in confident with the support of documented methods! Eventually I got some PDF directions that the retailer got from their rep and emailed to me. Second, I had to wait on the stair nose piece because they are generally made-to-order or on some kind of schedule and therefore can't just be rush shipped at extra cost. That took 2 weeks after bringing home the planks  Anyway, Eric and I unloaded all the boxes into the living room in a mostly-out-of-the-way place behind some chairs on the Saturday after I brought them home.


After "patiently" waiting 15 days I finally got going on Saturday and once I decided where to start and laid a few rows, it went poorly. Why? Well the floor was out of level just enough that to keep the planks from locking together properly. Sigh. As this happened after the local building supply place closed on Saturday (1:00p), it meant a Sunday trip to Missoula to buy all the things it take to apply/install self-leveling underlayment. I could have gone on Saturday afternoon, but I was crestfallen and cranky just couldn't face it.

The First Planks... The First Time. Sigh.

This did not mean I didn't make progress on Saturday afternoon, because there is an issue with the subfloor at the top of the stairs and I started tackling it. Because the lip on the stair nose piece is shallower than the cobbled together edge that was under the carpet there and wouldn't cover them, I had to remove those pieces (one fir and one plywood) and replace it with some oak to blend with the stair riser. Yeah. What would've been perfect is a 4' length of 1x2 oak that I could make into a 5/8" thick piece. What I could get nearby was a 9' length (yes, even the employees were surprised about the 9' length) of 1x4. All but about half of one side will be covered, so it only has to look "pretty" on that one bit. With some creative cutting with my table saw, I have a good start. I need to knuckle down and tackle some creative "nibbling" with the table saw before it's done.


I have no idea what these stairs are finished with and given some stories I have heard about the last owners and how the floors are wearing since we got here, I would say they are finished with something other than professional-level products. Like maybe something seen on a late night infomercial. Ahem. This bit certainly isn't going to get any wear, but this makes matching quite difficult particularly as wood stain stuff is far from my forte. So the goal was to get close and hope it mostly goes unnoticed. It being the top stair means it's at eye-level at some point, but oh well!

Primed.

So, here is the guest room floor after the self-leveling process. This process... well it didn't go as expected or wished for. I kind of (actually) did it twice. The whole thing got me quite frustrated and temporarily semi-paralyzed, even though I understand that a 42 year old house is just not going to have totally level floors - especially on the 2nd story and it's not any real indication of some historical half-assery. Anyway... I ended up msixxing 6 bags and the whole thing took about 2.5 "extra" hours to apply.. Then I had to level out the "self-leveling underlayment" with a feathering product. I used 1.25-ish boxes and this added about 6 "extra" hours over the 9 times I applied it. All these steps had to cure for 16 hours - each of the nine times time I did part of it.  I hope this means I'll be laying planks on Friday - the second Friday after this all started. Finally!

Leveled! Or close enough to it.

All my research led me to two different brands of self-leveling material. Both of these brands are designed and promoted as ones you can apply flooring over fairly quickly - as soon as 3 hours for tile. I think this worked against me, as I learned later that these really are not one-person jobs. But I am just one person despite my mightiness. For the rest of the rooms, I am going to look for something less quick-setting which might make for better results with a one-person application. And perhaps ultimately it will mean less time between evacuating a room and laying the planks.


During those 16 hour curing windows, I worked on some other time-sensitive crafting projects, so at least there was that bright spot! Of course that is also when we slept, cooked & ate, shopped for more materials, and wrote blog posts. Oh yeah, and I had to buy a saw so I could cut back all the door jambs and some of the door mouldings. I wanted to avoid anything even remotely like this situation we inherited in the upstairs bathroom. Luckily, that will go away when I redo that floor later this year.


____________________________________________


More unforeseen additional steps:

Oiling baseboards, since they were already taken out.
Leveling the floors which exceeded the tolerance of the material.
Fashioning & staining a piece of oak to under the stair nose piece.
Cutting back all the door frames and some of the door moulding.

A cool new saw was required, so at least there's some tool-geekery involved.