 |
| One week ago. |
 |
| Three weeks ago. |

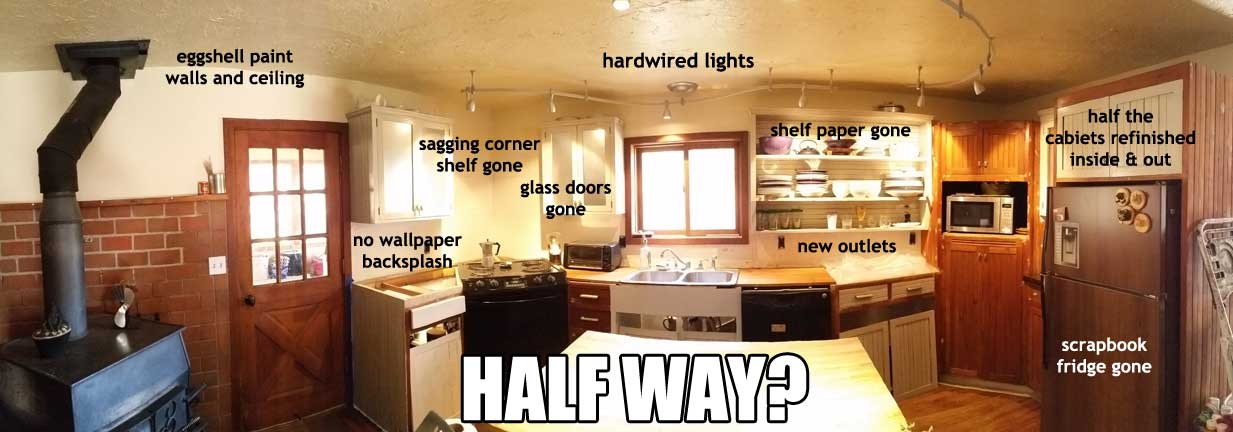
1. Refinishing the cabinets.
I am down to a few parts and sections. It's a little slow going as we have limited space for working on the doors and drawers. The last sections of carcass adjoin the backsplash which I want to have grouted and sealed before I glaze and varnish. I did manage to get the rest of the carcass glazed on Sunday afternoon!
 |
| That hole there is the result of poor planning on someone or many someones' part: no outlet on this section of counter. That hole allows access to the outlet behind the refrigerator. This is where our toaster oven lives. |
EXTENUATING CIRCUMSTANCES
Just a few hours after I typed the last information into that last post I was still waiting for my hinge screws, then I got the call that they were in! Well, half of them anyway. At least I was able to get a few sets of doors back in their rightful places.
ETC.
Annnnnnd, I got to start a special cabinet-related bonus project over the weekend! It's a secret until it's done, but I will give you an vague hint: Forstner Bit.
2. Installing the backsplash.

After doing a small color test of the grout with the tile to verify that they would work together, I was able to get that backsplash grouted! Which means we were able to put the stove back in place (for now)! YEY for the work area being back to easy and convenient! BUT I also realized that this grout is not the kind of grout I am used to and I needed to get another product so that I could ensure that I could get the extra grout off of the tiles. Since I driving to Missoula and back is a 60-80 minute round trip, sometimes steps are postponed a few days until the next scheduled trip... this was the case with the grout.

Now there's nothing left but the crying. And by "crying," I mean "caulking the bottom along the counter." I'll shop for dark brown kitchen and bath caulk when I'm in Missoula next week.

3. Replace outlets and switches.
 |
| B'bye wallpapered plates! |
Once the backsplash was grouted and cured, I was able to install the plates. Like I did in the dining and living room, I decided to use the screwless covers. Unlike the other rooms, I chose brown to blend with the backsplash. Because the tile is more of a matte finish and the plates are shiny, I used #1 steel wool to scuff and dull the plates. I might have another go with finer steel wool in hopes of making them even more dull.
 |
| Wait. What's that? A GFCI in the kitchen within a few feet of the sink? Here in the Bitterroot? Who'da thunk. |
B. Unrelated to the kitchen project.
 |
| Helping Papa keep an eye on the burn piles. |
Betty is doing well with the chemotherapy. Because her tumor is benign, this does mean that her treatment is palliative and not curative. She's feeling well and living large and we're going to treasure all the time she has with us that is time that is good for her.
 |
| There is just something so great about rolling on the ground on a warm, spring day. |
The original list of the order I thought the projects will happen.
1.
2.
3.
4.
5.
6.
8.
11.
10.
9.
7. Maybe try to do something with that terrible brick veneer wood stove surround?
12. New refrigerator surface to replace old new refrigerator surface.
13. Build a door of some sort for that too-big hole for the microwave & deal with the inside.
14. Replace outlets, switches, plates by wood stove.
No comments:
Post a Comment
It feels so good to read comments! If you're leaving one (or more!), THANK YOU! If you're not... c'mon, already!