Showing posts with label cooking. Show all posts

Thursday, April 21, 2016

Other Projects at the Vast Mountain Estate (VME)

While I am entering Week 12 of the kitchen remodel, Eric has spent time the last few weekends dealing with the pine needles and cones* in the yard. First raking them into piles and then performing the first burning this weekend!

Of course, Betty decided to run through one of the piles, stop in it, then squeal and run. Eric caught her and I ran out with a ice pack and within 6 minutes she was barking insistently for her papa to kick a pine cone for her to chase.

This time of year we see lots of smokey piles around as people are trying to get their yards and properties cleaned up before burning closes for summer. We've got a just few weeks in spring and a few weeks in autumn when open fires are permitted.


Eric has also spent the last few weekends exploring all the options and benefits of his new Weber gas grill! I have spent those same weekends enjoying delicious grilled dinners. And we've been lucky that at least two of the last three weekends have had eat-al-afresco weather!

Even pizza!


* Oh yeah, and some dog poop. There's definitely some dog poop in those piles.


Friday, January 29, 2016

Island Time in the Mountain Time Zone


"Island time" is especially apropos: We installed a kitchen island, but I took my sweet time posting about it... it was done in September during the building of the woodshed and boy, oh boy, has it made a difference in the functionality of our kitchen. Yowza!

(photo taken when we viewed the house)

The former owners had a big round dinette table in the kitchen where I think they ate most of their meals. We never considered putting another dining table in the house and we really wanted (needed?) more storage- and especially more counter space. Originally, I was hoping to find suitable cabinets at one of the used construction materials places that I could refinish, but anything smaller than a full kitchen's worth of cabinets that I found available was real crap. Then, I found this pre-owned butcher block top at the Home ReSource in Missoula! It was the perfect size for an island in our space and a good 3-inches think!  I picked it up and it sat in our shop for months while I kept looking for cabinets. Eric was getting very frustrated when cooking on weekend, so we started shopping for new cabinets.

The 3" thickness on top of standard-height, kitchen base cabinets put this a 1.5 inches over standard height and WE LOVE IT. It wouldn't work for everyone, but it is really comfortable for us slightly-taller-than-average folks.

We ended up ordering unfinished, maple, Kraftmaid cabinets through Lowe's when they were having a sale. The lead time was about six weeks, later extended to a little over seven. I finished them myself, then we hired Handyman Nick to install them - I just didn't feel confident to get them level and even and all that. I did cut and install the base shoe, though! I also sanded down all six sides of the butcher block starting with 80gr, moving through 120gr, and finishing with 220gr. Then I finished all surfaces with food grade mineral oil, letting it soak in between a couple coats.

You can see the very first or very second kitchen project in the background. I am not sure how the look of the fridge might change as we move forward with our redecorating/remodeling of this room.

While we were at it, we had Nick bring power to the island, too. I picked up one of those nifty outlets with USB ports for charging devices at the home center and chose a color that would blend pretty well with the cabinet stain - there's no reason to ruin the look of the cabinets with a white rectangle, right? You can see where it is on one end of the island in the top photo, but here it is all up close and personal.


The other end of the island is home to a new towel bar. You know you're a grown up when you are so eager for your towel bar to arrive that you compulsively check the FedEx tracking site multiple times a day, day after day. It's solid bronze with an "antique pewter" finish to coordinate with the drawer and door hardware. The towel bar came from Signature Hardware and the pulls and knobs from Hardware Hut. I did try to find this things locally, hitting the home centers and hardware stores, even places like World Market, etc., but had no luck finding what I wanted: simple, but not plain; a rustic-ish type finish.


As you can see in the photo take when the former owners' still lived her (2nd from top), the old towel ring mounted by the sink was both cheap-looking and not very functional. Sure it was convenient to the sink, but it also would get caught in both the under sink cabinet and the dishwasher. When it wasn't doing those things, it was shutting the door to the trash can when we wanted it kept open to put things in over the course of cleaning and such.


Speaking of the trash can, this might be Eric's favorite part of the new set up: trash can located right below the cutting station! It's a little bigger than our old can and easier to access because it slides out. The can and hardware are not as deep as the cabinet, which allows room for the electrical outlet and wiring, too. After I removed the shelf paper, scrubbed, I replaced the shelf paper under the sink. Now the cutting boards are off the counter and stored under there. While we generally cut directly on the new butcher block, we do use cutting boards for things that are extra stinky (onions, garlic, etc.), extra stain-y (beets, tomatoes, etc.), and extra bacterial (raw meat).

And now the dirty details:

The drawer pulls pretty much inspired the pewter-like finishes for the hardware. These are low profile so that the drawer hardware over the trash bin wouldn't catch a lot of detritus from falling trimmings and cuttings*.


These knobs are from the same line. They're a cast composite aluminum from Italy, but they weren't expensive and I just love them. We replaced all the door knobs on the existing cabinetry with them, too. And then chose a different drawer pull from the line for the existing drawers which I shared back in September.


Originally, we thought we would put stools on the overhang side, but it doesn't overhang  the standard depth, so we'll see. Besides, we ended up setting up a little bar there.


I was given this sweet bar set for my birthday last year, so it's nice to be able to put it where we can see it and use it easily!


And I picked up this vintage, hammered-aluminum tray for our bar basics. The handles are faux bois and there is a pine bough/cone pattern on the tray itself.


I am now all excited to start redecorating/remodeling the rest of the kitchen and have mostly-finalized our choices for finishes, etc. Hopefully, I won't wait months before posting and will share the projects in-progress, as well as finished.

Our starting points from when we first moved in:


* We would like to compost, but we haven't yet found a bear-proof method that would also work during the winter months. If we ever get chickens, I am sure they will help us out with this.


Sunday, September 20, 2015

Dogtember Birthday: Delia Turns Four!

September 5 comes around and Delia turned four years old! 


September 12 comes around and we celebrate with homemade pupcakes and a song! This silly video is the only photographic proof! 

I used this recipe for the cakes (3 regular size, 48 minis*). For the "frosting" I did a mix of 3 parts cottage cheese, 1 part creamy peanut butter, a tablespoon or so of dehydrated egg whites, applied with a piping bag. The sprinkles are grated carrots. This one had carrot candles, just for the birthday girl!

NOTE: Eric was also singing, but you can't hear him over my wonderful rendition of the classic.
 
*Eric took 34 to work, labeled them clearly as dog treats, set them in the break room, and only one person ate one without reading the note. We shared some others with Handyman Nick's pup.


Friday, August 21, 2015

Dogust Birthday: Betty Turns Five!

Betty turned five years old on Thursday, August 20! Her papa was out of town on beeswax, so she was treated to a solo performance by mama. What a lucky girl!


A friend from a Facebook group shared a recipe for "dog ice cream" so I decided to make pupcicles to celebrate! One of the pupcicles is the base for Betty's peanut-butter-supported carrot "candles."

RECIPE*
Add the following to a blender:
3 ripe bananas
1 cup peanut butter (make sure it does not contain xylitol, which can be deadly to dogs)
Blend until combined and at least mostly smooth. Pour into ice cube trays or moulds. Freeze.


I was lucky to have received this bone-shaped, silicone baking mould for Christmas and it worked great! I also had this silicone mould of sausage shapes because I couldn't resist it when I saw it.


Once the treats are completely frozen you can pop them out of the moulds, put them in a freezer-safe container and then back in the freezer.


HAPPY BIRTHDAY, BETTY!


Both of the Beastie Grrrlz love these cool treat on these hot Dogust days and I have to say that of all the dog treats I have made, there are the tastiest!

* Here are the changes I made:
I did a 2/3 batch because I had only 2 bananas in the freezer.
I mixed the ingredients in a bowl, using a fork to break up the banana as necessary. We use the blender for bulletproof coffee and I didn't feel like doing all the cleaning it would take to use it for the pupcicles.
Because of that my mix was thicker and I scooped it into the moulds with a spoon.
My 2/3 recipe made 15 bones, 8 sausages, and about a dozen regular ice cubes. I bet the original recipe would fill about 3 standard ice cube trays.


Monday, April 27, 2015

Earthly Delights

Our first spring here we didn't even know that there was an asparagus patch in the garden until it was too late. Last year, our second, we didn't think to look at the asparagus patch until it was too late. This year, we've been checking in on it every few days for the last few weeks and as of a few days ago discovered we were in business!  It's a slow start, but has been picking up steadily already.

It's going to be the Spring of the Stinky Tinklin' around here.

It took 4 days to harvest these, but it was worth the wait. Eric grilled them with two kinds of squash for a delicious topping for couscous dish to go with some lamb on Saturday. I love weekends!

We had leftovers of everything but the veg.


Speaking of what's happening on the property, I just couldn't let these pink branches go without cutting a few to bring into the house. The downstairs bathroom is still in the worse-before-it-gets-better stage with half-finished and barely-started projects, but I went ahead and put them in there anyway.

Pardon the crappy lighting; the only window is north-facing and our fixture has halogen bulbs, so... this is just how it is at 8 a.m.


Sunday, February 15, 2015

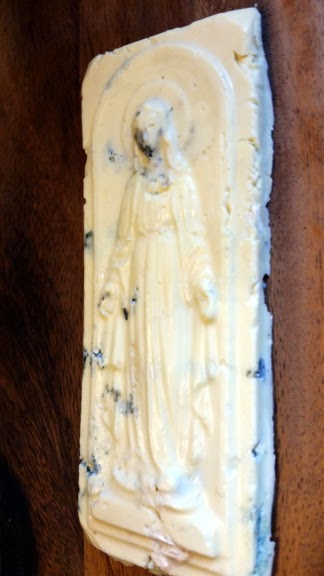
Funky Cheese Madonna or How I Used a Candy Mould to Shape Cheese... Like a Boss

What the heck?

Many years ago when Eric and I went on our very first overnight trip together we spent three weeks traveling around the Czech Republic in a rented Skoda Fabia. (yup)

Neato thing: I never noticed the reflection of a human man walking hand-in-hand with a bear cub in Eric's sunglasses before this filter was applied.  Why the filter? Ask the self-proclaimed poopy face (right).  

Of course this economy model didn't have a way to plug an iPod into the stereo, so we listened to Czech radio stations and of course there were the occasional English-language pop songs played... over and over.  Like radio stations do with pop songs. There was one that really sounded like the chorus (and title) had to be "Funky Cheese Madonna."  We learned on one of our last days in country that it was actually something like "she thinks that she's Madonna" ("She's Madonna" by Robbie Williams).

Sooooooooo, I decided to try to make a Funky Cheese Madonna for Eric for Valentine's Day.  Now what?  Well, I found a Virgin Mary chocolate mould on Ebay (like ya' do) and ordered that up in, like, October or November.  What can I say, I'm a planner.  Or prefer to be, anyway.


Then I set about to find Eric's favorite cheese, Cambozola, in Missoula or the Bitterroot.  Not so easy. This is a cheese you can get at Fred Meyer in our old neighborhood in Portland, but Toto, we're not in Portland anymore.  So every different grocery or super market I was in I would stalk the cheese section to no avail. Then I remembered that there was a wine/cheese type shop in downtown Missoula that we'd been recommended for wine.  So I looked them up on the magical interwebz, found their website and emailed their "contact us" address asking if they carried it and if not, is it something I could order.  Well, lo and behold, they replied on a weekend night! And yes they had Cambazola!  WOO!  So I went the pre-Valentine's Day Monday morning after hand therapy and bought two wedges.


I packed them in a brown paper bag and hid them in the back of the "extra" fridge in the top shelf shadows.  Then on the pre-Valentine's Day Thursday, I brought them out in the morning to warm/soften.  After they were what I thought was soft enough, I got out the mold, washed & dried it, and set about packing that funky cheese into Madonna. As it were.


I was able to get both moulds filled with one wedge with just a little extra. For the most part I removed the rind, but there's a little in there for flavor and for lack of interest in fussing with it too-too much.


When they were filled, I double checked for voids on what would be the top surface, filled any I could, then wiped most of the smeared cheese off the non-Madonna part of the mould.  Then I covered that with parchment paper, put the whole thing in a freezer bag and hid it in the crisper in the "extra" fridge.


I let it chill for many hours... like 24-ish... then I was able to pop/coax them out onto a serving stand (a wooden sushi server in this case) and re-refrigerate them until gift giving time. I am sure just a few hours would have been enough, but that didn't work for my secretive schedule.


I am so pleased with how they turned out!  First, that they turned out at all and second that they look like slightly crumbly and mossy old marble.  I had to include a shot that better shows the relief, just because.


Speaking of planning, sometime in early 2014 I was shown this material and I knew I had to make Eric boxer shorts out of it for Valentine's Day.  And luckily, I had reorganized the office/studio in November so one of the moms could stay in there over Thanksgiving weekend. I found the material and remembered/realized why I had it.


  This was also a nice backup should the Funky Cheese Madonna fail.


Saturday, December 6, 2014

What a Bunch of Turkeys: A Thanksgiving Review

I've been as busy preparing for Thanksgiving this year as last year, but I sure haven't have a chance to take photos and write blog posts.  One reason is because many of the preparations are because both Eric's mom and my mom are flying out for the long weekend  Obviously there are meal preparations, but this also means house preparations.

Occasionally we have more than one guest at a time or a family with kids, so we finally got an inflatable bed to set up in the office/studio. since we already had a third down comforter, I wanted to make a duvet set for that bed.  I managed to put it together over a weekend. WHEW!  Hopefully I'll get some photos soon.  If you've been following along, you know that I sewed a new shower curtain for our main bath, too.  It's the start of the "remodel" project that I hope I can accomplish in January of February.

I'm just starting to enjoy Thanksgiving now that I'm middle-aged so I went on a bit of a decoration-acquiring kick this summer in between trips to Bend for work.  Now that live turkeys are as much a part of our daily life as neighborhood cats were when we lived in Portland, I've taken a shine to turkeys and knick knacks in their image.  Yeah for friends, Ebay and thrift shops!

Two tureens, one candy dish, a pair of candles, two salt & pepper sets, and one candle holder.

As long as I can remember I have been fascinated by honeycomb paper decorations. The left-hand turkey is vintage from a thrift store and the right-hand turkey is a dollar store item.


Of course I have a pinterest pinboard for Thanksgiving and after I heard that most likely those at the first Thanksgiving served venison, I had to include deer imagery along with the turkeys.  So it's all about turkeys, deer, pumpkins, and that forest classic: pine cones.  

The leaf bowl was a welcome gift from one of the neighbors. In it are various pine cones: glitter ornaments, handmade felt that I put together for another project that didn't work out, and a real one from the property.  So far the dogs haven't noticed!  Last years' centerpiece craft project and place setting pumpkins have found their way to the end tables in the living room.

Last year I had fun putting together place settings for just us two and this year was fun doing the same for the four of us. One really neat thing is that this year we used both of our maternal grandmothers' china!  And I went ahead and made two more "gobblets" using some of the "things I'd do differently" that I wrote about last year.

Set up and photo-ready a few hours before The Moms arrived and dare I say, several hours before dinner was served,


All set!  See the pilgrim buckle homage?  Ha!


I decided to make special Thanksgiving napkins and found this pretty aubergine linen.  I found a tutorial for easy, crisp, mitered corners and just love how they turned out. They were fiddly and sort of time consuming, but man they sure look nice.


One of my early pins for Thanksgiving was a centerpiece similar to this one that I made from an antler I found in the forest last winter, pine and fir cones from the property, a turkey feather Eric spotted on the road our 2nd autumn in the Bitterroot, and cedar bows I ordered from a local florist.  I keep a thrift store list on my phone and found the wooden bowl this spring.

It was so nice to smell the cedar.

So all this stuff on the table meant that we served the food buffet style on a table in the kitchen.  We also got to use our grandmothers' things for serving.

Left to right, top to bottom: Lefse, cornbread stuffing, lemon almond green beans, roasted acorn squash with bleu cheese, maple apple gravy, cranberry sauce, and butterflied turkey with maple apple glaze.


Tuesday, March 4, 2014

It's Finally Come to This

I'm no fan of weather complaining, either doing it or listening to it.  That's especially the case then the weather is just doing what it's supposed to for a particular place and time.  When I learned last week that our own weather was extreme for our particular time and place I finally allowed myself to start resenting it and then several days later allowed myself to start complaining.  ENOUGH WITH THE SNOW & ICE ALREADY!

If you care to see the gory details you an enlarge this by clicking on it.


Honestly, I only mind that we keep getting semi-trapped at our house.  Our Road Committee ensures that our road stays pretty well plowed and our neighbor who does the plowing does a good job, but he's running out of places to pile the snow he plows and our road is getting narrower and narrower, especially our little part of it and that makes turning into our driveway a 45 degree turn. No big deal if you don't need to have a decent head of steam going just to get up the driveway, but we do.  Our driveway has gotten pretty narrow, too, which is our own fault and a result our our being newbies.  Who knew we would have to pile 3' of snow up on either side?  We should've started waaaaaaay wider.

This was taken a week and a half ago, when the plow worked and there was a foot or so less snow on the ground.

We bought the ATV with snowplow from the former owners as part of the house sale, but neither of us are engine people. Eric has experience with ATVs, but not owning and maintaining, just driving around as a kid. I have no experience at all and have yet to learn to drive something with hand operated throttle, etc.  My poor choice to not learn earlier, but last year gave no indication that it would be especially vital that I do.  It was really nice of the last owner to go out and buy a BIG book on stuff like how to wire it and such, but it would've been waaaaaay nicer if they'd left the owner's manual instead.  Even though it was valued at several thousand dollars: it won't idle unless the choke is on, the battery won't stay charged and even though we bought a charger for it it's as though the posts were designed to make that nearly impossible, AND now it won't stay started going uphill.  It's uphill both ways around here, folks.

A week ago on a cold, clear afternoon.  Of course, there's more snow now and the driveway is less plowed.
 Bonus points to anyone who can spot the "critter" in this shot!

Eric is recovering from knee surgery, so last Monday I has spent a couple hours shoveling yards and yards (cubic, that is) of snow so Eric could make it up the driveway when he got home. I also shoveled a path to the big firewood pile so I can bring some loads up to the by-the-house pile.  Of course, they I had to clear snow from the tarp covering the pile, etc. and so on.  EVERYTHING outside takes so much longer; walking dogs, feeding birds, fetching firewood (even when it's just outside the door).  Why do I blather on with this tale of woe? Well, Monday night is when we take the trash down for early, Tuesday morning pick-up. We drive it because it's about a mile to where they pick it up and the can is heavy, the road sloped, slippery, etc.  I just didn't have it in me to take it last week and this week I couldn't because... THE ATV IS STUCK IN THE DRIVEWAY.  Sigh. At least we don't generate much trash, the smallest can we could get is 60 gallons, and it's so cold out that it's not getting ripe.

We've learned some things so we can make some changes and do some things differently next year.
1. Don't put off plowing and go wide, just in case.
2. Push the snow from the driveway well into the lower pasture and keep the road plow's build-up from blocking that opening.
3. We wanted to build a proper wood shed anyway, but now we're thinking we won't build it where the last owners kept their wood, but on the opposite side of the house and quite a bit closer to it.
4. Always take the trash down while you can.

You can see a snow-covered Khan at the bottom of the driveway and a power co-op truck parked in the road.  You can also see dog-nose art on the window... ahem.

While it turned out not to be a very big deal we did lose power early on Saturday morning (during the Blizzard Warning).  We do have heat when the power is out, because our primary heat is a wood stove, and we can heat water and food on that, too.  But the well pump is electric, so that means no running water let alone hot-out-of-the-tap water.  We have drinking water set aside, but water is not coffee.  We were lucky that one of the issues causing the outages in the area was something that caused sparks at the top of the power pole that is outside our bedroom window and Eric saw it flash 3 times at 5:15a.  He was able to call our electric co-op at 5:30 and start the process.  It was probably 9:15 or so when they showed up here and it's a good thing they were able to fix that issue with a lonnnnnng pole with a hook on it, because they said that they probably couldn't have gotten their truck up our driveway.  They were very friendly and informative and didn't act especially put-out by having to wade knee deep in snow to get to the pole.

Eric made breakfast on the woodstove: bacon and eggs in toast!  It was pretty dark in there even with our LED portable lights, but I had to take a video.  That fan is powered by the heat from the stove and on there to circulate the warm air into the rest of the house. It's awesome.  It also circulates the smell of breakfast into the rest of the house.  Also, pretty awesome.


We are very lucky that we rarely lose power and when we do it's usually back in just a few hours.  A gas-powered generator wouldn't be a bad idea, but what we really want to do is get solar panels after we get a new roof in the next couple years.  We think we have a pretty good set up for it as half our roof faces southwest and there aren't really any trees near the house to cast shade on panels.

Some things we learned from this power outage which was more serious because it was so cold (around 10F).
1. Keep some non-potable water around to flush toilets.
2. Keep stock of the potable water storage.
3. Keep some pre-ground coffee in the freezer. We can make it on the wood stove if only we have some already ground.

And now I leave you some more recent images of the snow around the place.  Don't get me wrong, I still know that it is beautiful and feel lucky that I get to see these types of nature's wonders on a daily basis and I'm not wanting it to all melt off, just stop accumulating so frequently and deeply.

This is about the maximum size of the icicles on the NE side of the house; the longest are at least a yard long and it was still kind of a shock to see them through that upstairs bathroom window.  This is why we don't have gutters. YEY, NO-GUTTERS!
On one of the few sunny days, I walked around the house to see the sun lighting up the icicles on the SW side of the house.  Another instance where it would be nice to know how to use my camera better, because it was pretty striking.

Sometimes Delia likes to gaze at the view and it's a nice reminder to stop and do the same.  This was a few storms and probably 12" before the next few photos.

That big lump is the same birdbath that is in front of Delia in the photo above; completely buried.


Picnic table and benches; you can see it's up to the top of the benches.

What I have always assumed was w wildlife highway of some sort out in the woods not far from our place. Delia likes to go to it for her midday playtime and then follow along as far as I'll go.  Since the snow started condensing it was MUCH easier to follow it than blaze a trail where it was chin high on her and often knee deep on me.

This is what last year's winter looked like: lots of BIG, deep-blue sky.  Most of these other photos were taken when it was overcast.  We're about halfway to maximum icicles here (SW side of the house) and I got a tiny sunburn while hauling firewood that day.

When the sun comes out, the critters get on the move!


UPDATES:
We're entering a melting phase this week. That's not to say it isn't still going to snow, but it won't measurably accumulate. And it's going to rain, sometimes the freezing kind and sometimes the wintry mix kind.  Mostly this means our driveway and road will be slushy and that is deep and slippery slush that freezes in slicks and ruts overnight and sometimes stays that way in shady spots.  Also, that means that our shop has taken on water under the front doors that freezes on the floor.  That means way more shoveling and plowing over there next year!  I wonder if they built that in a depression or if it's just that years of sanding the area in front of it built up the ground?  Sigh.


Eric got the ATV out of the driveway, but the slushy snow on the driveway was too wet and heavy to plow.  We're still parking Khan at the bottom of the driveway and Bert is still staying put at the top (which means I am staying put and so is the garbage can, nearly full of garbage.