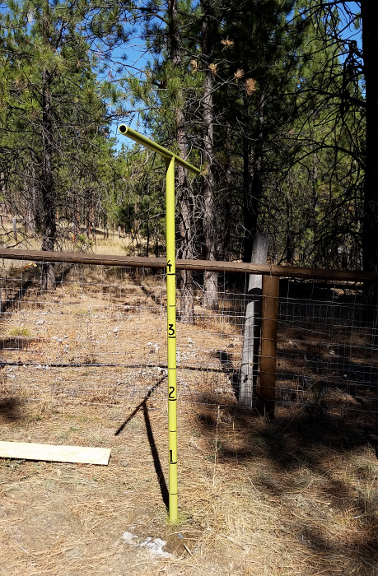
Not to get all House Stark on everyone, but winter is coming. That means preparing with lots of little projects, one BIG project, and this just-for-fun project: painting a snow gauge on one of our clothesline posts!
 |
| This picture is from way back in May 2013; it's all the MV guests' gear from the rafting trip. |
I love using the clothesline in the weeks between rainy season and smoke season and the one that came with the house has lots of room for lots of laundry, 4 lines about 24' long! But it was also kind of junky looking with its rusty posts and its drooping lines. I have pinned all kinds of pretty and clever clotheslines on pinterest, but the ones we have are plenty sturdy and stuck in cement footings. So... spray paint to the rescue! First I used a rust converter primer that I had on-hand, then this paint. It's just about the color of the most prevalent moss in our forest.
After the paint had dried a couple of days, I marked every 6" from the ground up to 4'. Then I tried to use delicate surface masking tape to mark the lines, but found it was pulling little bits of paint off, so I thought about it a bit and decided that our huge stash of toilet paper and paper towel tubes* could be put to use as stencils!
 |
| I am kind of surprised that we had 3 paper towel tubes; it takes us ages to go through a roll. |
For the measurement marks I used the longer paper towel tubes. I marked & cut a larger strip for the foot marks and a smaller strip for the six inch marks, then split it up the back. Then I split 2 more to use to protect the adjacent areas against over spray.
I made sure the foot marks on the pole matched up with the larger strip on the stencil then taped the tube closed in the back. Then I added the other tubes, one above and one below before spraying the marks.
I waited a few minutes for the paint to dry then removed the tubes and did the same to the next foot mark until I'd done all four.
After all the measurement marks were up, I started making the number stencils. It was pretty much the same procedure but with drawn numbers on shorter toilet paper tubes.
I noticed that I needed a little help keeping some of the parts of the tubes around the cut out numbers stuck against the post, so rolled up tape to stick on the inside of the stencils where needed. I found the end and top of the foot lines thru the number stencil and tried to get them about 1/4" above. Then used my paper towel over spray tubes again above and below the number stencils.
And done! Now, I wish I'd had another color on-hand to paint the lines and numbers; something less harsh than the black, but also easy to see from a distance. Alas I did not and I didn't feel like buying more stuff to sit on the shelf.
 |
| I understand it's rare to get as much snow as this gauge is ready to measure, but heck, we could have a repeat of February 2014. |
I still have to get new lines and install them, but I think that might wait until spring. I have just a few finishing touches on the woodshed to get done, plus many of those little things.
"PRO" TIP!
Don't get cocky and forget to make sure that there is no gap between your tubes! Or in my case, one of the over spray tubes was not taped tight against post. D'oh! Once it was dry, I used my masking tubes to cover the marks that were supposed to be there, then sprayed over it with the green. You can see the "patch," but it's good enough to dry the clothes and good enough to measure the snow so that's good enough for me.
*When set next to the homemade fire starters and stuffed with a bit of news paper, they are helpful for getting the fires in the wood stove going, so we save them.


