Considering our kitchen was built in 1976, it's pretty decent. Sure, it's design finishes lean towards the rustic, but we
do live on a mountain in the woods after all. Until we decide to do a full-on remodel, we just want to deal with a few smaller projects. One thing I didn't expect to have to contend with again was open shelving for the kitchen upper cabinets. But, most of the uppers are either open shelving or glass fronted doors. I can't really do anything easily and inexpensively with the open shelves, but I could do something about the glass: faux etching. POW!
But what design? FAUX BOIS! But before we get to photos of said faux bois, how about some before photos?
 |
| The highlighted circle up top: the red thing on the right is a ceramic Santa Claus napkin ring left by the original owner of the house and the ceramic kitchen witch on the left was added by the folks who bought the place in 1986. We'll figure out a way to display them and add our own "kitchen totem" eventually. All that other stuff up there will find a home, most likely in a cupboard. |
I think that the wallpaper has served it's purpose and deserves to be retired. We'll do that once we decide on what do put up as a back splash. I have a few ideas for durable, inexpensive, DIY installation options that will also be fairly easy remove when we do decide to upgrade on larger scale.
 |
| Another set of doors on the opposite side of the kitchen. The fridge is just to the right and will be one of the next project in there. Wait'll ya' see that! (assuming it turns out) |
|
This project was moderately time consuming, but not really difficult. The hardest part was getting the wood and glass (4 panes of which had been right by the stove for decades) really, really clean and able to receive masking tape and contact paper, respectively. The people who lived here before kept a really clean house, but nooks and crannies just build up with stuff.
 |
| Took the doors off their hinges, cleaned them really well, masked and applied clear contact paper from the Dollar Tree. I didn't have enough for all 6 doors, so I had to go back for more. Luckily, piecing together pieces for this project is fine so long as the whole surface of the glass was covered. |
|
|
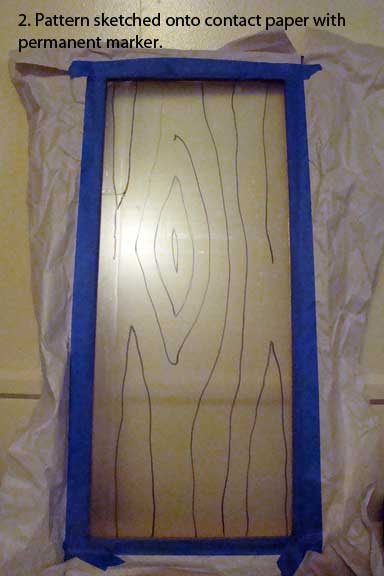 |
| I looked at some faux bois images that I'd pinned as a reference and then free-handed the wood grain onto the contact paper with a Sharpie. Obviously, I wasn't going for realistic wood grain, so it was pretty easy. |
 |
| I used a razor blade to cut the contact paper around both sides of the wood grain markings. Again, I wasn't going for realism, so I didn't have to be very exact. An Exacto or utility knife would work just as well, probably be easier to control, but since this pattern was relatively free-form I decide to use cheap, plentiful blades that I didn't' have to put in and take out of a holder. The first time I did this on the first 3 doors, I removed the skinny little grain pieces instead of the wide pieces. Luckily, I caught it before spraying the "etching" paint on! And I had already planned to go back to the Dollar Tree for more contact paper. |
 |
| Ready to spray, with the correct pieces cut away and removed. |
|
I did all those steps in the kitchen and in the office in the house, but I moved the center of operations to the shop for the spraying. I used
Krylon brand Frosted Glass Finish which I had to shop 4 stores to find. I wasn't looking specifically for Krylon brand; there just wasn't any frosting product. I'm pretty sure this stuff is available at the chain craft stores in Portland, but not in Missoula and not at the hardware stores in the Bitterroot that I checked. I finally found it at the big Ace store in Missoula where we get the
Beastie Grrrlz'
food. BUT I as able to
walk right into the spray paint aisle unaccompanied and view all the spray paint cans without a glass or metal barrier and then just buy it like a law abiding citizen! Didn't even have to show ID.
 |
| I did eight (8) coats, following the manufacturer's directions of doing horizontal, then vertical passes and standard rattle can *best practices. |
|
I didn't remember to take photos of them after they were painted, but before I pulled the masking. But they looked pretty much like that, only the glass was frostier. I used a picking tool from large scale, one-time use, self-adhesive
stencils that I have used in my decorative painting business to grab the little strips of contact paper so I wouldn't have to dig gently and precisely with what is left of my fingernails. The tape just pulled off.
 |
| Annnnnd our spices, oils and vinegars are now much less visible behind the frosted glass! |
In person, the stuff in the cupboard is even less noticeable and the diminished visual clutter is such a relief to my eyes. Also, it's inspired me to finish unpacking and sorting out the kitchen stuff to further diminish the visual noise (as much as we can with the wallpaper still up). We'll see if that inspiration lasts the next couple of days.
We're both pleased with how it looks. It solves the issue of seeing every last bit of our kitchen crap, updates the look, expresses a little humor, keeps with the rustic/mountain style AND was accomplished for under $25 and is reversible with paint or lacquer thinner. Also, it claims to be washable, but I applied the spray to the inside surface of the glass, to minimize its exposure to grubbiness and scrubbing.
* I apologize for the yucky business jargon, but it's late and I couldn't remember another way of phrasing it. What a burden.


Nice job! Not only does it hide kitchen clutter, but it is a great whimsical yet rustic accent piece now :D
ReplyDeleteThank you! I hadn't thought about it, but I think you're right about the whimsy. :)
ReplyDeleteI love it! Yes, whimsical indeed.
ReplyDeleteAnd yeah, the 1980's wallpaper is done. [shudders]
There is lots of wallpaper to contend with, all of it 80s, all if it floral in one style or another, and much of it pink. Luckily, I've taken down lots of wallpaper, I have a wallpaper steamer, and this looks like it was installed correctly so it shouldn't be too hard to remove... except the stuff that's painted over in the office.
Delete