Way before we moved, but after we started looking in Montana I started a pin board called "
Cool Ideas for a Cold Climate" for things that we just really couldn't do in Portland, at least not unless things got extreme. At first most of the pins were for ice crafts including one for "
giant marbles."
 |
| The orange ice marble down where the road enters the property. Behind it you can see the "lower pasture." |
I had to try twice to get them right, but I'll show you the good ones first, then explain what went wrong with the first batch when I give the ol' how-to. Which is like the ol' one-two, but with more how.
 |
| This green ice marble and the blue one in the background are part of the four that we can see from the kitchen window. |
After the first run, I decided that I wanted them a good size to put on fence posts. So I have four (one of each color) on posts that we can see from the kitchen window over the sink and five on fence posts where the road enters the property (also
where the wreaths have gone).
 |
| Large muffin tin, rag, liquid food dye, balloons and something to keep the cutting board from getting stained. |
For the successful set I used balloons 9" balloons that came in a pack of 25 from the dollar store. I didn't fill them all the way, only to a 4-5" diameter. They were certainly more economical than the Party City balloons I used for the first run which I had left over from a few parties, but they actually were more effort to remove. I don't know if that has to do with the quality of the material or that the Party City balloons were 14" balloons or what.
The directions I read had me filling the balloon with water then adding dye. I don't know how they accomplished this because it took some careful handling to get the filled balloons not to shoot water all over before I tied them. So, I added the food dye before the water. I just doubled the recipe on the back of the dye box for orange, turquoise, violet, and lime green. I think the
violet
needs more red to be the color I want it to be. It's more of a midnight blue as it is.
 |
| For "parts" I did drops. |
I fit the balloon around the faucet in the kitchen sink, held it in place with my left hand fingers and turned the cold water on. After the first few I got a handle on how fast to add the water.
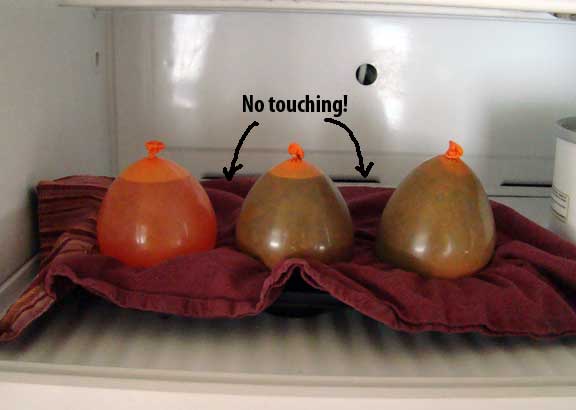 |
| The mudroom freezer: where so much crafty magic happens. |
Once full, I tied each balloon off and set it in a large muffin tin lined with a rag. When all 5 cells of the muffin tin were full, I put them in the mudroom freezer. They sat there for about 5 days. It was warmer than freezing outside when I started the second batch so I didn't even check them until sometime the third day and they seemed solidly frozen. They were certainly frozen by the fifth day.
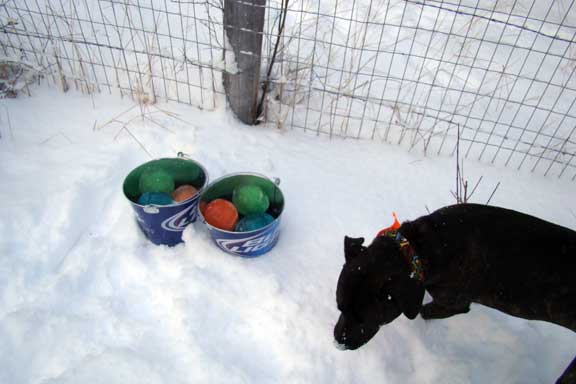 |
| The Bud Light buckets came from a friend who bought a restaurant, but didn't have a need for them, because it was a classy joint. I have some plans for them involving painting over the exterior, because this is a classy joint. The Delia came from Family Dogs New Life shelter in Milwaukie, Oregon. |
The mudroom is pretty cold, so I tore off the balloons in there and put the ice marbles into buckets to carry around outside while I decided where to put them.
 |
| If you squint a bit you can see one of each color on the fence posts at the entrance to the property. On the other side of the road is a post with our house number in one of those reflective green road signs and a green ice marble on top. |
Here is the first batch of five. For them I used more water and half the dye and they were pretty lightly colored. That was exacerbated by the fact that there were hollow. Unintentionally, hollow.
 |
| Okay, maybe "marbles" isn't exactly the right word since they're really not sphere shaped, but I bet the smaller ones are much closer to spherical. |
Why were they hollow? Because they each had one or two holes on the sides caused by them touching in the freezer
and me not letting them stay in the freezer long enough.
 |
| The mudroom freezer, one star of our show. We have a HUGE deep freeze, so if we ever have a daytime party in the winter I am going to make a ton of these to decorate outside. |
Luckily, when I tore the balloons off this batch I did it outside because the dyed water spilled out onto the ground and not the wood floor of the mudroom or kitchen.
 |
| This is the birdbath that is visible from the kitchen window. The former owners left us a heater for it to keep it from freezing, but it stopped working the day after we installed it. I don't have any ice marbles in there now, but I may make more because it was cheery to see from the window and we drive by it to park behind the house. |
Another mistake I made with the first batch was letting the dye get on my skin and on the cutting board. Of course, that evening we were going to dinner at Eric's friend Megan's house and I'd never met her, so it was awesome to have green stained skin. I got most of it off with Gojo and baking soda, at least. Baking soda worked well on the cutting board and just the passing of time and repeated cleanings from regular use have gotten most of that out. Sigh.
 |
| This climate is hell on my fingernails. I'm not used to paying attention to them and it's really showing now. |
|
For the second batch I didn't have this issue when making them, but with twice as much dye in a smaller volume of water there was some residual dye in the inside of the balloons and on the outside of the ice marbles. I have green fingers again, but at least I don't have plans to meet anyone new for the next couple of days.
And to end on an up note a few more shots of the second patch cheering up the place.
 |
| Three "extras" set on the deck rail where we'll see them coming and going from the front door and from the hot tub. I imagine Betty will inspect them pretty regularly, too. |
|
|
 |
| This orange ice marble and the turquoise one among the branches in the background are on the fence posts we see from the kitchen window. |
 |
| It snowed overnight so they got little hats and some got coats, even. |


Those are beautiful! I saw something similar (I think it was in a BH&G mag a number of years ago), where they did colored pillars inside pvc pipes or something. I know I saved it, I'll see if I can find it. It's not been cold enough here the last several years to do this.
ReplyDelete~ Peggasus
Oh! I'd love to know how to do that! These marbles are so easy and cheap, I can't imagine not doing them at least once if one lives somewhere with a cold snap.
ReplyDeleteThey're SO pretty! Almost makes me want to live somewhere it snows. Almost. I'll share this post with my family in Wisconsin. You know it gets cold enough there for ice crafts.
ReplyDeleteThanks! They eventually fell off the fence posts when the slow beneath them melted and the dogs started playing with them. A ball is a ball is a ball after all.
ReplyDeleteBeautiful! And this is the first winter in a while when I can do this. (Long Island NY) Thanks for a great post!
ReplyDeleteYou won't regret it! Thanks for dropping by and having a look around.
Delete