
[Deep breath in]
My plan was that once the walls and ceiling were finally fixed and fancified and the outlets and switches replaced and plated, I would finally tackle the closet. But instead, I was waiting for what was supposed to be a 2-day delivery of more Venetian plaster, but was in fact a nearly 2-week delivery*. Also there was a snafu with the dimmer switch - oy. I had to switch gears entirely on that which bums me out, but that's the way these things go, I guess. You see, I had found and ordered these great switches and outlets which you will see in the next post. They blended right in with the indigo blue wall finish! The problem is that the dimmer switch was a "smart switch" which means it requires a neutral wire to function at all. Of course our 1976-built house isn't wired with those and the only solutions were either to have an electrician add one between the light and the switch or to find a "dumb" dimmer. I was not excited about spending what would probably be a couple hundred dollars just for this one wire. Eric is vehemently opposed to adding smart technology to the house, because personal security/privacy technology has not kept up with the smart technology. Neither of us are having anything to do with any smart speakers, etc. so this made sense to me. I made sure that this product line did not include a non-smart dimmer (it did not), searched for another company that might have a similarly colored, non-smart dimmer (I found none), then decided to go a completely different way with the main light dimmer switch (but not the closet light switch or the outlets). My beautiful blue switch and its plate were returned and the Plan B switch and plate ordered (on sale!).
[Deep breath out]
So decide to start on the closet while waiting on that. Even with all the disappointment and frustration of the dimmer switch debacle fresh and tender, it's still ridiculously satisfying to have this closet spruced up and made more suitable to our needs.
[Satisfied sigh]
Here is how the closet was when we moved in. Well, it came to us with doors, base moulding, and that carpet, but I removed all of those at the beginning of this project. They'll all get reinstalled after the floor goes in... except the carpet, of course.
[Shudders]
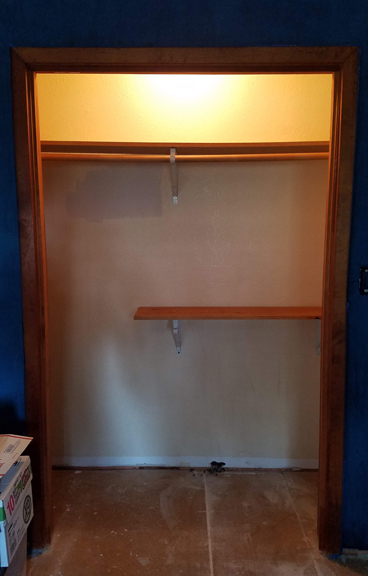 |
| I consider us lucky that there are lights in the 2nd and 3rd bedroom closets. At least with this one, the switch is at or pretty close to standard height. |
First, I took out the shelves and rods along with the hardware. Second, I repaired and painted the walls. Heck, I painted the ceiling, too.
 |
| Let's pretend there is a comma after "no" up there. |
 |
| If you're wondering why the space outside the closet seems dark, it's because I did this work and took this photo before reinstalling the old main light switch, so the room itself was a little dim. |
Third, I got new materials: brackets and shelving which I had cut to size at the store for the shelves on the right. The top shelf I custom cut myself. Then to the exposed cut areas I added the iron-on tape sold for this purpose. I determined that I could stall the top shelf a little higher if it was not the full 24" depth where it passed behind the door, because it would leave more space for fitting larger boxes and such. I didn't want to lose any storage space I didn't have to, so I decided to try this instead of just putting in a 12" shelf all the way across or trying to wrangle three different shelves at the same level.

 |
| After the floor is installed and the base moulding back up, I'll put in that last shelf. |
 |
| MAXIMIZIN' THAT CUBIC AREA STORAGE LIKE A BOSS! |
 |
| A place to hang the big stencils, sewing projects, life-sized skeletons, etc. and to keep the wide rolls of upholstery and vinyl. |

One last shelf will go in on the bottom right after the floor is done.
[Whoop]
Getting this part of the project checked off the list really helped the upstairs feel a bit more livable since many of the crafting materials that had been moved out of this room were stored on shelves that had been moved into the hallway. Ugh. We still have all the furniture and some of the stuff that will be stored in the closet stashed in places around the second floor, but this helps a little.
[Satisfied sigh]
*Emails have been sent, 1-star rating left**, product returned, refund issued.
** With specific, rational & non-ranty reasons described in review. Which is when the seller actually decided to respond. Too little, too [expletive] late, M_xW_rehouse.
______________________________________________________________
THE BREAKDOWN
Phase I
1. Empty that room!
2. Remove base moulding
3. Remove closet doors & hardware
4. Remove the carpet and pad
5. Remove tack strips and staples
6. Remove chair rail and paneling
7. Determine if wall paper is removable
8. repair walls
9. prime walls and ceiling
10. paint walls and ceiling
11. decorative finish(es)?
12. replace light fixture (back-ordered, supposed to be available July 7)
13. replace switches and outlets, covers (dimmer switch ordered, but not arrived)
14, make and install closet shelves, etc.
15. prime existing subfloor x 2
16. pour self-leveling subfloor
17. install LVP
18. reinstall base moulding
19. reinstall closet doors
20. install transition piece at doorway
21. make window covering
22. install window covering
Phase II
1 - ?. Build built-in bookshelves
... Finish last course of flooring
... Add base shoe or other moulding to bookcases
... picture rail
... picture rail
Nice! Deep shelves and lots of room to fill up with goodies!
ReplyDelete