Wednesday, January 30, 2013

$3 Faux Bois Shower Curtain Rod*

I just couldn't look at that shower door anymore, but removing it seemed counter productive and I had that sample shower curtain that inspired the whole redecoration of the upstairs bathroom so I needed to hang it.  Easier said than done.  The tension rod I had moved with us doesn't get short enough and locally I didn't find one that would.  One of the local Helpful Hardware Folks suggested a cafe curtain tension rod which I thought was ridiculous.

The whole point was aesthetic and this didn't work for me.


So, I went home and tried it.  It seemed strong enough, but I just couldn't handle the look.  So, I figured I could get a length of lightweight pipe, faux bois it up.  Like a boss.

Yup, that's a PVC pipe all right.


I went to Home ReSource (a similar thing to Portland's ReBuilding Center) with a shower curtain ring to make sure I got the right size.  I paid $1 for this length of 3/4" PVC and I paid the cutting fees ($2) to get a nice clean cut on either end since I no longer have any power saws.  I cleaned it well, sanded it lengthwise so any scratches would help simulate grain, then applied primer, again lengthwise so any ridges or grooves would work with the grain.


faux_bois faux_bois_how-to
That's the same cafe curtain tension rod, this time mounted at the top of the stairs (before Ramon came to live, well not live, with us).


I could work on one end then the other when priming and even when painting, but not when glazing, so I jury rigged this setup to use from this point on.  From there I painted two coats of Benjamin Moore's Chestertown Buff (HC-9) which I had on hand to sample for the living room (it didn't make the cut).

faux_bois faux_bois_how-to
There she is with 2 good coats of the base color.  Yup.


Next came a layer of burnt umber glaze using Proceed Full-bodied Glazing Texture, applied with a chip brush then and given a sort of striĆ© with another chip brush and left to dry completely.  Professional glazing media take much, much longer to dry than house paint and especially craft paint. With the temp and humidity in our house, I let this go about 16 hours.

faux_bois faux_bois_how-to
It looked plenty wood-y, but I wanted to tone down the stripes a bit.


After that, I just did a light all over glaze to make the striae a little more subtle.  I used a chip brush to apply a generous amount of glaze, then gently rubbed the length of pipe with a folded paper towel redistributing and removing some of the glaze.

faux_bois faux_bois_how-to
The first shot I took had the pipe parallel with the grain on the floor and you could hardly see the pipe.  Sweet!


The glaze leaves a shiny finish and I although the Pergo floor is shiny, the real wood wainscot is flat or matte.  I liked the idea of a duller finish better for a more rustic look and I wanted to protect the glazed surface from both moisture generated by the shower and from wear generated by the curtain rings.  I had some Modern Masters Dead Flat Varnish Exterior and put about 4 coats of that on, drying completely between each coat and giving it a super light sanding with 320gr with each coat after the second.

faux_bois faux_bois_how-to
All installed and ready for action... the action of holding up a shower curtain.

One of the trickiest parts of making a convincing faux bois in this style (which isn't true faux bois, but more like faux faux bois) is choosing the base color.  I didn't have anything in my stock that was right for really matching the floor or the wainscot, but I did have something that would match this lighting chain I picked up to use for another project.

This is another Home ReSource find that I plan to use to refurbish the light fixture in the stair well using pretty much this same technique and the same materials.  In the meantime it was a great resource for finding a close-enough base color.


And how the rod looks when you're standing in the room; pretty much like wood.  YEY!  And whew!

faux_bois faux_bois_how-to


*One thing that comes from having been a decorative painter, DIYer, and crafty type for years is that I already have a bunch of materials and tools.  If that were not the case, this surely would not have been a $3 project.  But, I do believe that similar results could be achieved using less expensive materials, readily acquired at a craft store.


Monday, January 28, 2013

That 70s Bathroom: Phase 2

Just to refresh your memory, this is what we started with:

bathroom_makeover 70s_bathroom

And this post covers what I've done so far: That 70s Bathroom: Phase 1.

bathroom_makeover 70s_bathroom
Sadly, I lost most of the blue/green patina when I WD-40ed it to get the swivel action back.  Also, I need to touch up those screws; our local Ace didn't have brass screws both thin and long enough.  Shoot.


Since we last met (in the bathroom), two things have been accomplished.  First, I installed an antique swiveling hook (above) I had in my stash next to the shower.  So often there isn't room near the shower for a full towel bar, so I always install a hook so I don't have to traipse across the floor dripping wet after a shower or drape my towel over the shower curtain rod or shower door.

bathroom_makeover 70s_bathroom faux_bois
Basic PVC cut to fit over the cafe curtain tension rod and painted.  I'll make a how-to post on that, soon.


Second, I decided to try cutting a piece of PVC to fit and then painting it to look woo-like.  The way it turned out kind of thing tickles me, so I think I'll stick with it so long as it stays up.  While it meant more work, it also meant that I spent $1 on a PVC scrap from Home ReSource + $2 to have two, neat, straight cuts made instead of spending $8.99 - 19.99 + shipping to get a shower stall tension rod in a color I don't want. 

bathroom_makeover 70s_bathroom
It looks way better than that silly old window curtain rod!


There are a couple things that didn't happen since we last met (in the bathroom), despite my adequate efforts.

Light Fixtures:  Again, since we plan to really remodel in a few years we didn't want to spend real money on good looking and/or nice fixtures that we may not reuse.  I was hoping I could find new (or vintage) glass shades that would make me feel better about them, but no luck so far.  We may just live with them until we remodel.


Toilet Paper Holder: I've heard some people prefer the free-standing model, but at least in our situation it means that it's either behind you or in the middle of the room or you have to move it into position every time you use it (and remember to move it back, just like the toilet seat).  Neither of us like the shiny brass for this situation and I don't feel like painting it.  I have searched ebay, etsy, online retailers specializing in antique and vintage house hardware, new pieces online. I wasn't super excited about anything that didn't cost way more than I thought a used TP holder should.  And I'm a gal who has dropped some dough on bath hardware as I'm kind of a geek about that stuff, but something that's been in a stranger's bathroom and is not retro chic, just retro... not gunna happen.  Unless I get desperate.  Example: a vintage antique-brass piece I found on ebay started at $22, but eventually sold for over $100! 


Sunday, January 27, 2013

Slippery As S_ _t.

The weather warmed up a bit last week which was not wholly unpleasant, but the inevitable associated melting of snow was a bummer.  Not only do the yard and forest not look as pretty with patches of bare, winter ground, but it turns out melting snow is the best way to find out where one or more of the Beastie Grrrlz liked to do their poopin' before the snow started falling and staying in mid-December.

Gratuitous poop shot:  I'm sure I mistakenly highlighted a few sticks or pine cones, but I'm also sure I missed a few turds. Luckily, I think they're taking care of they're business off a bit now that they're comfortable in the knowledge that this place is home.


In other bummer news, the melting has turned the driveway into an Ice Luge of Treachery (TM).  Eric has navigated Bert (the truck) down the driveway by running one side of her (Bert is female) to the edge where it's still snow or dirt, but not ice.  I have not.

Looks a little like liquid water, but that's just a tiny, thin layer over the slick-as-snot ice.


Today I got right to the top of the slope and chickened out because I was sliding on the nearly flat ground and I was scared.  Upon exiting the vehicle I went right down on my left knee and left eyebrow.  My glasses are all out of whack, but my face and knee seem okay, maybe just a bit swollen.  My shoulders however feel like it's the 2nd day after a relatively high-speed car accident.  I guess getting out of the car and having an accident qualified as a car accident, right?

This is the right-hand curve at the top of the hill looking toward the road... it looks just like a frozen river without all the quaint notions of old time-y ice skating in long wool coats with fur mufflers.


The photos were taken yesterday; today it has been snowing off and on so it looks much better.  It's not, in fact it may be worse.  Silver lining: the dog poop is getting re-covered.


Wednesday, January 23, 2013

Suddenly Surrounded by Faux Taxidermy

Thanks to the gift-giving savvy of some special people* in my life, we're really starting to get our domestic surroundings in the swing of mountain life, our style.

Check out these fantastic magnets hand-crafted especially for yours truly by my deer friend (see what I did there?), Cinda.

faux_taxidermy craft_taxidermy
Plastic animals, heads separated from their bodies and be-glittered, on real wood plaques!  Currently mounted on our kitchen fridge (faux bois makeover here)


I've had a Lite Brite on my list for a few years and this year my Beastie Grrrlz came through!  Today's models are not what we think of when we say we want a Lite Brite, but the cube idea is growing on me.  Now I'm scouring ebay for more pegs.

faux_taxidermy craft_taxidermy
You can see why I need more pegs; this poor deer looks like it has mange.  E and I are debating painting the white and green plastic to class it up a bit, too.


But wait, there's more!  Look what the BGs got me for my birthday!  GAH!  Dinodermy!

faux_taxidermy craft_taxidermy t-rex Tyrannosaurus_rex
I'd like you all to meet Ramone.  He's mounted in our stairwell and I imagine will be sporting some natty duds now and again.  I think we'll attach him to a plaque to give him the taxidermic presence he deserves.

Look how Ramone's tongue brings out the pink in the wall color! [cringe]  All the more motivation to get that painted.


*I don't know about your dogs, but my dogs are people.

Wednesday, January 16, 2013

Let's Get This Fire Started! -- UPDATE: Easier Storing Method

The main heat source for our house is a wood stove in the kitchen.  We have electric baseboard heaters to supplement, but we hardly use them.  I had seen a few different types of homemade fire starters on pinterest and decided to give making some a try to see if it would help facilitate that first-fire making in the mornings.  I decided on the paraffin-wax-in-paper-egg-crate style.  I can't take credit for the idea, but I did fine tune the measurements and methods myself over 2-3 making sessions.


homemade_fire_starters DIY_fire_starters
Those handy dandy fire starters burn bright and hot to get the kindling going.


These things work so much faster than news paper, take up less space and are cheaper since we don't get the paper (I don't know if they even deliver since no one else will come up the road after the snows start).  They also diminish the time and effort that goes into making the extra small kindling so we've decided that these are going to be our go-to method.  We don't eat enough eggs to provide our at-least-once-daily need, so I went online and ordered egg cartons from an egg carton manufacturer.  This one offered free (but not quick) shipping.  We had to get 125 cartons, but Eric really wants to get chickens in the spring, so we'll probably need cartons for that, too.


 homemade_fire_starters DIY_fire_starters


Here's what you'll need:
Paper egg cartons (any size),
Paraffin wax (found in the canning section of the grocery or hardware store)
A thrift store pot you can use just for melting wax and the like (to use as a double boiler)
A thrift store spoon you can dedicate to waxy endeavers
Dryer lint

You'll also need a pot for the bottom part of the double boiler, wax paper, cookie sheets (optional), range.

CAUTION: Both paraffin wax and dryer lint are super flammable.  Never melt the wax directly over the heating element or leave it unattended while it's melting.  Dryer lint catching fire in dryers and ducts is a leading cause of house fires so keep it away from your hot stove and other sources of heat.

homemade_fire_starters DIY_fire_starters
In Missoula and up the Bitterroot there is a big spread in the price for a box of Gulf Wax brand paraffin.  I'm glad I shopped around, because it's about half the price at my local IGA as it was at the big Ace Hardware where we by the Beastie Grrrlz's food.


1.  Once you have collected your materials, set up your double-boiler and cut your paraffin into chunks that will fit well in your pot.  My pot is small, so I cut my brand of paraffin wax in half with a dough knife/scraper-thingy; 3 halves fit nicely.

homemade_fire_starters DIY_fire_starters
My jury-rigged double boiler will melt 3 halves in about 12 minutes once the water in the bottom half is boiling.  Hint: don't let your metal spoon sit in there while you're waiting: ouch, it gets hot!  (duh, Tara) 


2.  While you're waiting for your wax to melt, tear or cut the top and the tabs off of your egg cartons.  Then stuff about a cotton ball-sized bit of lint into each cell.  The lint is not as dense as a cotton ball, so just the physical size is enough.  Once the carton cells are filled compress the lint a little.

homemade_fire_starters DIY_fire_starters
What lint doesn't go to fire starters will be put out for nesting birds in the spring.  Luckily, the birds also like using dog hair in their nests, because our dryer lint has plenty of that.

3. Set your egg cartons on waxed paper or other protective layer, because some of the melted paraffin will leak through the carton paper.  I set mine on on cookie sheets, because our counter space next to the stove is limited and I like to make 4-6 dozen at a time. This allows me to stack them or move them out of the way for the next batches.

4.  Once your paraffin is completely melted, spoon it into the cells of the be-linted egg cartons.  I find that 2 spoonfuls saturates the lint and soaks into the bottom of the cell and allows my 1.5 bars of paraffin to make about two dozen fire starters.

homemade_fire_starters DIY_fire_starters
I tried pouring, but my cheap thrift store pot doesn't pour neatly so couldn't control how much or where my paraffin poured/dribbled.  Even if I upgrade my double boiler set up, I think I'll still use the spoon just so I can maximize consistency.


5.  Let filled cartons cool and harden.  I do this in the mudroom which is quite a bit cooler than the rest of the house.

homemade_fire_starters DIY_fire_starters
They're not pretty, but if they were I may not want them sacrificed by fire to the mundane task of home heating.

6. Tear the cells apart and store them somewhere away from open flame, etc.  They're designed to catch fire, after all.

homemade_fire_starters DIY_fire_starters
They don't store especially compactly, so I also tear off the bigger "flags" left behind when separating the cells just so I can get them into a 1-gallon pail.


Recycling is not as easy or even as available here as it was in Portland and we don't have any friends here with chickens to save our cartons for, so it feels good to reuse them and "reduce" them.  It's also nice to turn the natural byproduct of the clothes dryer into something useful and keep it out of the landfill.  And in the long run, we probably save money, too:

Carton:    2.33 cents/starter.
Paraffin:    .07 cents/starter 
Total:      2.4 cents/starter

Obviously this doesn't include the cost of electricity to heat the stove burner and run the well pump to fill the bottom of the double-boiler, the cost of wax paper or the time.  I didn't really track the time, but once the materials were all procured, I bet it took me less than an hour to set up, make 6 dozen starters, and clean up.  Next time I'll probably make even more and it won't add much time.


NOTES ON MISERLINESS: Once hardened, I peel the spilled paraffin off the wax paper and drop it into my pot, I have a lot less of that since I narrowed my amount down to two spoonfuls/cell.  I have dedicated the pot and the spoon to this purpose, so I don't use my time or resources to clean the paraffin residue off of them.  It's not like it's going to rot, right?  I just keep them away from the other pots and spoons so they aren't mistaken for those used for food.  Also, I  roll up the wax paper and store it with the pot and spoon to use again next time.

Who knew you could use a skin flint to start fires?

UPDATE: Jan 2014 I made about ten dozen more of these to get us through the winter (I hope) and realized that if I left them in pairs (or threes with the 1.5 dozen crates) that they would stack neatly several deep.  In the bucket, they stack even higher and I got ALL of them in there.


This does mean that first thing in the morning whomever makes the fire will have to break one off some of the time, so we'll see how it goes.  My guess is the slight inconvenience of doing that is better than the inconvenience of the falling out of the bucket when it's over full.  Plus this means making them is that much faster!

Sunday, January 13, 2013

Wildlife Watch V!

I had gotten off my sick couch to take a few minutes to swap out the 2nd and 3rd bedroom closet door pulls for new ones and come back downstairs.  It's usually cold in those rooms if we don't leave the doors open (or turn on the baseboard heaters), but it seemed extra cold tonight and since it didn't get above 10 degrees on our thermometer today I went to the kitchen window to see if I could see the thermometer through the last bit of twilight.  I could not read it clearly and just as I turned away to grab a light, I saw movement out there.  It was a red fox trotting (heh) up the side and around the back of the house!

Vulpes vulpes (so nice they named 'em twice). It looked a lot like this only more trees in the background and nearly dark outside.


Eric was reading by the woodstove and after a second of speechlessness I started whisper-squealing, "There's a fox!  There's a fox!  There's a fox!"  He was able to catch sight of it, too, as we moved to the windows are the back of the house, but luckily the dogs did not and didn't seem to get too worked up over our excitement.

Friday, January 11, 2013

Odds & Ends

There are just a few interesting or fun things I wanted to share, most of which really aren't worthy of a whole blog post.  I'll deliver them in the order that they were discovered.

1) I was having a key made at Ace and while I waited I was looking at the end cap right between the key making machine and the cash register.  I realize this is a hunting tool, but I still think the merchandising/branding is strange.

Also available in cow "flavor."


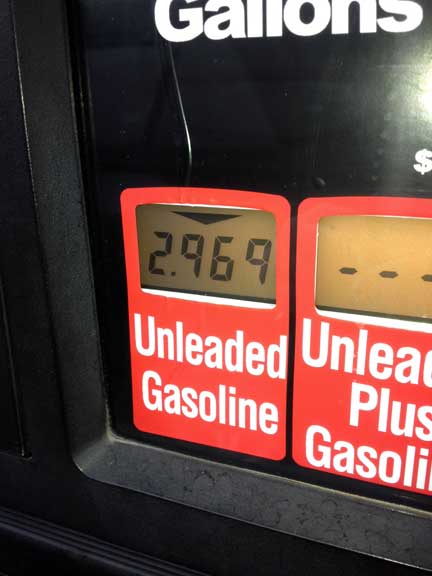
2) For those keeping score, I am getting almost adequately competent at pumping my own gas!

$2.96/gallon!  Well, closer to $2.97/gallon with that .9 cents, but still.


3) Information that makes this make sense: A) I don't walk around the hot tub in daylight very often. B) The snow had melted off the deck a few days before it started snowing again; yesterday morning we had a fresh 3/4" or so. C) Betty is one of those dogs who likes to greet us with something in her mouth (even if it's just to say good morning when each of us gets up).  Usually it's a toy or bone, but sometimes it's a small article of our clothing she's gotten out of the basket, a slipper, or shoe.

What is that?  Oh, frozen panties.  Of course.


4) The Alexanders left Christmas lights up around the living room window year round as a way to welcome each other home if one or the other arrived home late and they left them up for us.  E came home after dark yesterday so I had them on and while they don't put off much light they did enable us to see the Return of the Flying Squirrel! 

I used the "night vision" setting which is why it's all green and grainy.  That is not why there are dog nose smudges all the window.