Monday, February 25, 2013

Please, Light Up My Life Already.

<rant>

What is it about light fixtures?  Why are there so few ceiling mount fixtures that are attractive?  And those that are... well, they tend to be kind of crazy expensive considering they're mostly for homes with ceilings 8' or shorter i.e. not especially fancy or "high-end."  Our house came with pretty much no winners in the light fixture department and many aren't even so plain that you can easily ignore them.  The few winners are only winners if you can have a bit of a sense of humor about some retro kitsch in your life or retro of a certain era or style is your thing.  Luckily, we do.

Obviously there are differences in proportion and finish and the more expensive ones do look better, but not more than 7 and 9 times better.  It's not like these things have motors or real moving parts or are at eye-level*.


If they can sell a reasonable approximation of this ninety-four dollar light for less than ten bucks, then why can't they do it with some other more interesting options?  This place came with 3 different boob lights probably purchased at different times and probably costing more than $10 each, but....  I keep looking for new or used replacements, but for flush mount fixtures at a price we want to pay and in keeping with the house it's all boob light all the time.

These are decent looking, shallow and subtle enough, but...


... it's hard to get excited about buying a couple of these (one each for the 2nd and 3rd bedrooms) when they're up high and aren't actually going to provide improved function.  Certainly not enough to just justify over $300 and almost $800!  Both of these could be replicated with lesser materials and work just fine for, again, a light with no moving parts and above everyone's line of sight*.  And the drum shade is EVERYWHERE the last couple of years, so it's not like plenty of people in the general public aren't aware of and probably interested in the style. They'd sell a $44.91 version for sure.


 This is certainly not plain and not for every person or every decor, but Eric and I both thought it was kind of neat and would work for us and the direction we're taking the decor of the house.  And as often as they've replicated Tiffany-style stained glass in plastic, they could do similar here and with the popularity of Lodge Style and with the vacation subdivisions, condos, and time share communities in mountain and western environments, they could sell a lesser quality version for half the price all day. 

And a deep cleansing breath before I share this.  Let's do it together: inhaaaaaalllllle... and exhaaaaallllle.  That's better.  Ahhhhh.


Don't get me started on ceiling fans.

</rant>

*Trista's husband excepted


Saturday, February 23, 2013

Lost

A few weeks ago, I was in the next town up the valley to hit their hardware store and saw this posted on a lamp post.

I still haven't gotten used to 7-digit dialing for phone calls.  Not that I can, since I have kept my Portland cell number; the hard part is remembering the Montana area code.  Yes, there is just one.


I love living in a place where someone has at least a glimmer of hope that an expensive tool that they lost will be returned if only they let people know where it belongs.


Sunday, February 17, 2013

It's the Little Things: Fairy Door


 The previous owners of the house had satellite television and the accompanying coaxial cables coming out of the wall.  We don't pay for the service (and took the satellite off the side of the house) so now the wires are both unnecessary and an eyesore, especially in the guest room where we're unlikely to ever even have a TV (we only have one, it's in the living room).


So Eric jammed that sucker back into the wall (it's not hooked up to anything and is low-voltage anyway) and I went to dig through my stash of covers to see if I had a blank.  I did, but I couldn't just screw it into the wall all plain white, could I?  Sure I could. And normally I would, but I've been admiring fairy doors even more now that we have this forest for a yard so I made a fairy door out of it instead.  Go figure.

And here's how:

It seemed like a no-brainer to stick with the recipe from the faux bois shower curtain rod, so I used the same materials and basic method only I masked off parts for the cover in order work the glaze in different directions and have defined edges to accomplish a rough approximation of a panel door.

faux_bois fairy_door


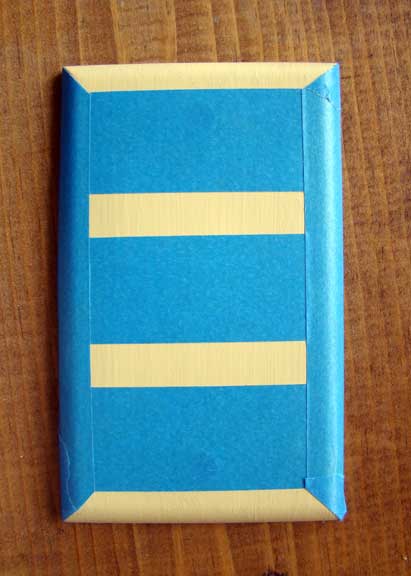
After I sanded and primed the plastic, I masked off the "panels" and "stiles" leaving the "rails" exposed.

faux_bois fairy_door


I then applied the glaze with a small chip brush to the exposed areas, then manipulated it with a larger chip brush to give it an approximation of wood grain.  When that was dry I removed the tape to expose what would become the "stiles" of the door.  Now, a door wouldn't normally have mitered corners, but the plate's shape dictated miters.


You can see there was a little bleeding of glaze under the tape, but it is so minor as to not be noticeable when finished.  And it's a fairy door.

faux_bois fairy_door


Next, I applied the glaze to the "stiles" using the same method as the last step, but making the "grain" run vertically.

faux_bois fairy_door


When the glaze was dry, I pulled the tape from the "panels".  Again, more bleeding and again it doesn't' matter.

faux_bois fairy_door


If this were a serious project, I would have made sure all he glaze was really dry and then masked over the previously completed parts for the next step.  As this is a folly, I just went right ahead and glazed the "panels" and then used a paper towel and a light touch to wipe any fresh glaze off the previously glazed areas.  Then while the glaze was still open, I used a small artists paint brush, a light touch, and a steady hand to remove even more glaze from two, contiguous sides of each panel (an L shape). 


After that was dry, I used the same artists brush to add a light layer of glaze to the other two sides of the panel, adding a fake shadow.


Of course, I'd given the screws the whole treatment, as well.  And I gave the whole shebang two (2) coats of a flat varnish to dull it down and protect it a little.

faux_bois fairy_door door_knob


Once everything was dry, I glued a bead on for a door knob.  Of course, only fairies can open the door and they are known for their light touch, so hopefully glue will be enough.


Wednesday, February 13, 2013

An Odd End

I just wanted to update on the ice marbles.  I know you're sitting on the edge of your respective seats.

"A ball is ball is a ball, after all."
~Dr. Seuss*


Guess what happens when the snow holding them up on the deck rail melts...  they turn into dog toys and end up in the driveway.  And they magically do this even after you pick them up and pile them into a planter on the deck.


*Actually, that's not a Dr. Seuss quote.  That's just me getting my Seuss on.


Sunday, February 10, 2013

Odds & Ends

Seems like there hasn't been much going on.  I'm always busy with both stuff and things, but not much lately that seems photogenic or like especially big news (or is done and ready to share).  But there have been a few new additions and small changes around the homestead.

1) We finally put a real display in the curio-style coffee table!  What's on display?  Bigfoot paraphernalia, of course.  I was lucky to have found that big old piece of tanned Bigfoot hide* that I'd picked up on sale back in Portland to use for the backdrop.

bigfoot bigfoot_collection
Most of those things are gifts!  (from the top) Yeti print from Bridget, framed Sasquatch fur, trivet, and books authored by Bigfoot from Eric, and hand embroidered hoop from Shannon.


2) Ramon: One dapper dude.

tyrannosaurus_rex t-rex fez
We also decided to utilize some preexisting picture hooks in the stairwell to hang Eric's Mucha print.  Bonus: the green mat flatters Ramon's swampy complexion.


3) Betty is almost as long as her papa!

If only Betty were more affectionate and cuddly, especially with Eric.  Sigh.


4) Why we can't have nice things: Exhibit (some high number)

Usually they'll just stand on the couch with their front feet on the window sill, but sometimes they just go all out.  It seemed pretty neat that the window sills are extra deep when we first moved in...


 *Not actual Bigfoot hide or actual anybody hide.  It's faux fur which I have because I always check the remnants for faux fur, cool vinyl, and other potential costume materials.


Friday, February 1, 2013

Lost Marbles, Found Marbles

Way before we moved, but after we started looking in Montana I started a pin board called "Cool Ideas for a Cold Climate" for things that we just really couldn't do in Portland, at least not unless things got extreme.  At first most of the pins were for ice crafts including one for "giant marbles."

ice_marbles ice_marbles_how-to
The orange ice marble down where the road enters the property.  Behind it you can see the "lower pasture."


I had to try twice to get them right, but I'll show you the good ones first, then explain what went wrong with the first batch when I give the ol' how-to.  Which is like the ol' one-two, but with more how.

ice_marbles ice_marbles_how-to
This green ice marble and the blue one in the background are part of the four that we can see from the kitchen window.


After the first run, I decided that I wanted them a good size to put on fence posts.  So I have four (one of each color) on posts that we can see from the kitchen window over the sink and five on fence posts where the road enters the property (also where the wreaths have gone).


ice_marbles_how-to
Large muffin tin, rag, liquid food dye, balloons and something to keep the cutting board from getting stained.


For the successful set I used balloons 9" balloons that came in a pack of 25 from the dollar store.  I didn't fill them all the way, only to a 4-5" diameter.  They were certainly more economical than the Party City balloons I used for the first run which I had left over from a few parties, but they actually were more effort to remove.  I don't know if that has to do with the quality of the material or that the Party City balloons were 14" balloons or what.

ice_marbles ice_marbles_how-to


The directions I read had me filling the balloon with water then adding dye.  I don't know how they accomplished this because it took some careful handling to get the filled balloons not to shoot water all over before I tied them.  So, I added the food dye before the water.  I just doubled the recipe on the back of the dye box for orange, turquoise, violet, and lime green.  I think the violet needs more red to be the color I want it to be.  It's more of a midnight blue as it is.

ice_marbles ice_marbles_how-to

ice_marbles ice_marbles_how-to
For "parts" I did drops.


I fit the balloon around the faucet in the kitchen sink, held it in place with my left hand fingers and turned the cold water on.  After the first few I got a handle on how fast to add the water.
ice_marbles ice_marbles_how-to
The mudroom freezer: where so much crafty magic happens.


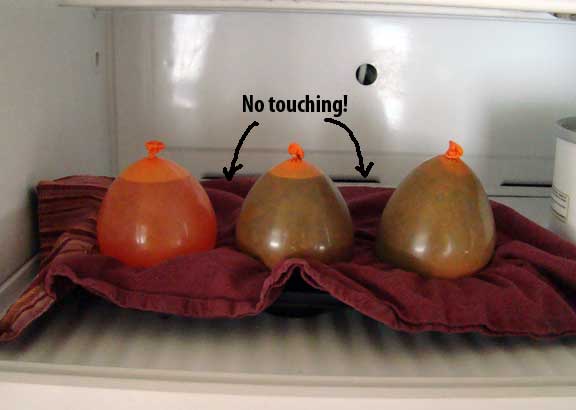
Once full, I tied each balloon off and set it in a large muffin tin lined with a rag.  When all 5 cells of the muffin tin were full, I put them in the mudroom freezer.  They sat there for about 5 days.  It was warmer than freezing outside when I started the second batch so I didn't even check them until sometime the third day and they seemed solidly frozen.  They were certainly frozen by the fifth day.
ice_marbles ice_marbles_how-to
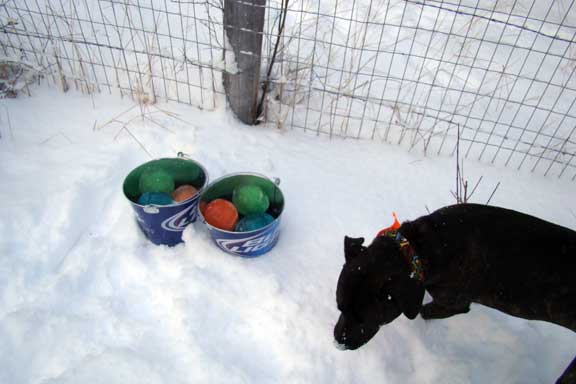
The Bud Light buckets came from a friend who bought a restaurant, but didn't have a need for them, because it was a classy joint.  I have some plans for them involving painting over the exterior, because this is a classy joint.  The Delia came from Family Dogs New Life shelter in Milwaukie, Oregon.


The mudroom is pretty cold, so I tore off the balloons in there and put the ice marbles into buckets to carry around outside while I decided where to put them.

ice_marbles ice_marbles_how-to
If you squint a bit you can see one of each color on the fence posts at the entrance to the property.  On the other side of the road is a post with our house number in one of those reflective green road signs and a green ice marble on top.


Here is the first batch of five.  For them I used more water and half the dye and they were pretty lightly colored.  That was exacerbated by the fact that there were hollow.  Unintentionally, hollow.

ice_marbles ice_marbles_how-to
Okay, maybe "marbles" isn't exactly the right word since they're really not sphere shaped, but I bet the smaller ones are much closer to spherical.


 Why were they hollow?  Because they each had one or two holes on the sides caused by them touching in the freezer and me not letting them stay in the freezer long enough.

ice_marbles ice_marbles_how-to
The mudroom freezer, one star of our show.  We have a HUGE deep freeze, so if we ever have a daytime party in the winter I am going to make a ton of these to decorate outside.


Luckily, when I tore the balloons off this batch I did it outside because the dyed water spilled out onto the ground and not the wood floor of the mudroom or kitchen.

ice_marbles ice_marbles_how-to
This is the birdbath that is visible from the kitchen window.  The former owners left us a heater for it to keep it from freezing, but it stopped working the day after we installed it.  I don't have any ice marbles in there now, but I may make more because it was cheery to see from the window and we drive by it to park behind the house.


Another mistake I made with the first batch was letting the dye get on my skin and on the cutting board.  Of course, that evening we were going to dinner at Eric's friend Megan's house and I'd never met her, so it was awesome to have green stained skin.  I got most of it off with Gojo and baking soda, at least.  Baking soda worked well on the cutting board and just the passing of time and repeated cleanings from regular use have gotten most of that out.  Sigh.

This climate is hell on my fingernails.  I'm not used to paying attention to them and it's really showing now.


For the second batch I didn't have this issue when making them, but with twice as much dye in a smaller volume of water there was some residual dye in the inside of the balloons and on the outside of the ice marbles.  I have green fingers again, but at least I don't have plans to meet anyone new for the next couple of days.


And to end on an up note a few more shots of the second patch cheering up the place.

ice_marbles ice_marbles_how-to
Three "extras" set on the deck rail where we'll see them coming and going from the front door and from the hot tub.  I imagine Betty will inspect them pretty regularly, too.


ice_marbles ice_marbles_how-to
This orange ice marble and the turquoise one among the branches in the background are on the fence posts we see from the kitchen window.

ice_marbles ice_marbles_how-to
It snowed overnight so they got little hats and some got coats, even.