The previous owners of the house had satellite television and the accompanying coaxial cables coming out of the wall. We don't pay for the service (and took the satellite off the side of the house) so now the wires are both unnecessary and an eyesore, especially in the guest room where we're unlikely to ever even have a TV (we only have one, it's in the living room).
So Eric jammed that sucker back into the wall (it's not hooked up to anything and is low-voltage anyway) and I went to dig through my stash of covers to see if I had a blank. I did, but I couldn't just screw it into the wall all plain white, could I? Sure I could. And normally I would, but I've been admiring fairy doors even more now that we have this forest for a yard so I made a fairy door out of it instead. Go figure.
And here's how:
It seemed like a no-brainer to stick with the recipe from the faux bois shower curtain rod, so I used the same materials and basic method only I masked off parts for the cover in order work the glaze in different directions and have defined edges to accomplish a rough approximation of a panel door.
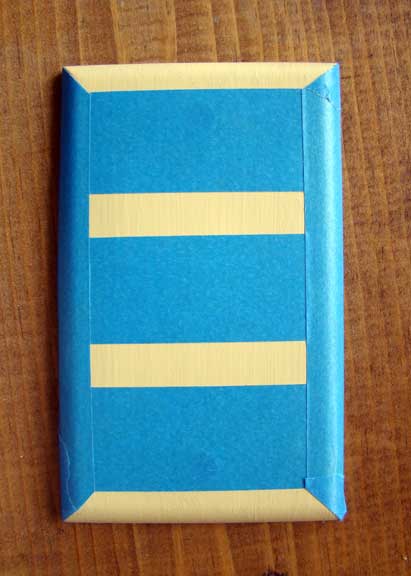
After I sanded and primed the plastic, I masked off the "panels" and "stiles" leaving the "rails" exposed.
I then applied the glaze with a small chip brush to the exposed areas, then manipulated it with a larger chip brush to give it an approximation of wood grain. When that was dry I removed the tape to expose what would become the "stiles" of the door. Now, a door wouldn't normally have mitered corners, but the plate's shape dictated miters.
You can see there was a little bleeding of glaze under the tape, but it is so minor as to not be noticeable when finished. And it's a fairy door.
Next, I applied the glaze to the "stiles" using the same method as the last step, but making the "grain" run vertically.
When the glaze was dry, I pulled the tape from the "panels". Again, more bleeding and again it doesn't' matter.
If this were a serious project, I would have made sure all he glaze was really dry and then masked over the previously completed parts for the next step. As this is a folly, I just went right ahead and glazed the "panels" and then used a paper towel and a light touch to wipe any fresh glaze off the previously glazed areas. Then while the glaze was still open, I used a small artists paint brush, a light touch, and a steady hand to remove even more glaze from two, contiguous sides of each panel (an L shape).
After that was dry, I used the same artists brush to add a light layer of glaze to the other two sides of the panel, adding a fake shadow.
Of course, I'd given the screws the whole treatment, as well. And I gave the whole shebang two (2) coats of a flat varnish to dull it down and protect it a little.
Once everything was dry, I glued a bead on for a door knob. Of course, only fairies can open the door and they are known for their light touch, so hopefully glue will be enough.


CUTE!!!! I have been seeing lots of fairy gardens on Pinterest lately and been thinking of you. You could have a whole fairy town out there in your yard. And when it gets to cold they'll come in the house, now that they have a door :)
ReplyDeleteI've ogled fairy doors for years, but never had the right place to put one! Our yard would be great for them so now I just need out how to make them weather-worthy w/o a great expense (like having to buy tools right away). Hmmmmmm.
Delete"She'll get bored in Montana" they said.
ReplyDelete"What will she do to stay busy?" they asked.
HA! This is great, Tara, I love it! Next think you know, you'll be whittling little patio rocking chairs and potted plants to set outside the fairy's front door, which would be AWESOME! :)
Well, there's a baseboard heating under there and a not-especially-wide space between the wall and the bed, but if we get more fairy guests than human guests we may do so just to be gracious hosts.
DeleteLove it! I might need to do this for my kiddo.
ReplyDeleteSo cute! Today I found an unfinished dollhouse door (new, in package) at a charity shop! I'm excited to gussy it up into a fairy door. Someday.
Delete